When Windows 10 experiences slow network speeds, it can affect daily usage and reduce work efficiency. This article will introduce several common optimization methods to help you improve network connection speed and ensure a smoother online experience.
1. Check Network Devices and Connections
Verify the Status of Network Devices:
Check if your network devices (such as routers and modems) are functioning properly.
Ensure all cables are securely connected, and the indicator lights on the devices are normal.
If you are experiencing Wi-Fi connection issues, try restarting your device. In many cases, a simple reboot can resolve the problem.
Optimize Wireless Network Signal:
If you are using Wi-Fi, check the router's position and avoid obstructions like walls or metal objects that may weaken the signal.
It is recommended to place the router in a central location, close to the devices being used, to ensure better signal coverage.
2. Check for Driver Updates
Outdated or corrupted network adapter drivers are a common cause of slow network connections in Windows 10. Keeping your drivers updated can significantly improve network performance. Using Driver Sentry is recommended, as it can automatically detect and update drivers, saving time and reducing the risk of installing incorrect drivers.
Click the download button to get the latest version of Driver Sentry. After installation, open the software and click "Scan".

After the scan is complete, the software will display a list of missing or outdated drivers. Locate the network adapter driver in the results and click the "Upgrade" button.
Once the update is complete, restart your computer to ensure the new drivers take effect.
3. Disable Background Applications and Services
Press Ctrl + Shift + Esc to open Task Manager.
Click on the Startup tab and disable applications that do not need to launch automatically.
In Task Manager, review currently running processes and end any unnecessary ones.
4. Adjust DNS Settings
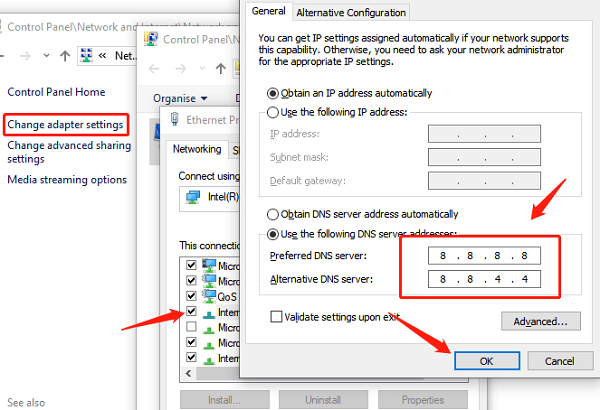
Right-click the network icon in the taskbar and select "Open Network and Sharing Center".
Click "Change Adapter Settings", then right-click your active network connection and select Properties.
In the "This connection uses the following items" section, select "Internet Protocol Version 4 (TCP/IPv4)" and click "Properties".
Select Use the following DNS server addresses and enter the following public DNS servers:
Google DNS: 8.8.8.8 and 8.8.4.4
Cloudflare DNS: 1.1.1.1 and 1.0.0.1

Click "OK" to save the settings. Restart your computer and check if the network speed has improved.
5. Disable IPv6
Open Control Panel and go to "Network and Sharing Center".
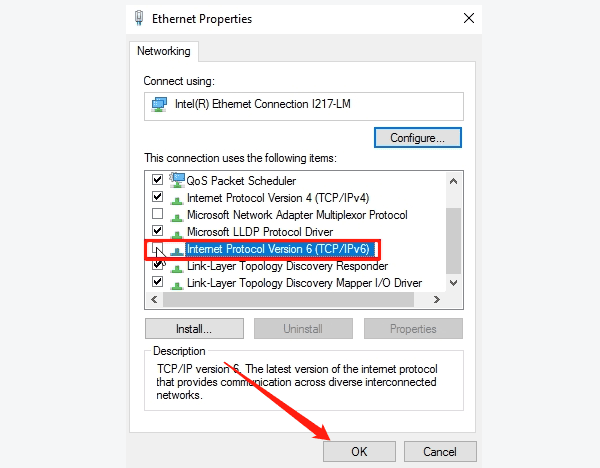
Click "Change Adapter Settings", then right-click your active network connection and select "Properties".
In the "This connection uses the following items" list, uncheck "Internet Protocol Version 6 (TCP/IPv6)".

Click "OK" to save the changes.
6. Run Network Troubleshooter
Press Win + I to open Settings.
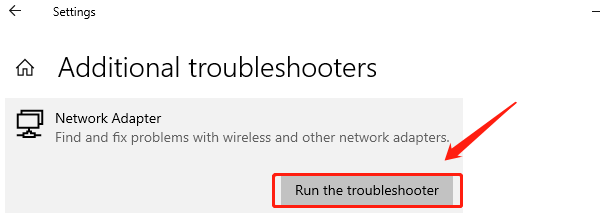
Go to "Update & Security", then click "Troubleshoot" on the left panel.
Click "Additional troubleshooters". Locate "Network Adapter" and click "Run the troubleshooter".

Windows will scan for network issues and attempt to fix them.
After the troubleshooting process is complete, check if your network connection is restored.
By following these methods, you can effectively resolve slow network issues in Windows 10. If the problem persists after trying these solutions, it may be due to your Internet Service Provider (ISP). In that case, contacting your ISP for further assistance is recommended.
See also:
How to Fix Windows 11 Unable to Enter Sleep Mode
Methods to Fix 'HP Printer Driver Is Unavailable'