Laptop black screen issues are a common problem for many Windows users, affecting normal usage and causing inconvenience. This article introduces several common solutions to help you quickly fix black screen issues and restore your computer to normal operation.
1. Force Restart and Check Power
Force Restart Your Laptop:
Press and hold the power button until the laptop completely shuts down.
Press the power button again to restart the laptop.
If the system starts normally, the issue may have been caused by a temporary system glitch.
Check Power Connection:
Disconnect the power adapter and battery, then wait a few minutes before reconnecting them.
Plug in the power adapter and press the power button to check if the laptop can start normally.
2. Update Device Drivers
Outdated or corrupted drivers are common causes of black screen issues on laptops. Ensuring that your drivers are up to date can effectively resolve this problem. It is recommended to use Driver Sentry for automatic driver detection and updates, saving time and reducing the risk of installing incorrect drivers.
Click the download button to get the latest version of Driver Sentry. After installation, open the software and click "Scan".

Once the scan is complete, the software will display missing or outdated drivers. Locate the graphics driver and click the "Upgrade" button.
After updating, restart your laptop to ensure the new drivers take effect.
3. Check System Files
Search for "Command Prompt" in the Windows search bar, right-click it, and select "Run as administrator".
In the command prompt window, type the following command and press Enter: sfc /scannow

The system will begin scanning and repairing any corrupted or missing system files. This process may take several minutes depending on your computer's performance.
Once the scan is complete, restart your laptop and check if the issue is resolved.
4. Adjust Screen Brightness
Use Shortcut Keys to Adjust Brightness:
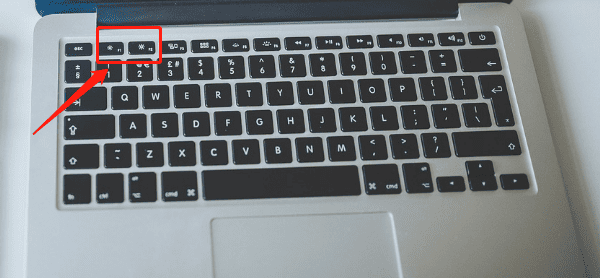
Most laptops have dedicated function keys to adjust screen brightness, typically located at the top of the keyboard (e.g., F1, F2).

Look for keys with a sun icon, which usually indicate brightness controls.
Hold down the "Fn" key and press the corresponding brightness up/down key to adjust the screen brightness.
Adjust Brightness via Settings:
If shortcut keys do not work, you can manually adjust brightness through Windows settings:
Press Win + I to open Settings.
Select "System", then click "Display".
Under Brightness and color, drag the brightness slider to adjust the screen brightness.
Check External Monitor:
If your laptop is connected to an external display, ensure that:
The monitor is powered on and set to the correct input source.
Try disconnecting the external monitor to see if the laptop screen returns to normal.
5. Perform A System Restore
If the black screen issue started recently, performing a System Restore can help revert your system to a previous stable state.
Force shut down the laptop by pressing and holding the power button.
Turn it back on and wait until you see the Windows logo, then force shut down again.
Repeat this process three times until the Automatic Repair screen appears.
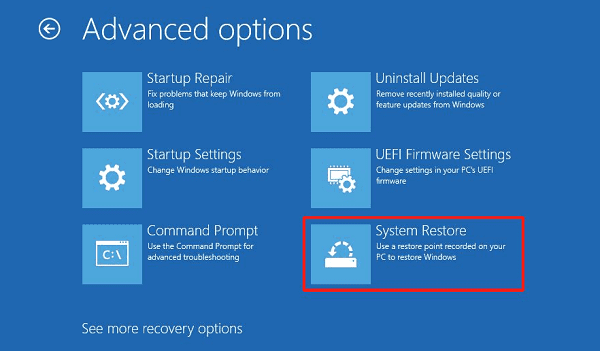
Select "Advanced options" > "System Restore".

Choose a restore point from a date before the issue occurred and click "Next".
Wait for Windows to restore your system and check if the issue is resolved.
By following these methods, most laptop black screen issues should be effectively resolved. If the problem persists, consider seeking help from a professional technician.
See also:
Quick Fix for Windows 10 Can't Connect to WiFi
How to Fix No Internet Access but Connected
How to Fix a Disappearing Mouse Cursor
Quick Fix Guide for Keyboard Typing Wrong Letters on Windows 10