Some users may encounter no sound issues when using Realtek digital output devices. This article provides several effective solutions to help you quickly restore the normal function of Realtek digital audio output.
1. Update Realtek Audio Drivers
Outdated or corrupted Realtek drivers are a common cause of digital output sound issues. Keeping your audio driver updated can effectively resolve this problem. It is recommended to use Driver Sentry to automatically detect and update drivers, saving time and reducing the risk of installing incorrect drivers.
Click the download button to get the latest version of Driver Sentry, install and open the software. Click "Scan" to detect missing or outdated drivers.

In the scan results, locate the Realtek audio driver and click the "Upgrade" button.
Restart your computer to ensure the updated driver takes effect.
2. Check Windows Audio Services
Press Win + R, type "services.msc", and press Enter to open the Services window.
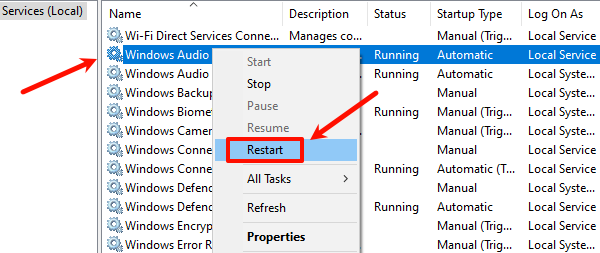
Find "Windows Audio" in the list and ensure its status is Running.
If it is not running, right-click "Windows Audio" and select "Start".
If it is already running, right-click it and select "Restart".

Close the window and test if the sound is restored.
3. Check Audio Format
Right-click the volume icon in the bottom-right taskbar and select "Sounds".
In the "Playback" tab, double-click Realtek Digital Output to open its Properties window.
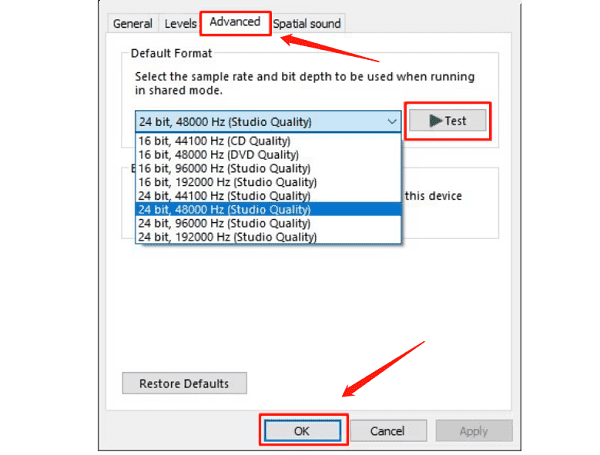
Go to the "Advanced" tab and try different sample rates and bit depths (e.g., 24 bit, 48000 Hz).

Click "OK" and check if the sound issue is resolved.
4. Set Realtek Digital Output as Default Device
Right-click the volume icon in the taskbar and select "Sounds".
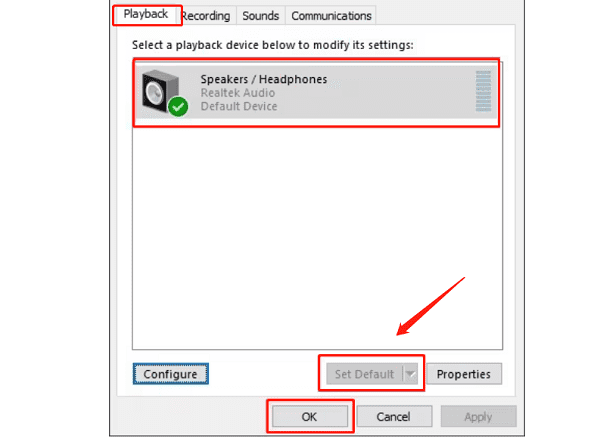
Under the "Playback" tab, locate "Realtek Digital Output".
If it is not set as the default device, select it and click "Set Default" at the bottom.

Click "OK" to save the settings, then test if the sound is restored.
Tip: If Realtek Digital Output does not appear in the list, right-click on the blank area and select Show Disabled Devices, then enable it.
5. Adjust Realtek Audio Control Panel Settings
Open "Realtek Audio Console" or "Realtek HD Audio Manager" from the Windows search bar.
Check the "Playback Devices" section to ensure Realtek Digital Output is enabled.
Go to "Advanced Settings", try enabling or disabling "Front Panel Jack Detection", and save the settings.
Play audio again to check if the issue is resolved.
6. Run Windows Audio Troubleshooter
Press Win + I to open Settings, then go to "Update & Security".
Select "Troubleshoot" from the left panel and click "Additional troubleshooters".
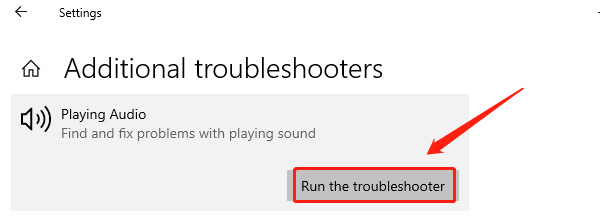
Find "Playing Audio" and click "Run the troubleshooter".

Follow the on-screen instructions to detect and fix issues automatically.
After the process is complete, test if the sound is working.
By following these methods, you can effectively resolve the Realtek digital output no sound issue. If the problem persists, consider contacting Realtek official support or a professional technician for further assistance.
See also:
How to Fix Dying Light 2 Stuttering and FPS Drops
Fix the Error Occurred While Updating Steam