Some users may encounter errors while updating Steam, causing update failures or preventing games from launching properly. This article provides several effective solutions to help you resolve Steam update errors.
1. Check Network Connection
Restart your router and modem.
Use a wired connection instead of Wi-Fi to improve network stability.
Check if other programs are consuming a large amount of bandwidth, such as downloads, video streaming, or online gaming, which may affect the Steam update process.
2. Check for Driver Updates
Outdated or corrupted drivers can cause system instability, leading to errors while updating Steam. Ensuring that your device drivers are up to date can effectively resolve such issues. It is recommended to use Driver Sentry to automatically detect and update drivers, saving time and reducing the risk of downloading or installing incorrect drivers.
Click the download button to get the latest version of Driver Sentry, install and open the software, then click "Scan".

After the scan is complete, the software will display a list of missing or outdated drivers. Find the necessary drivers in the list and click "Upgrade".
Once the update is finished, restart your computer to ensure the new drivers take effect.
3. Clear Steam Download Cache
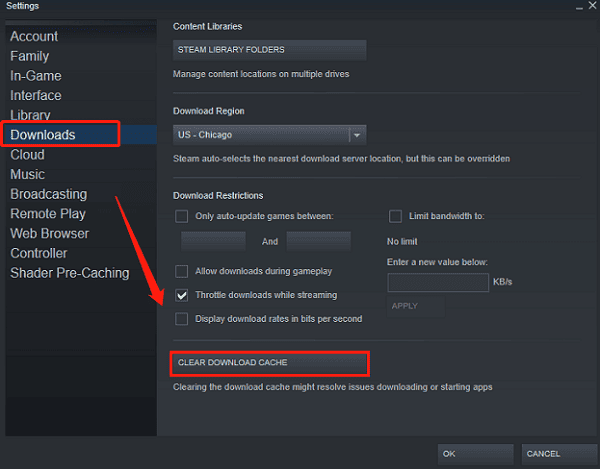
Open Steam Settings, then click the "Downloads" option on the left.
Click the "Clear Download Cache" button, follow the instructions, and log back into Steam.

When a confirmation window appears, click "OK" to proceed.
Try updating Steam again.
4. Verify and Repair Steam Files
Open the Steam client.
Click "Library", right-click any game, and select "Properties".
Under the "Local Files" tab, click "Verify integrity of game files".

Steam will automatically scan and repair any corrupted files.
You can also reinstall the Steam client to fix file corruption issues. To avoid losing game data, it's recommended to back up game files before reinstalling.
5. Edit the Hosts.txt File
Search for Notepad in the Start menu, then run it as an administrator.
Click File in the top-left corner and select Open.
Navigate to the following path: C:\Windows\System32\drivers\etc
Select "hosts.txt", then click "Open".
Add the following lines to the bottom of the file:
142.122.70 cdn.steampowered.com
111.128.6 cdn.store.steampowered.com
111.128.7 media.steampowered.com
Save the file and close Notepad.
Flush DNS Cache:
Press Windows + R to open the Run dialog.
Type the following command and click OK: ipconfig /flushdns
6. Disable Firewall and Antivirus Software
Disable Antivirus Software:
Open your antivirus program, find the Real-time Protection or Shield option, and temporarily turn it off.
Turn Off Windows Firewall:
Press Win + R, type "control", and press Enter.
Navigate to "System and Security" > "Windows Defender Firewall".
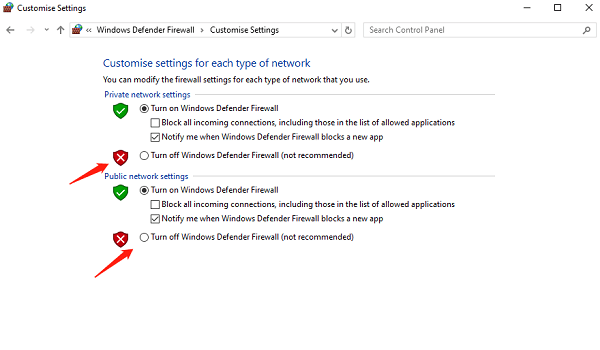
Click "Turn Windows Defender Firewall on or off" on the left panel.
Select "Turn off Windows Defender Firewall (not recommended)" for both private and public networks.

Try updating Steam again.
Once the update is complete, re-enable your security software and firewall to ensure system protection.
By following the solutions provided in this guide, you should be able to resolve Steam update errors effectively. If the problem persists, consider contacting Steam Support or visiting relevant user communities for additional assistance.
See also:
Methods to Fix Slow Internet on Windows 10
Fix Intel Wireless-AC 9560 Not Working (Code 10)