In Windows 10, many users face headphone issues. This article offers effective solutions to help you restore normal headphone functionality.
1. Check Audio Drivers
Outdated or corrupted audio drivers may prevent headphones from working correctly. Checking and updating the audio drivers is an important step in solving this issue. We recommend using Driver Sentry to automatically detect and update drivers, saving time and avoiding the risk of downloading or installing incorrect drivers.
Click the download button to get the latest version of Driver Sentry. After installation, open the software and click "Scan".

Once the scan is complete, it will display which drivers are missing or need updating. Find the audio driver in the list and click the "Upgrade" button.
After the update is complete, it's recommended to restart your computer to ensure the new drivers take effect.
2. Set Headphones as Default Device
Right-click the volume icon in the taskbar and select "Sounds".
In the pop-up window, go to the "Playback" tab to find your headphone device. Typically, the headphones will appear as "Headphones" or the name of your device.
Click the "Set Default" button at the bottom.

If the headphones don't appear, try reinserting the headphones or check if the drivers are installed correctly.
3. Disable Audio Enhancements
Right-click the volume icon in the taskbar and select "Sounds".
On the "Playback Devices" page, click on "Headphones" or the connected audio device.
Click "Properties" to open the audio device properties window.
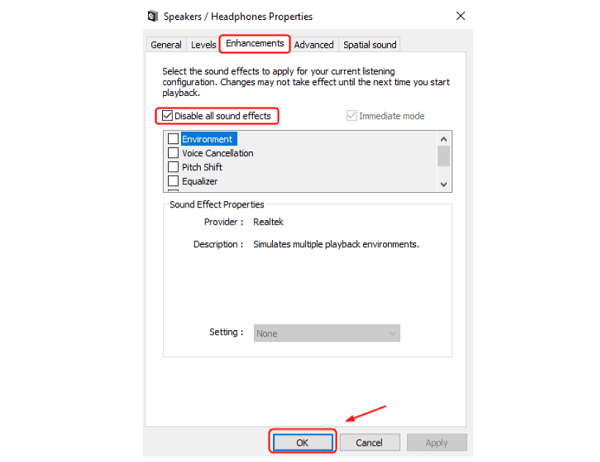
Go to the "Enhancements" tab and uncheck the "Disable all sound effects" box.

Click "OK" to save the settings, and test whether the headphones are working normally.
4. Check Audio Settings
Click the volume icon in the taskbar to check if the volume is set to an appropriate level and ensure it's not muted.
Open "Control Panel" > "Hardware and Sound" > "Sound", then go to the "Playback" tab and confirm whether the headphones are listed and show as "Connected".
If the headphones are not listed or show an abnormal status, try reinserting the headphones or restarting your computer.
5. Run Audio Troubleshooter
Click the Start menu, select "Settings" > "Update & Security" > "Troubleshoot".
In the "Troubleshoot" section, click "Additional Troubleshooters".
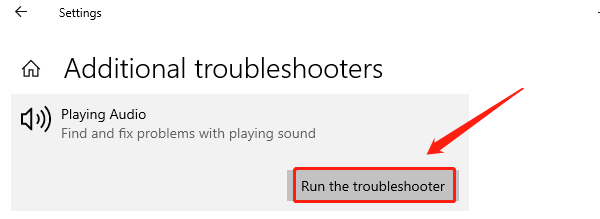
Find "Playing Audio" and click "Run the Troubleshooter" to let the system scan and fix any audio-related issues.

Follow the on-screen instructions to complete the troubleshooting process, then restart your computer and test if the headphones are working properly.
6. Check for Hardware Issues
Make sure the headphone plug is properly inserted into the headphone jack or USB port. If you're using wireless headphones, ensure they are correctly paired with the computer.
Try inserting another pair of headphones to see if the issue persists. If the other headphones work, the original pair may be faulty.
If the headphones don't work in one port, try plugging them into a different headphone jack or USB port on the computer.
If the problem still persists, there may be a hardware issue with the computer's audio card or port. At this point, you may need to contact professional technical support or replace the hardware.
By following these steps, you should be able to fix most headphone issues in Windows 10. If the problem persists, consider seeking professional technical support.
See also:
7 Ways to Fix the Unexpected Kernel Mode Trap Error
Fix Windows 10 PFN LIST CORRUPT BSOD Error