If you encounter the "Audio Service is Not Running" issue on Windows 10, this guide offers solutions to help restore your device's audio functionality.
1. Update Audio Drivers
Outdated or corrupted drivers are a common cause of the "Audio Service is Not Running" issue on Windows 10. Updating the audio driver is a key step to resolving the problem. Using Driver Sentry for automatic driver detection and updates is recommended, saving time and preventing incorrect driver installations.
Download and install the latest version of Driver Sentry. Open the software and click "Scan".

After scanning, review the list of drivers that need updating or installation. Locate the audio driver and click "Upgrade".
Restart your computer after updating to ensure the new driver takes effect.
2. Restart Audio Services
Press Win + R, type "services.msc", and press Enter.
This will open the "Services" window, displaying all running services.
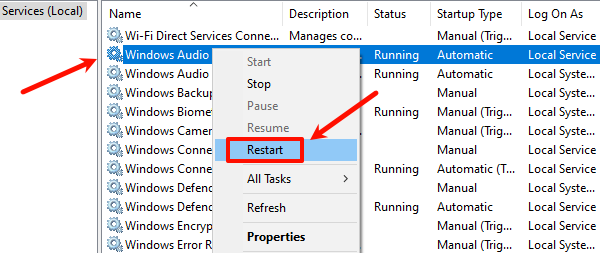
Find "Windows Audio" in the list and ensure its status is "Running".
Right-click "Windows Audio" and select "Restart".

If the Restart option is unavailable, select "Stop" first, then "Start".
Check dependent services:
Locate "Windows Audio Endpoint Builder" and ensure it is also running.
If it isn't, right-click and select "Start".
After completing these steps, close the Services window and check if audio functionality is restored.
3. Modify the Registry
Press Win + R, type "regedit", and press Enter to open the "Registry Editor".
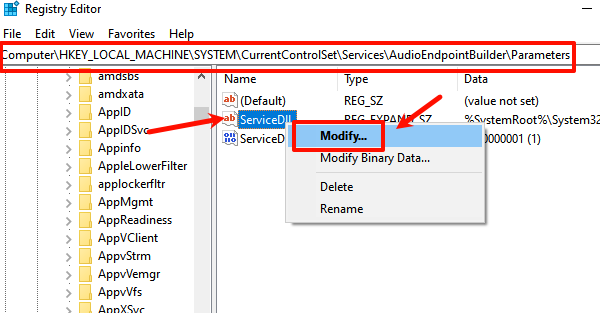
Navigate to the following path: HKEY_LOCAL_MACHINE\SYSTEM\CurrentControlSet\Services\AudioEndPointBuilder\Parameters
In the right pane, find the "ServiceDll" key, right-click it, and select "Modify".

Change the "Value data" to: %SystemRoot%\System32\AudioEndPointBuilder.dll
Click "OK", close the Registry Editor, and restart your computer.
Check if the audio service is functioning normally.
Note: Be cautious when modifying the registry, as incorrect changes can cause system issues. Back up the registry before making changes.
4. Check Audio Components
Press Win + R, type "services.msc", and press Enter.
Scroll down to locate "Windows Audio" services.
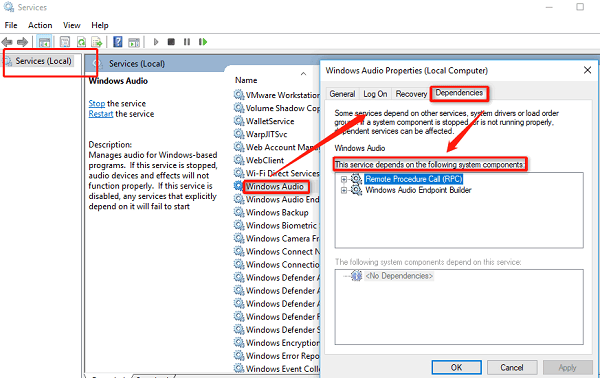
Right-click the service and select "Properties", or double-click to open the Windows Audio Properties window.
Switch to the "Dependencies" tab.
Expand the "This service depends on the following system components" section to view all dependencies.
Ensure all listed components are in the Started and Running states in the Services Manager.

Restart the Windows Audio service and reboot your computer to apply the changes.
5. Run the Windows Troubleshooter
Press Win + I to open "Settings".
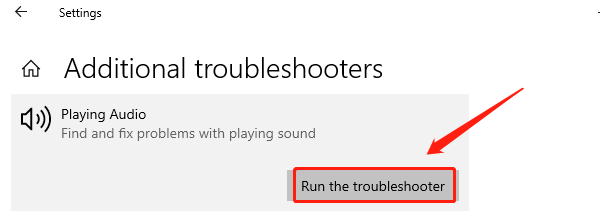
Navigate to "System" > "Troubleshoot" > "Other troubleshooters".
Find "Playing Audio" and click "Run the troubleshooter".

Follow the on-screen instructions to diagnose and fix the issue.
After troubleshooting, check if the audio service is restored.
6. Check for System Updates
Press Win + I and select "Update & Security".
From the left menu, choose "Windows Update", then click "Check for updates".
If updates are available, click "Install now" and wait for the process to complete.
The system may prompt you to restart after installing updates. Click "Restart" now to finish.
Test your audio devices after the update to confirm functionality.
These steps can help you fix the "Audio Service is Not Running" issue on Windows 10. If the problem persists, contact technical support or check for hardware issues.
See also:
HP Printer Driver Unavailable Fix Guide
How to Fix Brother Printer Not Printing on Windows 10