


If your Canon printer is not printing, stays offline, or does not respond to print jobs, the problem may be caused by outdated drivers, loose USB or network connections, a stuck print queue, Print Spooler errors, incorrect default printer settings, or Windows configuration issues. This guide explains several practical ways to fix Canon printer problems, including updating printer drivers with Driver Sentry, checking wired or wireless connections, clearing pending print jobs, restarting the Print Spooler service, setting the correct default printer, and running the built-in Windows printer troubleshooter.
1. Check Printer Connections
USB Connection: Check if the USB cable is securely connected. You can try switching the USB port or using a different cable.
Network Connection: For wireless printers, ensure the printer is connected to the correct Wi-Fi network and is on the same network as your computer.
Turn on the printer and check the display screen for any error messages, such as "No Ink" or "Paper Jam".
Use the printer's built-in self-test feature to print a test page and ensure the hardware is functioning properly.
2. Clear the Print Queue
Press Win + R, type "control printers", and press Enter to open the Devices and Printers interface.
Right-click your Canon printer and select "See what's printing".
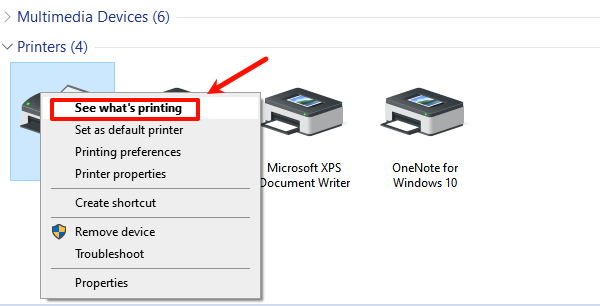
In the new window, click the Printer menu and choose "Cancel All Documents".
Restart your printer and try printing a new document.
3. Restart the Print Spooler Service
Press Win + R, type "services.msc", and press Enter to open the Services window.
Locate the "Print Spooler" service, right-click it, and select "Stop".
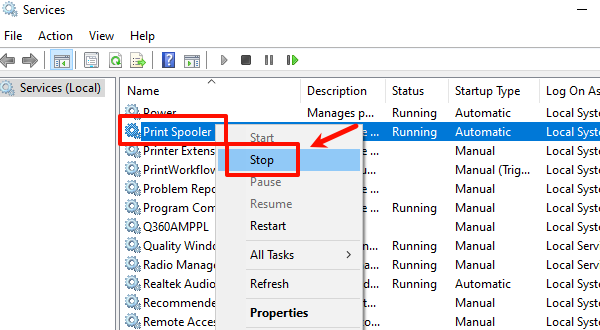
Open File Explorer and navigate to C:\Windows\System32\spool\PRINTERS. Delete all files in this folder.
Return to the Services window, right-click Print Spooler, and select "Start".
Restart your computer and test the printer functionality.
4. Update Device Drivers
Outdated or corrupted drivers are one of the main reasons why printers stop functioning correctly. Ensuring your device drivers are up to date can effectively resolve such issues. We recommend using Driver Sentry to automatically detect and update drivers, saving time and avoiding the risks of downloading or installing incorrect drivers.
Click the download button to get the latest version of Driver Sentry. After installation, open the software and click "Scan".
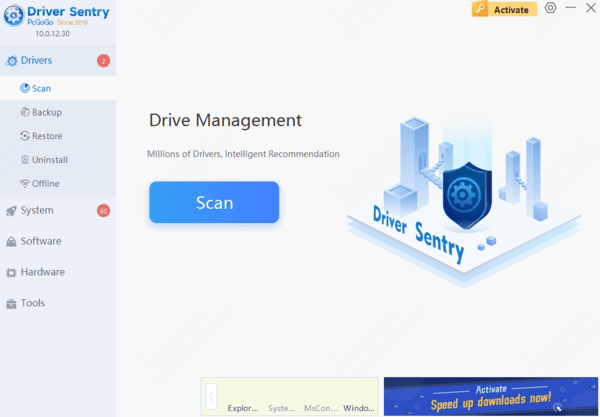
After the scan, the results will display drivers that are missing or need updates. Find the printer driver in the list and click "Upgrade".
Once updated, restart your computer to ensure the new driver is functioning correctly.
5. Set the Default Printer
Open Control Panel, navigate to "Hardware and Sound" > "Devices and Printers".
Find your Canon printer, right click and select "Set as Default Printer".
If you see the option Let Windows manage my default printer, turn it off to ensure the printer you selected remains the default.
6. Run Windows Troubleshooter
Press Win + I to open Settings, then select "Update & Security".
Click "Troubleshoot" on the left panel, then choose "Additional Troubleshooters".
Under "Additional troubleshooter", click "Printer" and select "Run the Troubleshooter".
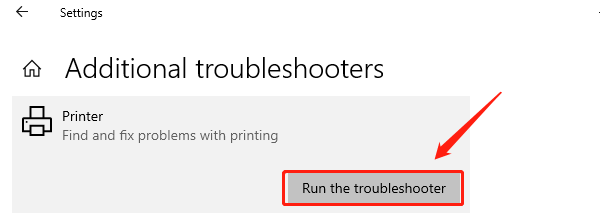
Follow the on-screen instructions to complete the troubleshooting process, and then retest the printer functionality.
The above methods should help you resolve issues where your Canon printer fails to print. If the problem persists, we recommend contacting Canon support for further assistance.