Many Windows users face the error "Ethernet does not have a valid IP configuration". This article offers solutions to fix the issue and restore your network connection.
1. Restart Your Computer and Network Devices
Completely shut down your computer, wait for a few minutes, and restart it. Restarting clears temporary configurations that may cause network issues.
Turn off the power to your router and modem, wait for a few minutes, and then turn them back on. Once restarted, the devices will re-establish network connections and assign new IP addresses.
After restarting, check if your network is back to normal. If the issue persists, proceed to the next steps.
2. Check for Driver Updates
Outdated or corrupted network adapter drivers can also cause the "Ethernet does not have a valid IP configuration" error. Updating the network adapter driver can resolve this issue. Using Driver Sentry is recommended for automatically detecting and updating drivers, saving time and avoiding errors.
Download the latest version of Driver Sentry, install it, and open the software. Click "Scan".

After scanning, the software will list drivers that are missing or need updates. Locate the network adapter driver and click "Upgrade".
Once the update is complete, restart your computer to ensure the updated driver takes effect.
3. Release and Renew IP Address
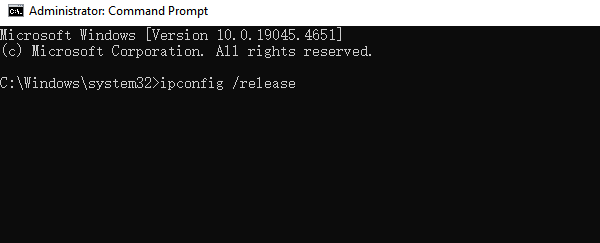
Press Win + S, type "Command Prompt", and run it as an administrator.
In the Command Prompt, enter the following command: ipconfig /release

This releases the current IP address in use.
Wait a few seconds, then enter the following command to renew the IP address: ipconfig /renew
The system will request a new IP address from the router. If successful, new network configuration details should appear.
Check if the network connection is restored.
4. Manually Set an IP Address
Open the search bar, type "Control Panel", and open it.
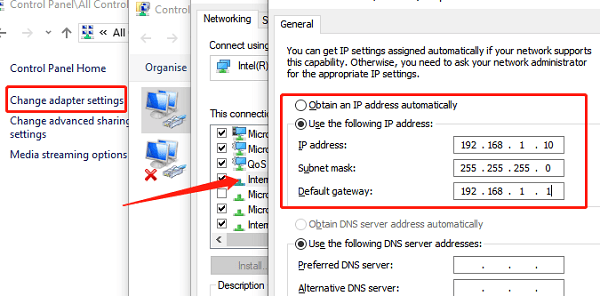
Click "Network and Sharing Center > Change Adapter Settings".
Right-click on your network connection (e.g., Ethernet or Wi-Fi), and select "Properties".
Under "This connection uses the following items", find and select "Internet Protocol Version 4 (TCP/IPv4)", then click "Properties".
In the window that appears, select "Use the following IP address" and enter appropriate details:
IP Address: 192.168.1.10 (Ensure it does not conflict with other devices on your network.)
Subnet Mask: 255.255.255.0
Default Gateway: 192.168.1.1 (Your router's IP address.)

Under Use the following DNS server addresses, enter:
Preferred DNS Server: 8.8.8.8 (Google Public DNS)
Alternate DNS Server: 8.8.4.4 (Google Backup DNS)
Click "OK" to save the settings, then check if the network is restored.
5. Reset TCP/IP Stack
Type "cmd" in the search bar, then right-click Command Prompt and select "Run as Administrator".
Enter the following commands one by one:
netsh winsock reset
netsh int ip reset

After executing these commands, you will see a message indicating the reset is complete.
Restart your computer to apply the changes, and check if the network connection is restored.
6. Disable and Re-enable the Network Adapter
Press Win + X and select "Device Manager".
Expand the "Network Adapters" category.
Right-click on your network adapter (e.g., Ethernet or Wi-Fi adapter), and select "Disable Device".
Wait for a few minutes, then right-click the adapter again and select "Enable Device".
Check if your network connection is back to normal.
7. Disable Fast Startup
Press Win + X and select "Power Options".
Scroll down and select "Additional Power Settings".
Click" Choose what the power buttons do", then select "Change settings that are currently unavailable".
Scroll down and uncheck "Turn on fast startup (recommended)".
Click "Save Changes".
Restart your computer to apply the changes, and check if the network is functioning properly.
Follow these steps to fix most network issues. If the problem persists, contact your ISP or technical support.
See also:
Fix Fallout 3 Crashing on Windows 10
Guide to Fixing a Computer That Keeps Crashing