Computer can't shut down is a problem that many users may encounter in daily use. This article will mainly introduce several common solutions to help users quickly solve the problem of computer can not shut down.
1. Force the End of the Task
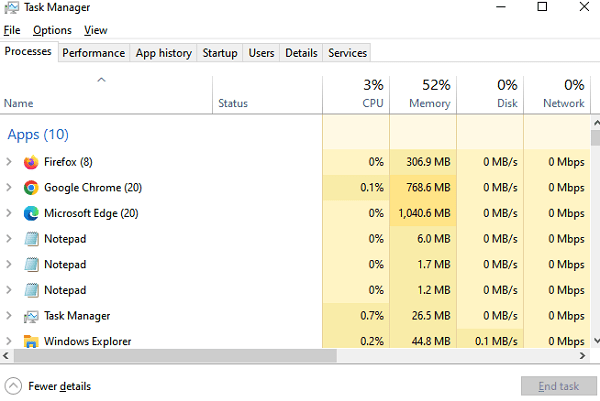
One of the common reasons why computers fail to shut down is that certain programs or processes fail to end properly. If a piece of software is not responding or a process running in the background is blocking the shutdown operation, users can manually end these tasks to solve the problem. The steps are as follows:
Press 'Ctrl + Shift + Esc' to open Task Manager.

Check the "Processes" tab to see if there are any programs that are taking up a lot of resources or not responding.
Select the relevant program and click the "End Task" button.
2. Update Driver
Driver problems may be one of the major reasons why your computer won't shut down, especially the drivers of key hardware such as graphics cards, sound cards, network cards, etc. It is recommended to use Driver Sentry to automatically detect and update drivers, saving time and avoiding the risk of downloading or installing incorrect drivers.
Click the download button to get the latest version of Driver Sentry, install the software, and then click "Scan".

After the scan, the software will display which drivers are missing or need updating. Find the driver program that needs to be updated in the result list, and then click the "Update" button.
After the update, it is recommended to restart your computer to ensure the updated drivers take effect.
3. Disable Fast Startup
Windows comes with a fast startup feature that speeds up bootup, but sometimes it can cause shutdown problems. Fastboot actually puts the computer into a "hibernation" state instead of shutting down the system completely, which may cause some hardware or software to not shut down correctly. Disabling Fast Startup can solve this problem:
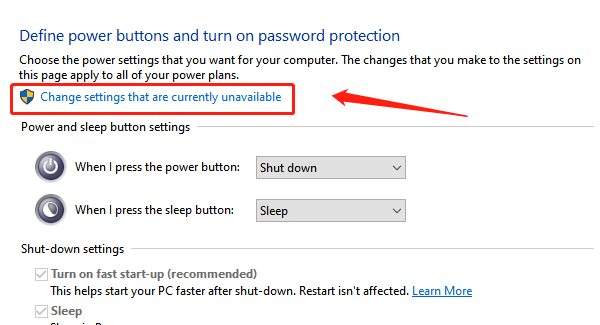
Open the "Control Panel" and click on "Power Options".
In the left-hand column, select "Choose what the power button does".
Click on "Change settings that are currently unavailable".
Under "Shutdown Settings", uncheck the "Enable Fast Startup" option and save the changes.

4. Check For System Updates
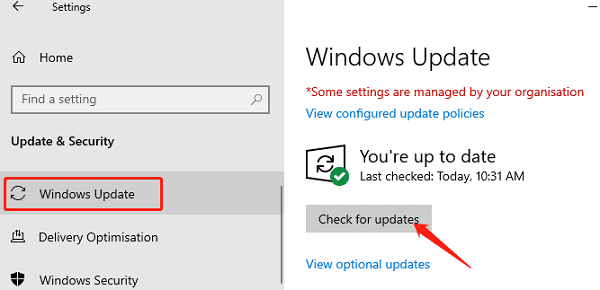
Click the "Start" menu and select "Settings".
In the settings window, choose "Update & Security".
In the "Windows Update" section, click the "Check for updates" button.

If updates are available, follow the prompts to install them.
After updates are complete, restart your computer to ensure all changes take effect.
5. Use Power Troubleshooter
Windows comes with a Power Troubleshooter that automatically detects and fixes common power-related problems. This tool can help to solve the problems related to power management or shutdown operation, the steps are as follows:
Open "Settings" and click "Update and Security".
Select "Troubleshooting" in the left column, and then click "Other Troubleshooting".
Find "Power" and click "Run Troubleshooting", the system will automatically detect and try to fix the problem.
6. Reset Power Settings
If your computer's power settings are incorrectly configured, it may cause the shutdown to fail. You can troubleshoot this problem by resetting the power settings. The steps are as follows:
Open "Control Panel", go to "Hardware and Sound", select "Power Options".
On the Power Options page, click "Change Program Settings", and then select "Restore Default Settings".
Confirm and save the changes, and restart your computer.
7. Forced Shutdown
If none of the above methods solves the problem, as a temporary solution, users can force the computer to shut down by pressing and holding the power button for 5-10 seconds. This will shut down the computer immediately but may result in the loss of unsaved data, so try to save important work before using this method.
The above is the solution for computer won't shut down, hope it will help you.
See also:
8 Ways to Fix Satisfactory Crashes
How to Fix Windows 10 System Crash