Network connection issues on an Asus laptop can be frustrating. This article offers effective solutions to quickly restore a smooth network experience.
1. Update Network Drivers
Outdated or damaged drivers are one of the most common causes of network connection problems. Ensuring your wireless network adapter drivers are up to date can significantly improve network stability. We recommend using Driver Sentry to automatically detect and update drivers, saving time while avoiding the risk of downloading or installing incorrect drivers.
Click the download button to get the latest version of Driver Sentry. After installation, open the software and click "Scan".

After scanning, the software will display the drivers that are either missing or need updating. Find the wireless adapter driver in the list and click the "Upgrade" button.
After updating, it's recommended to restart your computer to ensure the updated drivers are applied correctly.
2. Check Hardware Connections
Wired Connection:
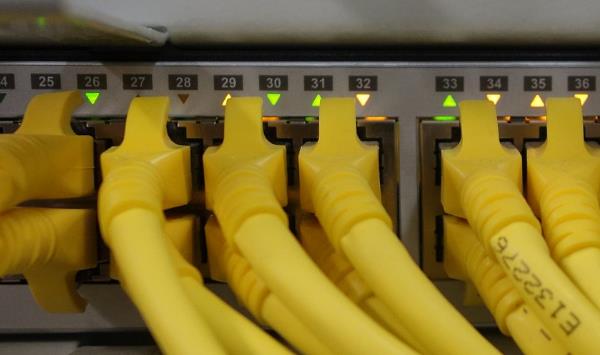
If you're using a wired network connection, first ensure the Ethernet cable is securely plugged into both your computer and the router.
Try using another Ethernet cable to eliminate any cable-related issues.
Check the network ports on both the router and computer to ensure they are not loose or malfunctioning, ensuring a stable connection.

Wireless Connection:
Make sure your computer is connected to the correct Wi-Fi network, and that the signal strength is good.
You can confirm the network connection by clicking the Wi-Fi icon on the taskbar. If the signal is weak, try moving closer to the router or using a Wi-Fi extender.
If wireless issues persist, restart the router or disconnect and reconnect to the Wi-Fi network.
3. Check Network Service Status
Press Win + R, type "services.msc" and hit Enter to open the Services Manager.
In the Services Manager, check if the following essential network services are running:
DHCP Client
DNS Client
Network Connections
Network Location Awareness
Remote Access Connection Manager
If any service is not running, right-click it and choose "Start". If the service fails to start, right-click it and select "Restart".
4. Change DNS Settings
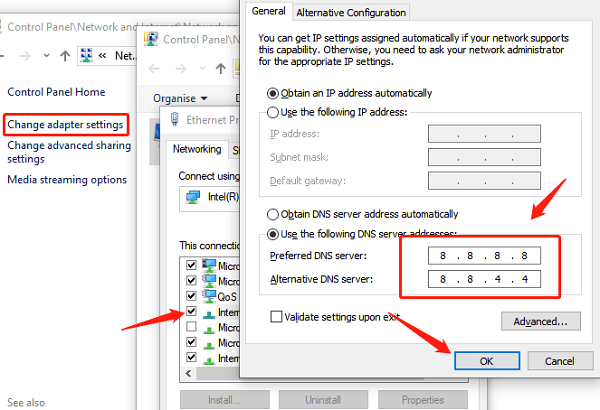
Open Control Panel, click "Network and Sharing Center", and then select "Change adapter settings".
Right-click your active network connection (wired or wireless) and select "Properties".
In the properties window, select "Internet Protocol Version 4 (TCP/IPv4)", then click "Properties".
In the new window, select "Use the following DNS server addresses", and enter the following public DNS addresses:
Preferred DNS server: 8.8.8.8
Alternate DNS server: 8.8.4.4

These are Google's public DNS servers, which can improve network stability and speed.
Click "OK" to save the settings, and restart both your computer and router to apply the changes.
5. Reset Network Settings
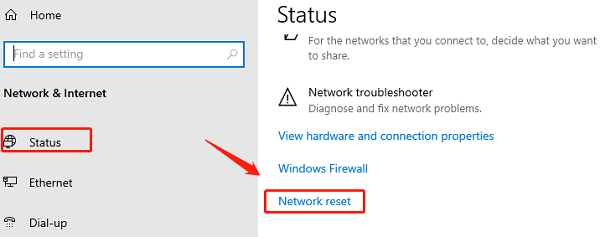
Press Win + I to open the "Settings" menu, and select "Network & Internet".
In the left menu, click "Status", then on the right side, find and click "Network reset".

On the "Network reset" page, click "Reset now". This will remove and reinstall all network adapters, restoring network settings to their default state.
The system will prompt you to restart your computer to complete the reset. After restarting, check if the network connection issue is resolved.
6. Adjust Power Management
Press Win + X and select "Device Manager".
Expand "Network adapters", right-click the network adapter you're using, and select "Properties".
In the Properties window, click the "Power Management" tab.
Uncheck "Allow the computer to turn off this device" to save power to prevent power management settings from interfering with the network adapter's operation.
Click "OK" to save the settings and restart your computer.
7. Run Windows Network Troubleshooter
Press Win + I to open the "Settings" menu, select "Update & Security", and then click "Troubleshoot".
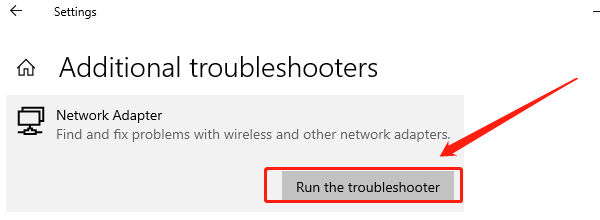
In the right panel, click "Additional troubleshooters".
Find and select "Network Adapter", then click "Run the troubleshooter". The system will automatically scan and fix any issues related to the network adapter.

Follow the on-screen instructions to complete the troubleshooting process. If the system detects issues, it will provide options for fixing them.
Follow these steps to resolve most network connection issues. If the problem persists, contact professional support for further help.
See also:
How to Fix Windows 10 Screen Flickering
How to Improve GPU Performance