Windows users may face the "Audio Service Not Responding" issue. This guide offers solutions to restore your computer's audio quickly.
1. Check Audio Drivers
Damaged or outdated drivers may cause the audio service to malfunction. Checking and updating your audio drivers promptly is a key step in resolving the issue. Using Driver Sentry to automatically detect and update drivers can save time and prevent incorrect downloads or installations.
Click the download button to get the latest version of Driver Sentry. Install the software and open it. Click "Scan".

After the scan is complete, a list of uninstalled or outdated drivers will be displayed. Find the audio driver in the results and click the "Upgrade" button.
Once updated, it is recommended to restart your computer to ensure the new driver works properly.
2. Check Audio Device Connections
Physical Connection:
Ensure that headphones, speakers, or other audio devices are correctly plugged into the appropriate port (usually the green jack).
For USB audio devices, try switching to a different port and avoid using docking stations.
If using Bluetooth devices, make sure they are properly paired and connected.
Confirm Device Power:
For external speakers or audio systems, ensure they are powered on and correctly connected to the power source.
Test Devices:
Connect another audio device to the same port to rule out hardware issues.
Test your current device on another computer or phone to verify functionality.
Set Default Device:
Right-click the volume icon in the taskbar and select "Sound Settings".
In the "Choose your output device" dropdown menu, select the connected audio device as the default.
3. Restart the Audio Services
Press Win + R, type "services.msc", and click "OK".
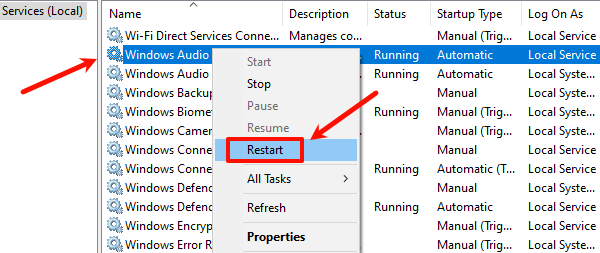
Locate "Windows Audio" and "Windows Audio Endpoint Builder" in the list of services.
Right-click Windows Audio and select "Restart".

Repeat the above steps for "Windows Audio Endpoint Builder".
For each service, right-click and select "Properties". Set the Startup Type to "Automatic" and click "OK" to save.
After completing these steps, restart your computer to ensure the services are running properly.
4. Modify the Registry
Press Win + R, type "regedit", and press Enter.
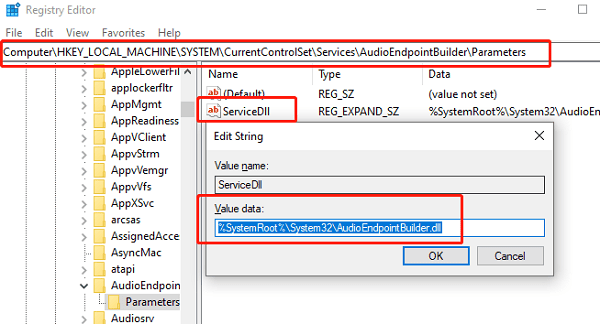
In the Registry Editor, navigate to the following path:
HKEY_LOCAL_MACHINE/SYSTEM/CurrentControlSet/Services/AudioEndPointBuilder/Parameters
Locate the "ServiceDll" key in the right pane and check the value in the Data column.

If the value is not "%SystemRoot%\System32\AudioEndPointBuilder.dll", update it to the correct path.
Close the Registry Editor and restart your computer to apply the changes.
5. Check Audio Components
Press Win + R, type "services.msc", and press Enter.
Scroll down to locate the "Windows Audio" service.
Right-click and select "Properties" or double-click to open the Windows Audio Properties window.
Go to the "Dependencies" tab. Expand the "This service depends on the following system components" section.
Ensure all listed components are "Started" and "Running" in services.msc.
Restart the Windows Audio service and reboot your computer to apply changes.
6. Run the Troubleshooter
Press Win + I to open Settings.
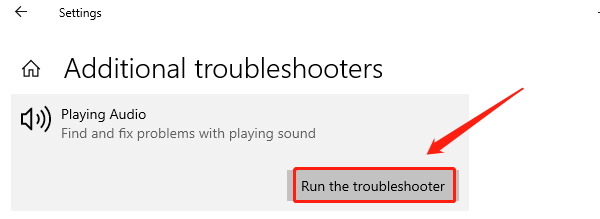
Navigate to "System > Troubleshoot > Other Troubleshooters".
Find the "Playing Audio" option and click "Run the troubleshooter".

The tool will automatically detect issues and provide solutions.
Follow the prompts to complete the troubleshooting process and verify if the issue is resolved.
7. Perform a System Restore
Press Win + S, search for "Create a restore point", and open it.
In the System Protection tab, click "System Restore".
Select a restore point from before the issue occurred and click "Next".
Review the details, confirm your choice, and click "Finish".
The system will restart and restore to the selected point.
After restoration, check if the audio functionality has returned to normal.
Follow these steps to resolve audio issues. If they persist, seek professional support or consider hardware replacement.
See also:
How to Fix The application was unable to start correctly
Fix Windows Key Not Working on Windows 10