Many users may experience a black screen with a cursor on Windows 11, disrupting normal use and causing inconvenience. This article offers effective methods to help you quickly fix the issue.
1. Check Hardware Connections
Ensure that all external devices (such as monitors, keyboards, and mice) are properly connected.
Check that the power cable and outlet are functioning correctly, ensuring the computer is powered on.
If using an external monitor, confirm that the monitor is turned on and check that the video connection cables (like HDMI or DP) are securely connected.
2. Update Graphics Drivers
Outdated or corrupted graphics drivers can lead to black screen issues. Timely updates can effectively resolve this problem and ensure system stability. We recommend using Driver Sentry to automatically detect driver updates, saving time and avoiding the risk of downloading incorrect drivers.
Click the download button to get the latest version of Driver Sentry. After installation, open the software and click "Scan".

Once the scan is complete, it will display any missing or outdated drivers. Find the graphics driver in the results list and click the "Upgrade" button.
After the update is complete, it is advisable to restart your computer to ensure the new drivers take effect.
3. Force Restart the Computer
Press and hold the power button for about 5-10 seconds until the computer shuts down.
Wait a few minutes, then press the power button again to turn it back on.
Check if the system can start normally and see if the black screen issue is resolved.
4. Enter Safe Mode
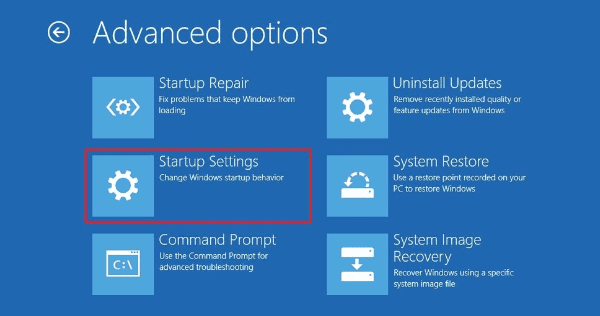
During startup, press F8, Shift + F8, or repeatedly press F11 during the Windows startup process to access the "Advanced Startup Options".
Select "Troubleshoot", then "Advanced options".
Click "Startup Settings", then select "Restart".

After rebooting, press the corresponding number key (usually 4 or 5) to choose "Safe Mode" or "Safe Mode with Networking".
Check if the display works normally in Safe Mode.
5. Use System File Checker (SFC)
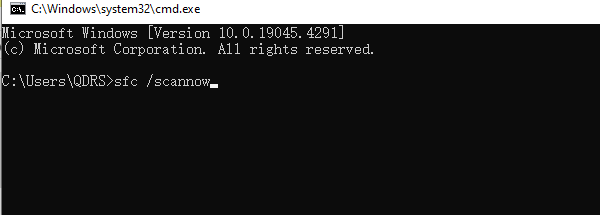
Type "cmd" in the search box, right-click on "Command Prompt", and select "Run as administrator".
In the command prompt window, type "sfc /scannow" and press Enter.

The system will automatically scan and repair corrupted system files. After completion, restart your computer to see if the issue is resolved.
6. Uninstall Windows Updates
Open the "Settings" app, click "Update & Security".
In the left menu, select "Windows Update", then click "View update history".
Click "Uninstall updates", find the most recently installed update in the list, select it, and click "Uninstall".

After completing this process, restart your computer and check if the black screen issue is resolved.
7. Run the DISM Tool
Open Command Prompt as an administrator, enter the following commands and press Enter:
DISM /Online /Cleanup-Image /CheckHealth
DISM /Online /Cleanup-Image /ScanHealth
DISM /Online /Cleanup-Image /RestoreHealth
These commands will check and repair issues with the Windows image. After completion, restart your computer.
8. Reinstall Windows 11
Make sure to back up important data.
Create Windows 11 installation media using Microsoft's "Media Creation Tool".
Insert the installation USB drive, restart your computer, and boot from the USB.
Follow the on-screen prompts to install, selecting "Custom Installation" to reinstall Windows.
After installation, check if the black screen issue is resolved.
By following these steps, you can effectively troubleshoot and resolve the black screen issue on Windows 11. If the problem persists, it is advisable to seek professional technical support.
See also:
How to Fix Dread Hunger Crashing Issues
8 Methods to Fix Persistent Crashes in Ghostwire: Tokyo