Error code 0x80072F8F in Windows 10 is often linked to Windows Update. This article offers effective solutions to help you fix the error and restore system stability.
1. Check for Driver Updates
Outdated or corrupted drivers can cause the 0x80072F8F error code in Windows 10. Regularly checking for driver updates can help prevent this issue. It is recommended to use Driver Sentry to automatically detect and update drivers, saving time and avoiding the risk of downloading or installing incorrect drivers.
Click the download button to get the latest version of Driver Sentry, install it, and open the software. Click "Scan".

After the scan is complete, it will show which drivers are missing or need updates. Find the driver that needs updating in the list and click the "Upgrade" button.
Once the update is complete, restart your computer to ensure the updated driver works properly.
2. Install Root Certificate Updates
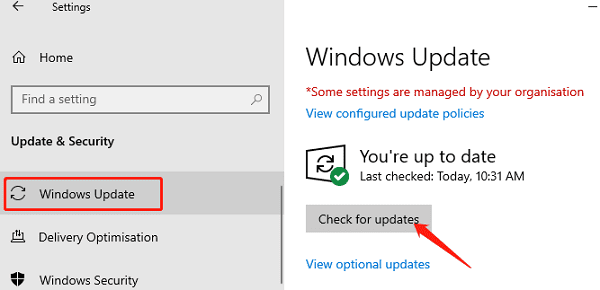
Click the Start menu, select "Settings" > "Update & Security" > "Windows Update".
Click "Check for Updates", and Windows will automatically scan and install all available updates.

Visit the official Microsoft website to download and install the latest root certificate updates. The link for root certificate updates can usually be found in the "Windows update history", or visit the Microsoft Update Catalog website.
After installing the updates, restart your computer to ensure the certificate updates take effect.
3. Check System File Integrity
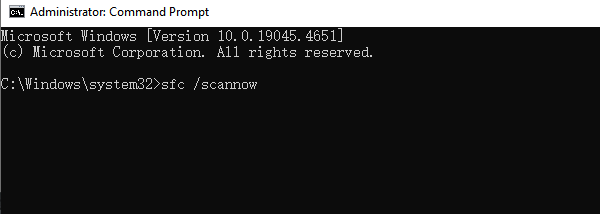
Press Windows + S, type "Command Prompt" and select Run as Administrator.
In the command window, type the following command and press Enter: sfc /scannow

The system will automatically scan and repair any corrupted system files. This process may take several minutes.
After the scan is complete, restart your computer and check if the error is resolved.
4. Check Date and Time Settings
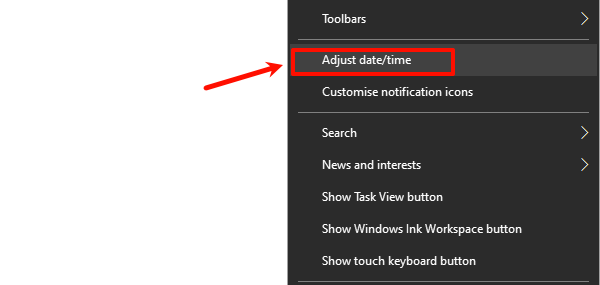
Right-click the time and date on the taskbar and select "Adjust date/time".

In the Date and Time settings, ensure that the "Set time automatically" and "Set time zone automatically" options are enabled.
If automatic settings do not work, manually set the correct date and time. Ensure that the date, time, and time zone match your current geographic location.
After making the changes, restart your computer and try updating again.
5. Run Windows Update Troubleshooter
Click the Start menu, select "Settings" > "Update & Security" > "Troubleshoot".
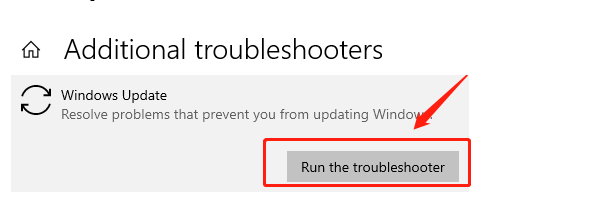
On the Troubleshoot page, click "Additional troubleshooters", find and click "Windows Update", then click "Run the troubleshooter".

The system will automatically scan and fix issues related to updates. Follow the on-screen instructions to complete the troubleshooting process.
Once the troubleshooter finishes, restart your computer and check if the problem is resolved.
6. Temporarily Disable Firewall
Disable Windows Firewall:
Press Windows + R, type "control", and press Enter to open the Control Panel.
In the Control Panel, click on "System and Security", then select "Windows Defender Firewall".
On the left menu, click "Turn Windows Firewall on or off".
Under both Private network settings and Public network settings, select "Turn off Windows Defender Firewall (not recommended)".
Make sure both are set to "Off" and click OK to save the settings.
Disable Third-Party Firewalls:
If you're using third-party firewall software, disable the firewall in its settings.
After disabling the firewall, try running Windows Update again to see if the system can connect to the update servers.
Once the update is complete, remember to re-enable Windows Firewall or the third-party firewall to ensure system security.
Follow these steps to fix most issues related to error code 0x80072F8F. If the problem continues, contact Microsoft support for help.
See also:
6 Ways to Fix Windows 11 Unidentified Network Issue
How to Fix Windows 10 'This Device Cannot Start (Code 10)' Error