External hard drives are crucial for data storage and backup, but they may sometimes not show up, causing access issues. This article offers effective methods to resolve the problem.
Method 1: Check Hardware Connections
Ensure that the USB or power cable of the external hard drive is securely connected. If possible, try connecting the drive to another USB port to rule out port failure.
If the connection is fine but the drive still does not show up, try replacing the USB data cable to see if the issue lies with the cable.
For drives that require an external power source, ensure the power cable is connected properly and confirm that the power to the drive is turned on.
Method 2: Update Drivers
Outdated or corrupted drivers may prevent the external hard drive from being recognized. Timely updating of drivers can effectively resolve this issue. Outdated, corrupted, or incompatible drivers can lead to performance degradation, hardware malfunctions, or system crashes. It is recommended to use Driver Sentry to automatically detect and update drivers, saving time and effort while avoiding the risk of downloading or installing incorrect drivers.
Click the download button to get the latest version of Driver Sentry, install it, and then open the software and click "Scan".

After the scan is complete, it will show which drivers are not installed or need updating. Find the hard drive driver in the result list and click the "Upgrade" button.
After the update is complete, it is recommended to restart your computer to ensure the updated drivers function properly.
Method 3: Check for File System Errors
Press Win + R, type "cmd", and press Enter to open the command prompt.
In the command prompt, enter the following command: chkdsk X: /f /r (replace "X" with the letter of the external hard drive).

The system will automatically scan and repair any errors in the file system.
After the scan is complete, check if the hard drive is now displayed.
Method 4: Check Disk Management
Right-click the "Start" menu and select "Disk Management".
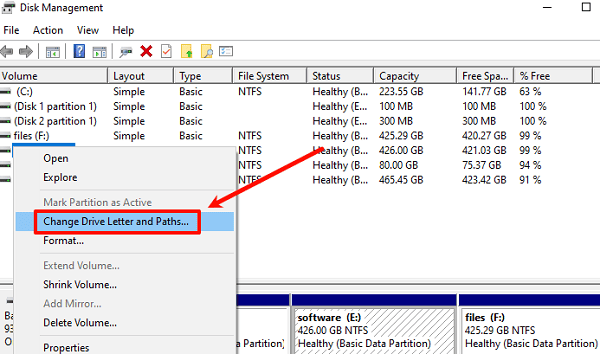
In the Disk Management window, check if you can find the external hard drive. If the drive shows as "Unallocated" or does not have a drive letter, right-click the partition and select "Change Drive Letter and Paths" to assign a drive letter.

If the drive shows as "Uninitialized", right-click the disk and select "Initialize Disk", then follow the prompts to proceed.
Method 5: Run Hardware and Devices Troubleshooter
Click the "Start" menu and select "Settings".
Click "Update & Security", then select "Troubleshoot".
In the troubleshoot menu, find the "Hardware and Devices" option and click "Run the troubleshooter".
The system will automatically detect and fix hardware issues. After completion, check if the external hard drive is displayed.
Method 6: Format the Drive
Right-click the "Start" menu and select "Disk Management".
Find the external hard drive in Disk Management, right-click the drive.
Select "Format", and in the pop-up window, choose the file system (typically NTFS or FAT32), and fill in the volume label.
Confirm the operation, and the system will begin formatting. After completion, check if the drive displays normally.
By following these steps, you can resolve the issue of the external hard drive not showing. If the problem persists, consider contacting technical support for further help.
See also:
6 Ways to Fix Network Adapter Not Working in Windows
Methods to Reset Network Adapter