Many players experience crashes in Fallout 3 on Windows 10, disrupting gameplay. This guide offers solutions to fix these issues for smoother play.
1. Verify Minimum System Requirements
Ensure your PC meets the game's minimum requirements:
Operating System: Windows XP/Vista
Processor: 2.4 GHz Intel Pentium 4 or equivalent
Memory: 1 GB (XP) / 2 GB (Vista)
Hard Disk Space: 7 GB
Video: DirectX 9.0c-compliant video card with 256 MB RAM (NVIDIA 6800 or better/ATI X850 or better)
Sound: DirectX®: 9.0c
Controller Support: Xbox 360 controller
Other Requirements: Online play requires login to Games for Windows - Live
2. Update Graphics Drivers
Outdated or corrupted graphics drivers may cause crashes during gameplay. Updating your drivers is a key step in resolving these issues. Using tools like Driver Sentry can make the process more efficient and error-free.
Download and install the latest version of Driver Sentry, then open the program and click "Scan".

Locate the graphics driver in the results and click "Upgrade".
Restart your PC after updating to ensure the changes take effect.
3. Run the Game as Administrator
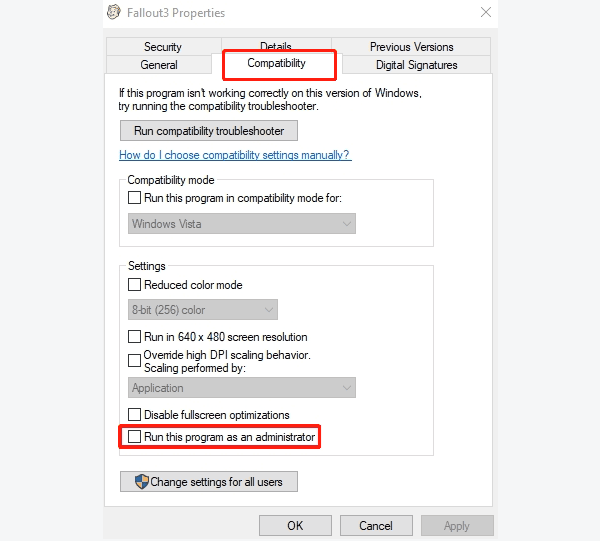
Navigate to the game's installation folder (commonly located at C:\Program Files (x86)\Steam\steamapps\common\Fallout 3).
Right-click the Fallout3.exe or launcher file and select "Properties".
In the Compatibility tab, check "Run this program as an administrator".

Click "Apply" and "OK".
Double-click the launcher to test if the issue is resolved.
4. Play in Windowed Mode
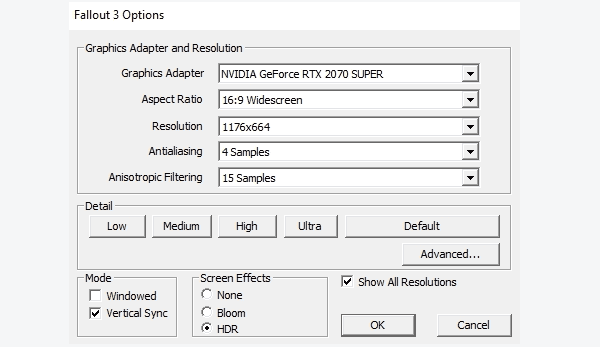
Launch the game and click "Options" in the menu.
Select the "Windowed Mode" checkbox.

Ensure the resolution matches your monitor's supported resolution for better compatibility.
Save changes and launch the game to see if this improves stability.
5. Run the Game in Compatibility Mode
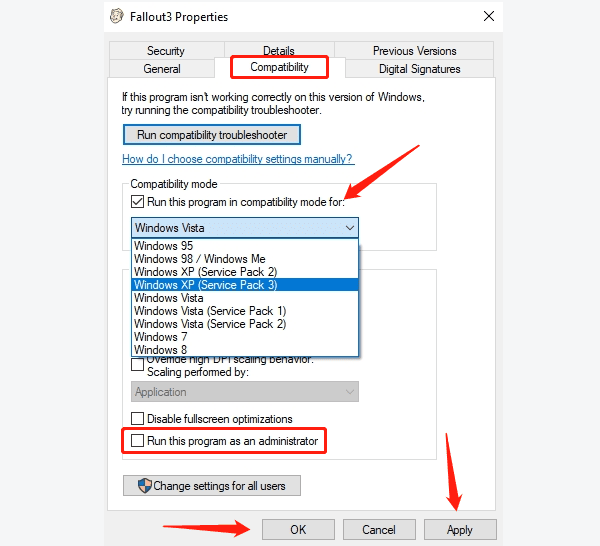
In the game's installation folder, right-click the "Fallout3.exe" file and select Properties.
Go to the Compatibility tab and check "Run this program in compatibility mode for".
From the dropdown, select "Windows 7" or "Windows XP (Service Pack 3)".

Click "Apply" and "OK".
Test the game to see if the problem is resolved.
6. Install Fallout 3 Fix Mods or Patches
Visit reputable forums or community sites to download Fallout 3 fixes, such as the Fallout 3 Script Extender (FOSE).
Extract the downloaded files to the game's installation directory.
Follow the patch instructions to replace or copy specific files into the game root folder.
Use the patch's custom launcher to start the game and test for improvements.
7. Disable Multi-Core Processor Support
Open the game's installation directory and locate the "Fallout.ini" file (commonly found at Documents\My Games\Fallout3).
Open the file in Notepad and find the following line: bUseThreadedAI=0
Change it to: bUseThreadedAI=1
Add a new line immediately below it: iNumHWThreads=2
Save the file and restart the game to see if this resolves the crashes.
8. Reinstall the Game
Open Steam or your game launcher, right-click Fallout 3, and select "Uninstall".
Navigate to the installation folder and delete any leftover files.
Delete configuration files from: C:\Users\[YourUsername]\Documents\My Games\Fallout3
Re-download and reinstall the game from Steam or another platform.
Install the latest official or community patches.
Configure necessary settings and test the game.
Follow these steps to fix crashes when running Fallout 3 on Windows 10. If the issue continues, contact technical support or use compatibility tools.
See also:
Steps to Update BIOS on a Computer
How to Fix Windows Msvcr120.dll Missing
How to Fix a Wireless Mouse Not Working
Guide to Fixing the "Print Spooler Service Not Running" Error