Experiencing the "GPU Not Detected" issue on Windows can limit graphics performance and prevent high-performance graphics applications and games from running. This guide offers solutions to quickly restore GPU functionality.
1. Check Physical Connections
Power off the computer and unplug it.
Open the case to ensure the GPU is firmly connected to the PCI-E slot on the motherboard.
Check that the GPU power cables are fully inserted. If the GPU requires additional power, ensure these cables are properly connected.
Ensure the display cable (e.g., HDMI, DP, VGA) is correctly connected to the GPU output port.
Check that the monitor's power is on and that the input source matches the connected port.
2. Update Drivers
Driver incompatibility or corruption is often the main reason for the GPU not being detected. Updating the driver can resolve this issue. Using Driver Sentry can help you automatically detect and update drivers, saving time and reducing the risk of incorrect installations.
Download the latest version of Driver Sentry, install, and open it.
Click "Scan" to identify missing or outdated drivers, locate the display driver, and click "Upgrade".

Restart the computer to apply the updated driver.
3. Ensure the GPU is Enabled
Press Win + X and select "Device Manager".
Expand "Display Adapters" to see if your GPU is listed.
If there's an arrow next to the GPU name (indicating it's disabled), right-click the GPU and select "Enable Device".
4. Set GPU Priority in BIOS
Restart the computer, pressing F2, DEL, or the specified key to enter the BIOS (key depends on the motherboard manufacturer).
In the BIOS, locate settings related to display adapters or GPU, usually under the "Advanced" or "Boot" tab.
Set "Graphics Priority" or "Primary Display Device" to "PCI-E" or "Discrete GPU" instead of "Integrated Graphics".
Save changes, exit BIOS, and check if the GPU is now recognized.
5. Adjust Windows Power Settings
Right-click the "Start" button and select "Power Options".
Click "Additional Power Settings" and choose "High Performance" to ensure the system does not limit GPU performance.
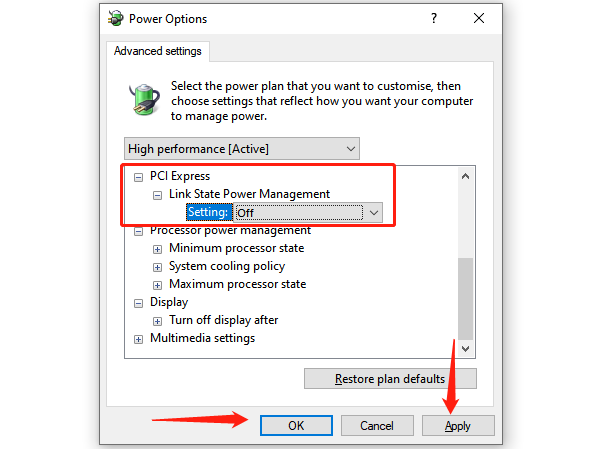
Click "Change Plan Settings" > "Change Advanced Power Settings".
In the "Advanced Settings", expand "PCI Express" and ensure "Link State Power Management" is set to "Off".

Confirm changes and click "OK" to save.
6. Use Device Manager to Detect Hardware Changes
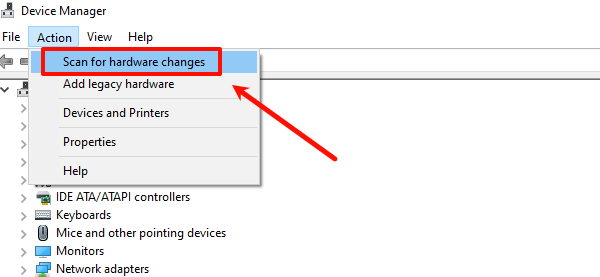
Press Win + X and select "Device Manager".
In Device Manager, click "Action" in the top menu, then select "Scan for Hardware Changes".

The system will re-scan all connected hardware and attempt to detect any unrecognized GPU.
Check if the GPU now appears as a recognized device.
7. Check for Windows Updates
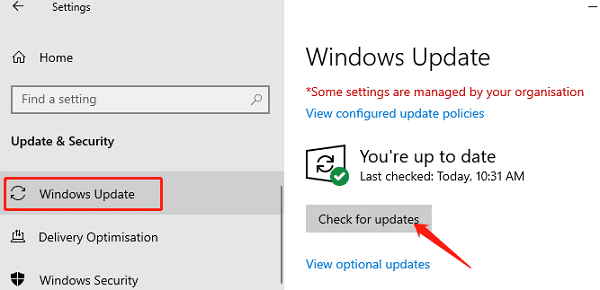
Go to "Settings" > "Update & Security" > "Windows Update".
Click "Check for Updates" to install any available updates.

If relevant driver updates or system patches are found, install them and restart your computer to check if the GPU is detected and functioning correctly.
8. Update the Motherboard BIOS
Locate your motherboard model, which is usually labeled on the board.
Visit the manufacturer's website to download the latest BIOS version for your model.
Follow the manufacturer's BIOS update instructions, typically using a USB flash drive for installation.
Restart the computer after the update to verify if the GPU is detected.
Following these steps can help resolve the issue of Windows not detecting the GPU. If the problem persists, consider replacing the GPU or contacting professional technical support.
See also:
8 Ways to Fix Satisfactory Crashes
How to Fix Windows 10 System Crash