Users may encounter the "Printer driver is unavailable" error with HP printers. This article offers effective solutions to quickly resolve the issue and restore printer functionality.
1. Update Printer Drivers
Drivers are the key link between your printer and computer. If the driver is unavailable, the printer will not work properly. We recommend using Driver Sentry to automatically detect and update drivers, saving time and avoiding the risk of downloading or installing incorrect drivers.
Click the download button to get the latest version of Driver Sentry. After installation, open the software and click "Scan".

Once the scan is complete, a list of missing or outdated drivers will be displayed. Find the printer driver and click the "Upgrade" button.
After the update is complete, it is recommended to restart your computer to ensure the updated driver works properly.
2. Manually Add the Printer Device
Press Win + I to open the "Settings" menu.
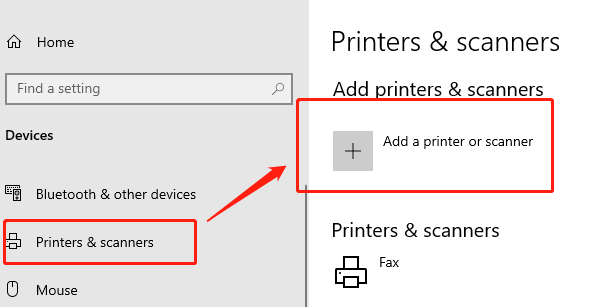
Select "Devices", then click "Printers & Scanners".
On the "Printers & Scanners" page, click "Add a printer or scanner".

The system will search for nearby printers. If your printer does not appear, click "The printer I want isn't listed".
Select "Add a local printer or network printer", then choose the appropriate printer port (e.g., USB or network connection).
Follow the on-screen instructions to complete the printer installation process. If the correct driver is not found, you can manually select your printer model or download the appropriate driver from the HP official website.
3. Rollback the Driver
Press Win + X to open the shortcut menu and select "Device Manager".
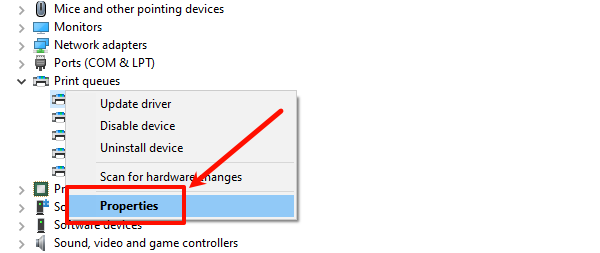
In Device Manager, expand the "Print Queues" section, right-click your HP printer, and select "Properties".

In the Printer Properties window, switch to the "Driver" tab.
If the "Rollback Driver" button is available, click it and follow the prompts to restore to a previous driver version.
After completion, restart your computer and check if the printer returns to normal operation.
4. Check for System Updates
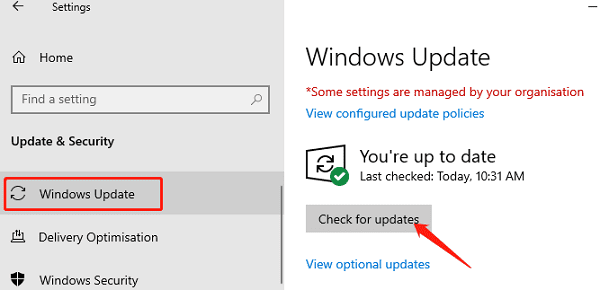
Press Win + I to open the "Settings" menu, and select "Update & Security".
In the "Windows Update" tab, click "Check for updates".

If updates are available, click "Download and install".
After all updates are installed, restart your computer and check if the printer is functioning properly.
5. Run Windows Troubleshooter
Press Win + I to open "Settings" and select "Update & Security".
Click "Troubleshoot" > "Additional troubleshooters".
Select "Printer", then click "Run the troubleshooter".

The system will automatically begin scanning and detecting printer-related issues.
Follow the on-screen prompts to complete the troubleshooting process. If any issues are detected, the system will offer repair options, and you can choose Apply this fix to resolve them.
6. Use HP Print and Scan Doctor
Visit the official HP Print and Scan Doctor page on HP's website.
Download and install the tool based on your operating system version (Windows 10).
After installation, open HP Print and Scan Doctor.
In the tool's interface, click "Start", then select your printer.
The tool will automatically scan and diagnose any potential printing issues. If problems are found, HP Print and Scan Doctor will provide repair options that you can follow to fix the issues.
Following these steps should resolve most HP printer issues on Windows 10. If the problem persists, contact HP support or seek professional help.
See also:
How to Fix Corrupted System Files in Windows 10
Fixing Windows 11 Keeps Crashing