Keyboard input lag in Windows 10 can hinder productivity and user experience. This article provides effective solutions to restore normal keyboard response speed.
1. Check Keyboard Connection
Ensure the keyboard's USB or PS/2 connector is securely connected to the computer.
Try plugging the keyboard into a different USB port to rule out port issues.
After confirming the connection, restart the computer to check if the keyboard driver loads automatically.
If possible, use cleaning tools to clear any dust or debris from the USB port to maintain a strong connection.
2. Update Keyboard Drivers
Driver issues are a common cause of keyboard lag, and updating drivers can resolve compatibility issues. Using Driver Sentry to automatically detect and update drivers can save time and prevent downloading the wrong drivers.
Download and install the latest version of Driver Sentry. Open the software and click "Scan".

After scanning, locate the keyboard driver in the results and click "Upgrade".
After updating, restart your computer to ensure the new driver takes effect.
3. Adjust Keyboard Properties
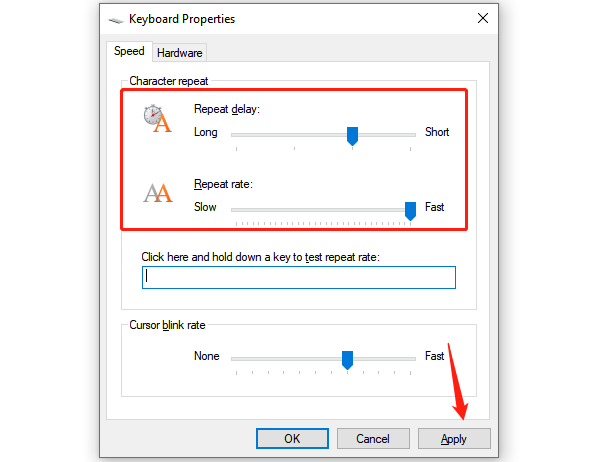
Go to the Start menu, type "Control Panel", and open it. Find and select "Keyboard".
In the "Keyboard Properties" window, adjust the "Repeat Delay" and "Repeat Rate" sliders to shorter delays and faster speeds.

Use the "Repeat Delay" test box to confirm improved key response.
Click "Apply" and "OK" to save changes.
4. Disable Filter Keys
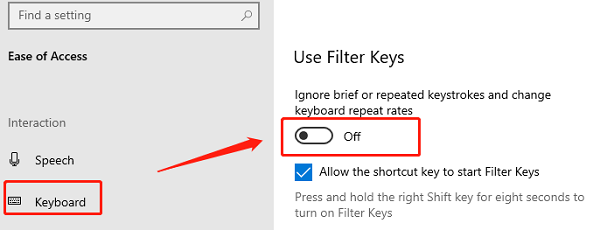
Press the Shift key five times to open the Filter Keys menu.
Click "Go to Settings", or search for "Keyboard" in Settings and select the Filter Keys setting.
Toggle off Filter Keys to prevent it from affecting input response.

Close the window and check if keyboard responsiveness has improved.
5. Run Keyboard Troubleshooter
Go to the Start menu, select "Settings" > "Update & Security" > "Troubleshoot".
Click "Additional troubleshooters", then select "Keyboard".
Click "Run the troubleshooter", and the system will detect and attempt to fix keyboard issues.

Follow on-screen instructions to complete any repairs, then test your keyboard.
6. Troubleshoot Wireless Keyboard
Make sure the wireless keyboard has sufficient battery power or replace the batteries.
Ensure the receiver is plugged into a working USB port; reconnect if needed to re-establish the connection.
Refer to the keyboard manual and hold the pairing button to re-pair the keyboard with the receiver.
Reduce interference from nearby wireless devices (e.g., routers) to ensure a stable signal.
7. Run DISM
Press Win + X, select "Command Prompt (Admin)" or "Windows PowerShell (Admin)". Enter the following commands, pressing Enter after each:
DISM /Online /Cleanup-Image /ScanHealth
DISM /Online /Cleanup-Image /CheckHealth
DISM /Online /Cleanup-Image /RestoreHealth
The DISM tool will scan and repair system image corruption, which may take a few minutes.
Restart your computer when finished and check the keyboard's functionality.
8. Check for Hardware Issues
Connect the keyboard to another computer to see if input lag or unresponsiveness persists.
Ensure keys aren't stuck or obstructed by debris under the keycaps.
Test with another keyboard to determine if the issue is hardware-related or a system problem.
If confirmed as a hardware issue, contact the keyboard brand's support service for assistance or replacement.
Following these steps will help identify and resolve keyboard input lag. If the problem persists, consider consulting professional technical support or contacting after-sales service.
See also:
How to Fix Laptop WiFi Connection Issues