The laptop keyboard is crucial for daily use, but it may sometimes stop working. This guide offers solutions to quickly restore its functionality.
1. Update Keyboard Drivers
Driver issues are a common reason for keyboard malfunctions. Keeping your keyboard driver updated can help prevent these issues. Using Driver Sentry is recommended for automatically detecting and updating drivers, saving time and reducing the risk of downloading or installing incorrect drivers.
Click the download button to get the latest version of Driver Sentry. After installation, open the software and click "Scan".

Once the scan is complete, you'll see any drivers that need to be installed or updated. Find the keyboard driver in the list, then click "Upgrade".
After updating, it's best to restart your computer to ensure the new driver takes effect.
2. Restart Your Computer
Make sure to save any ongoing work to prevent data loss.
Open the "Start" menu, select the "Power" icon.
Click "Restart". The system will automatically close all programs and reboot.
After restarting, check if the keyboard works. Rebooting often resolves temporary software conflicts or memory issues.
3. Check if the Keyboard is Locked
Some keyboards have a combination of the "Fn" key and function keys (like F1 to F12) to enable or lock certain functions. Some laptops even have a dedicated "Keyboard Lock" button, so ensure these keys haven't been accidentally pressed.
Check the Num Lock and Scroll Lock keys on the numeric keypad, as they can sometimes cause keyboard issues.

On certain laptops, you may need to press a specific key (e.g., F6, F8, or another key) to enable or unlock the keyboard. Consult your computer's user manual for specific shortcuts.
4. Enable the On-Screen Keyboard (Temporary Solution)
Press the Windows key + I to open "Settings".
In the Settings window, click "Ease of Access".
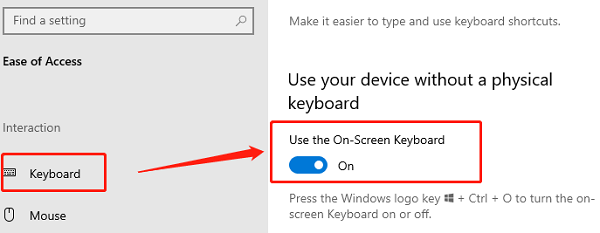
Select the "Keyboard" option on the left sidebar, and enable the "On-Screen Keyboard"option. A virtual keyboard will appear on the screen, allowing you to type using your mouse.

Note: The on-screen keyboard is a temporary solution; it's best to resolve the physical keyboard issue soon.
5. Disable Filter Keys and Sticky Keys
Press the Windows key + I to open "Settings".
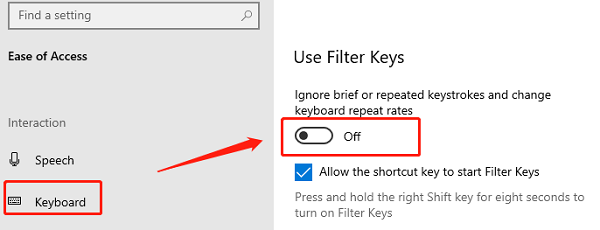
Click "Ease of Access", then select "Keyboard".
In the "Sticky Keys" section, ensure the option is turned off.
In the "Filter Keys" section, make sure this option is also turned off.

After disabling these options, check if the keyboard is functioning normally.
6. Run the System Keyboard Troubleshooter
Press the Windows key + I to open "Settings", then click "Update & Security".
Select "Troubleshoot" from the left menu, then click "Additional troubleshooters".
Find and click "Keyboard", then click "Run the troubleshooter".

The system will automatically scan and attempt to fix any detected keyboard issues. Follow the prompts to complete the process.
7. Clean the Keyboard
Turn off your computer before cleaning.
Use compressed air to blow away dust and debris from the keyboard.
Gently wipe the keyboard surface with a soft microfiber cloth to remove any stains.
For grime in the keyboard crevices, use a cotton swab or small brush to clean carefully.
Note: Avoid excessive moisture during cleaning, as water can damage the keyboard's internal circuits.
Following these steps can help you resolve common laptop keyboard issues. If these methods do not work, consider seeking assistance from a professional technician.
See also:
Guide to Connecting a Laptop to Dual Monitors
8 Ways to Fix Hogwarts Legacy Stuttering