Windows 10 users may experience issues with the mouse disconnecting frequently, which can impact both work efficiency and gaming experience. This article provides several effective solutions to help you quickly resolve the problem.
1. Check Hardware Connection
Try a different USB port:
If you are using a wired mouse, try plugging it into another USB port, preferably one at the back of the PC to avoid power issues with front ports.
If you are using a wireless mouse, try changing the position of the USB receiver to minimize signal interference.
Check the mouse battery (for wireless mouse):
Low battery levels can cause an unstable connection. Try replacing the battery or charging the mouse before testing again.
Test on another device:
Connect the mouse to another Windows computer or device to see if the issue persists.
If the mouse works fine on another device, the problem likely lies within your Windows 10 system rather than the mouse itself.
Clean the USB port:
Dust inside the USB port may cause poor contact. Use a cotton swab or compressed air to clean the USB port before reconnecting the mouse.
2. Check for Driver Updates
Outdated or corrupted drivers are common causes of mouse disconnection issues. Ensuring your device drivers are up to date can effectively resolve this problem. Driver Sentry is recommended for automatically detecting and updating drivers, saving time and preventing incorrect driver installations.
Click the download button to get the latest version of Driver Sentry. Install and open the software, then click "Scan".

Once scanning is complete, a list of outdated or missing drivers will appear. Locate the mouse driver and click "Upgrade".
After updating, restart your computer to ensure the new drivers take effect.
3. Check for Bluetooth Interference (For Wireless mouse)
Disconnect unused Bluetooth devices:
Go to "Settings" > "Devices" > "Bluetooth & other devices" and remove any unused Bluetooth connections.
Some wireless mouse operate on 2.4GHz, which may interfere with Wi-Fi signals. If possible, switch your Wi-Fi router to the 5GHz band to reduce interference.
Re-pair the mouse:
In Bluetooth settings, find your mouse, then click "Remove device".
Turn off the mouse, then turn it back on and put it in pairing mode. Reconnect it to your Windows 10 device.
4. Adjust Power Management Settings
Press Win + X and select "Device Manager".
Expand "Mice and other pointing devices", right-click your mouse, and select "Properties".
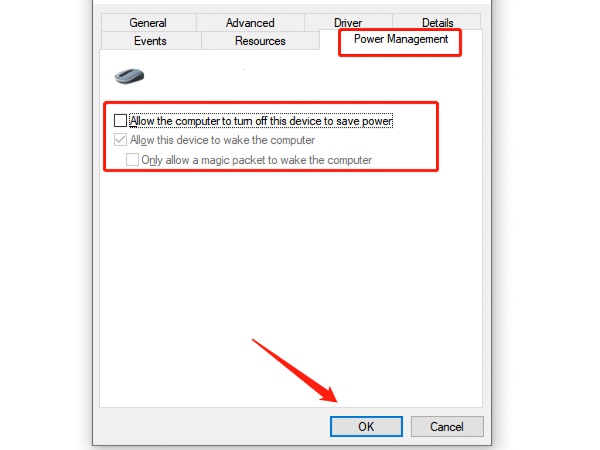
Go to the "Power Management" tab.
Uncheck "Allow the computer to turn off this device to save power", then click "OK".

Restart your computer and check if the mouse disconnection issue is resolved.
5. Disable USB Selective Suspend
Open Control Panel and go to "Power Options".
Click "Change plan settings" next to your active power plan.
Click "Change advanced power settings".
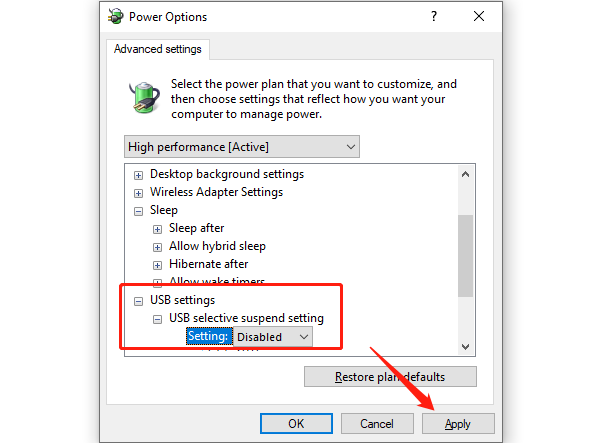
In the pop-up window, expand "USB settings" and then expand "USB selective suspend setting".

Set it to "Disabled", click "Apply", then click "OK".
Restart your computer and check if the issue is resolved.
6. Run Windows Troubleshooter
Press Win + I to open Settings, then go to "Update & Security".
Click "Troubleshoot" > "Additional troubleshooters".
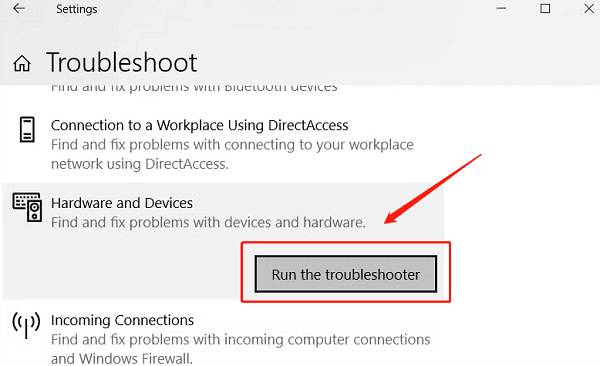
Find "Hardware and Devices", then click "Run the troubleshooter".

Follow the on-screen instructions to complete the repair process, then restart your computer.
By following these steps, your mouse should work normally again. If the issue persists, consider contacting the mouse manufacturer or Microsoft Support for further assistance.
See also:
Resolve Bluetooth audio stuttering issue on Windows 10
Ways to resolve the "Audio Device is Disabled" issue
How to fix Marvel Rivals crashing on PC
Methods to resolve the "Vanguard Not Initialized" issue in Valorant