Mouse lag can be frustrating, especially during gaming or work. This article offers a solution to quickly fix the issue and enhance your experience.
Method 1: Update Drivers
Outdated or corrupted mouse drivers can cause lag. Updating your mouse drivers can usually fix this problem. We recommend using Driver Sentry to automatically detect and update drivers, saving time and avoiding the risk of downloading incorrect ones.
Download the latest version of Driver Sentry, install it, and open the software. Click "Scan".

After scanning, the software will show any drivers that need to be installed or updated. Find the mouse driver in the list and click "Upgrade".
After updating, restart your computer to ensure the new drivers work properly.
Method 2: Check Hardware Connection
Wired Mouse Connection:
Ensure the mouse's USB plug is securely inserted into the computer's USB port. Try plugging it into a different port to rule out port issues.
If using a USB hub, try connecting the mouse directly to the computer to eliminate hub problems.
Check the USB port for dust or dirt and clean it if necessary.
Wireless Mouse Connection:
Ensure the receiver is properly plugged into the computer's USB port.
Check the mouse battery level, as low power can cause the mouse to malfunction. Replace the battery if needed.
If your wireless mouse has a switch, ensure it is turned on.

Reconnecting the Mouse:
Unplug the mouse or receiver, wait a few minutes, and then reconnect to allow the system to re-recognize the device.
Other Hardware Devices:
If you have other peripherals connected, such as a keyboard or printer, unplug them to check if they are interfering with the mouse.
Method 3: Disable Scroll Inactive Windows
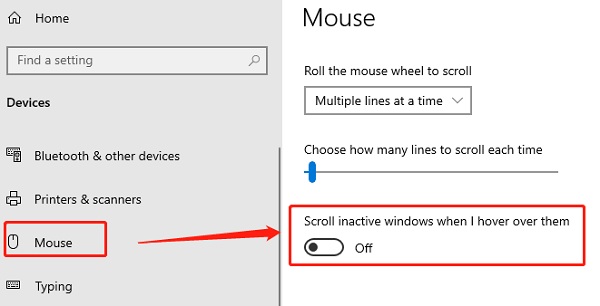
Open "Settings" and click on "Devices".
In the left menu, select "Mouse".
Scroll down to locate the "Scroll inactive windows when I hover over them" option and disable it.

Test the mouse again to see if it works normally.
Method 4: Change Mouse Settings
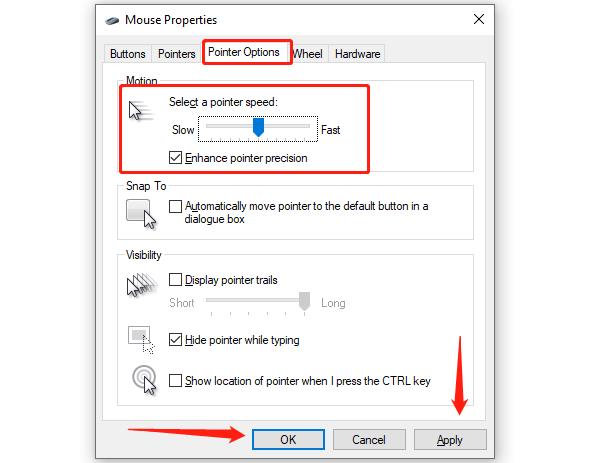
Open "Control Panel" and click "Mouse" (on Windows 10, you can also search for "Mouse" in Settings).
In the "Buttons" tab, check the button configuration to ensure it's set correctly. You can switch between "Left-handed" or "Right-handed" modes.
In the "Pointer Options" tab, adjust the pointer speed to suit your preferences.

In the "Wheel" tab, check the scroll wheel behavior and make sure it matches your needs.
In the "Hardware" tab, check whether the mouse appears as working. If it does not, click "Properties" to check for any driver issues.
Method 5: Run Hardware Troubleshooter
Press Win + S, type "cmd".
In the search results, right-click "Command Prompt" and select "Run as administrator".
Type the following command and press Enter: msdt.exe -id DeviceDiagnostic
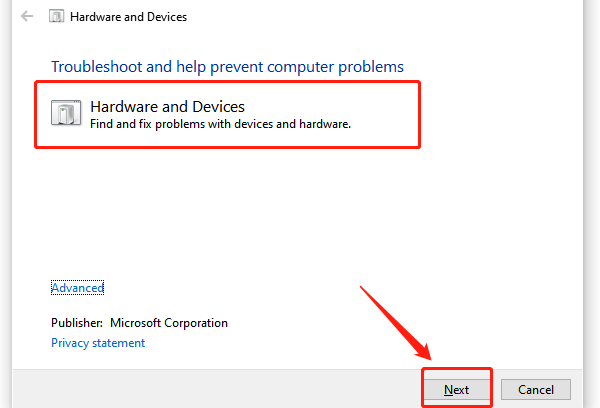
The "Hardware and Devices Troubleshooter" window will open.

Click "Next" to start the detection process. The system will automatically scan for device issues.
Follow the on-screen prompts to complete the troubleshooting. If any issues are detected, choose "Apply this fix" to resolve them.
Method 6: Check Mouse Hardware
Inspect the Mouse:
Check the mouse for visible damage, such as a broken casing or stuck buttons.
For wired mouse, inspect the cable for signs of wear, damage, or bending. Damaged cables can interrupt the signal.
For wireless mouse, check the sensor area for dirt or obstruction that may affect functionality.
Test on Another Device:
Try using the mouse on another computer or device to see if it works. If it doesn't work on another device, the mouse itself may have a hardware issue.
Check the Sensor:
For optical or laser mouse, check if the sensor is blocked or dirty. Gently clean the sensor area to remove any obstructions.
Follow these steps to troubleshoot and fix most mouse issues. If the problem continues, the mouse may be faulty and need replacement or professional support.
See also:
How to Fix Audio Services Not Responding
7 Methods to Fix Windows 10 Low Volume