Windows users may encounter network adapter driver errors. This guide provides steps to resolve the issue and restore connectivity.
1. Check for Driver Updates
Outdated or corrupted drivers can cause issues with the network adapter. Checking and updating the driver promptly is a key step to restoring normal network connection. We recommend using Driver Sentry to automatically detect and update drivers, saving time and avoiding the risk of downloading or installing incorrect drivers.
Click the download button to get the latest version of Driver Sentry, install the software, and then click "Scan".

Once the scan is complete, it will show which drivers are missing or need updating. Find the network adapter driver in the list and click the "Upgrade" button.
After updating, it's recommended to restart your computer to ensure the updated driver works properly.
2. Reset Winsock Directory
Press Win + S, type "Command Prompt", and run it as administrator.
In the Command Prompt window, type the following command and press Enter: netsh winsock reset

This command will reset the Winsock directory and restore the default network configuration.
After executing the command, restart your computer to ensure the changes take effect.
3. Show Hidden Hardware
Press Win + X and select "Device Manager".
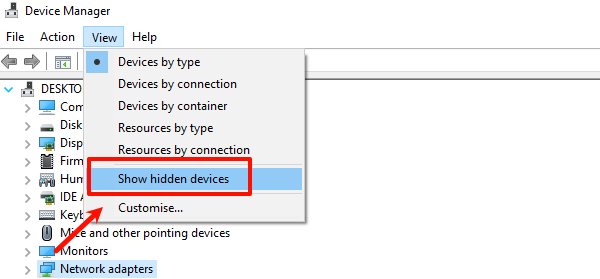
In the Device Manager window, click the "View" tab at the top and select "Show hidden devices".

Expand the "Network adapters" category to see if there are any disabled or abnormal network devices. If found, right-click the device and select "Enable" or "Uninstall", then restart your computer.
4. Run Windows Network Troubleshooter
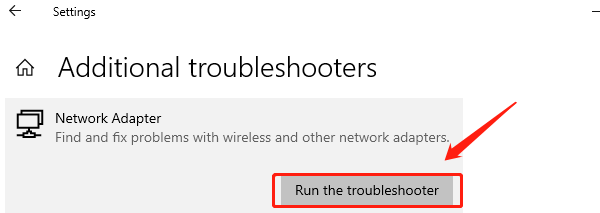
Press Win + I to open "Settings", then go to "Update & Security" > "Troubleshoot" > "Additional troubleshooters".
Select "Network Adapter" and then click the "Run the troubleshooter" button.

Follow the on-screen prompts as the system automatically detects and attempts to fix network issues.
If the troubleshooter finds and resolves an issue, it will notify you. Follow the prompts to complete the fix. If no issues are detected, you can try other solutions.
5. Update the Operating System
Press Win + I to open "Settings", then go to "Update & Security" > "Windows Update".
Click the "Check for Updates" button. The system will automatically check if there are any new updates available.
If updates are available, click to download and install them. Depending on the size and number of updates, the process may take several minutes to half an hour.
Once the installation is complete, the system will prompt you to restart your computer to finalize the update. Click "Restart" to apply the updates.
6. Check for Hardware Issues
Check the Network Adapter:
Open "Device Manager", expand the "Network adapters" category, and check if the network adapter is working correctly.
If you see a yellow warning sign, it indicates there might be an issue with the device.
Check the Router and Modem:
Inspect the power and indicator lights to ensure all devices are properly connected.
Try restarting the router and modem to see if the connection is restored.
Check Cable Connections:
If using a wired connection, check if the Ethernet cable is securely plugged in.
Try using another Ethernet cable to ensure there is no physical damage.
Try Other Devices:
Use another device (such as a phone or another computer) to connect to the network and see if it works.
If other devices also fail to connect, it could indicate a hardware issue.
These steps can help troubleshoot and fix network connection issues. If the problem continues, contact technical support or replace the faulty hardware.
See also:
Fix Kernel Mode Heap Corruption Error
How to Fix Faulty Hardware Corrupted Page on Windows 10