Hardware errors are common with Oculus devices (e.g., Oculus Quest or Rift). This article offers solutions to help fix these issues.
1. Check for Driver Updates
Outdated or corrupted Oculus and graphics drivers may trigger hardware errors. It's recommended to check for driver updates regularly to prevent such issues. Using Driver Sentry to automatically detect and update drivers is a time-saving and efficient method while avoiding the risk of downloading or installing incorrect drivers.
Click the download button to get the latest version of Driver Sentry, then open the software after installation and click "Scan".

After scanning, a list of drivers that need to be updated or installed will appear. Locate the graphics driver in the results list and click the "Upgrade" button.
After the update is complete, it's recommended to restart the computer to ensure the updated drivers are properly applied.
2. Check Device Connections
Ensure that the USB and HDMI cables of the Oculus device are securely connected to the correct ports. Make sure all connections are tight and not loose.
Plug the Oculus USB cable into a different USB 3.0 port on the motherboard. If using an HDMI connection, ensure it is plugged into the graphics card HDMI port, not the motherboard HDMI port.

The indicator light on the Oculus headset should be white or green. If it's not, disconnect the power to the device, wait a few minutes, and reconnect.
If you are using a USB hub or extension cord, it may cause signal instability. It is recommended to connect the Oculus device directly to the computer port.
3. Disable USB Power Saving
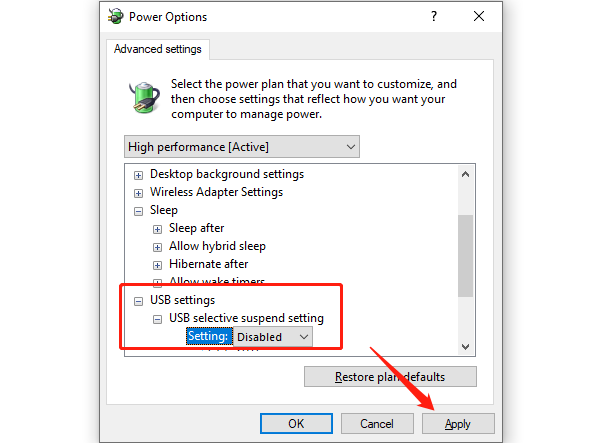
Disable USB Selective Suspend
Type "power plan" into the Windows search box, then click "Edit power plan".
Click "Change advanced power settings".
In the pop-up window, double-click "USB settings", then select "USB selective suspend setting".
Set it to "Disabled", then click "Apply" and "OK".

Change Power Management Settings
Press Windows key + R, type "devmgmt.msc", and click "OK".
In the Device Manager, double-click "Universal Serial Bus controllers" to expand the category.
Right-click USB device and select "Properties".
Select the "Power Management" tab, uncheck "Allow the computer to turn off this device to save power", and click "OK" to save changes.
Repeat the above steps for each USB port to disable the power management settings. Test if the issue is resolved.
4. Check for Windows Updates
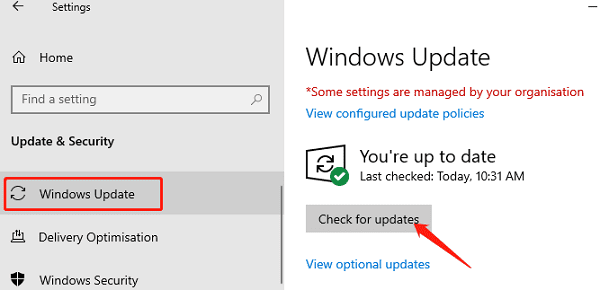
Click the Start button, then select "Settings" > "Update & Security".
In the "Windows Update" section, click "Check for updates".

If there are available updates, install all recommended drivers and patches, especially those related to USB or graphics card updates.
5. Update Oculus Software
Ensure that your Oculus application is open and you are logged into your account.
Click the settings icon in the top-right corner of the application and go to the About page.
If an update is available, click the Update button and wait for the download and installation to complete.
After the update, restart the Oculus application and ensure the headset connects properly.
Make sure your Oculus app version is compatible with the device model. If the issue persists, try reinstalling the Oculus application.
Following the steps above should resolve most hardware errors. If the issue persists, contact Oculus support for further help.
See also:
7 Ways to Fix the Unexpected Kernel Mode Trap Error
Fix Windows 10 PFN LIST CORRUPT BSOD Error