When using a printer, you may encounter the issue of "Printer in Error State". This article will introduce effective methods to help you quickly resolve the printer error state problem.
1. Check Hardware Connections
Ensure that the printer's power plug is securely inserted and that the power switch is turned on. Check the printer's indicator lights to confirm that the device is powered.
Make sure the USB cable or network cable is intact and properly connected to both the printer and the computer. If using a wireless printer, ensure it is connected to the same Wi-Fi network.
If you are using a multifunction device, confirm that other functions (such as scanning and copying) are working properly to rule out hardware failure.
2. Update Printer Drivers
Outdated or corrupted printer drivers can lead to connection issues, so it is important to update the drivers promptly. We recommend using Driver Sentry to automatically detect driver updates, saving time and avoiding the risk of downloading or installing incorrect drivers.
Click the download button to get the latest version of Driver Sentry. After installation, open the software and click "Scan".

After the scan completes, it will show which drivers are not installed or need updating. Find the printer driver in the results list and click the "Upgrade" button.
After the update is complete, it is advisable to restart your computer to ensure the updated driver functions correctly.
3. Restart the Printer and Computer
Turn off the printer and wait a few minutes before turning it back on to ensure the device can reinitialize.
Completely shut down the computer, wait a few minutes, and then restart it to check if the printer can be recognized by the system again.
4. Check Printer Status
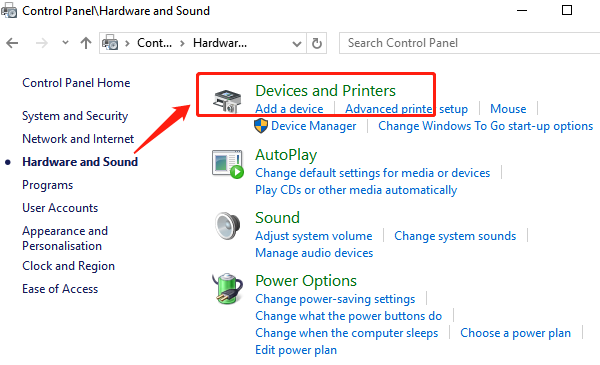
In the Windows search box, type "Control Panel" and open it.
Click on "Devices and Printers" to locate your printer.
Ensure that the printer's status is not "Offline" or "Error". If it shows "Offline", right-click the printer icon and select "Use this device" to restore the connection.
5. Check Print Spooler Service
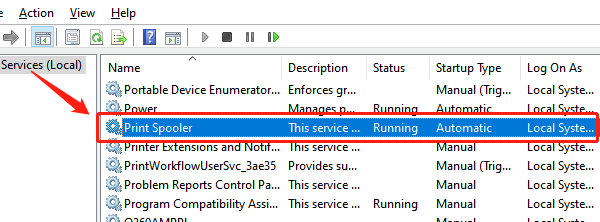
Press Win + R, type "services.msc", and press Enter.
Find the "Print Spooler" service in the list and ensure that it is running.

If it is not running, right-click the service and select "Start".
Right-click the "Print Spooler" service, select "Properties", choose "Automatic" from the Startup Type dropdown, and then click "Apply" and confirm.
6. Reset the Printer
In "Devices and Printers" in the Control Panel, right-click the printer icon and select "Printer Properties".

Depending on the brand and model of the printer, there may be options for "Reset" or "Restore Factory Settings". Follow the prompts to reset.
After resetting, you will need to reconfigure the printer connections and settings.
7. Run the Printer Troubleshooter
Press Win + I to open Windows Settings, and select "Update & Security".
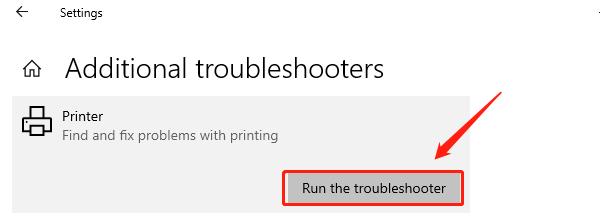
In the left menu, select "Troubleshoot", then choose "Additional troubleshooters".
Find "Printer" and click "Run the troubleshooter" to start the troubleshooting process.

The system will automatically detect and attempt to fix printer issues, following the on-screen prompts.
8. Update Windows System
Press Win + I and select "Update & Security".
In "Windows Update", click "Check for updates" to search for available updates.
If updates are available, follow the prompts to install them, and restart your computer after completion.
By following these steps, you should be able to effectively resolve printer issues. If the problem persists, it is advisable to contact the printer manufacturer's technical support for further assistance.
See also:
How to Fix Dread Hunger Crashing Issues
8 Methods to Fix Persistent Crashes in Ghostwire: Tokyo