WiFi adapter driver issues can cause network disconnections, unstable signals, and slow speeds. This article offers solutions to help you fix these problems and restore a stable connection.
1. Update Network Drivers
Outdated or faulty network drivers are common causes of wireless connection issues. Regular driver updates can solve many potential compatibility problems. Using Driver Sentry for automatic detection and updates saves time and helps prevent incorrect driver installations.
Click the download button for the latest version of Driver Sentry, install and open the software, then click "Scan".

After scanning, locate the network driver in the results list and click "Upgrade".
Restart your computer after the update to ensure the new driver is active.
2. Check Wireless Driver Status
Press Windows + X and select "Device Manager".
Expand the "Network Adapters" category, and find your wireless adapter (usually labeled with "Wi-Fi" or "Wireless").
Right-click the wireless adapter and select "Properties".
Under the "Driver" tab, check the driver's version and date, and ensure the status shows as normal.
3. Reset Network Settings
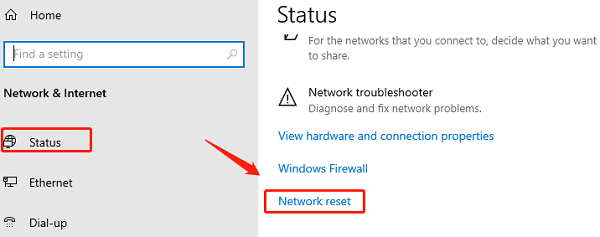
Press Windows + I to open Settings, and select "Network & Internet".
In the left menu, go to "Status", scroll down, and click "Network reset".

Click "Reset now". Windows will prompt you to restart your computer.
After the reset, Windows will restore the network adapter to its default settings and reinstall the network drivers. Note that you may need to reconfigure Wi-Fi connections after the reset.
4. Reset Winsock and TCP/IP Stack
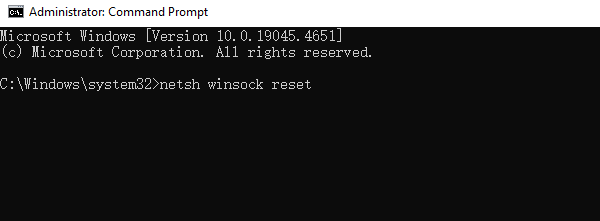
Type "Command Prompt" in the search box, right-click, and open it as an administrator.
In the Command Prompt, enter the following commands, pressing Enter after each:
netsh winsock reset
This resets the Winsock catalog, fixing potential network protocol issues.

netsh int ip reset
This command resets the TCP/IP protocol stack, addressing many common connection issues.
Restart your computer to apply the changes.
5. Check Adapter Power Management Settings
Press Windows + X and select "Device Manager".
Locate your wireless adapter in "Network Adapters", right-click, and choose "Properties".
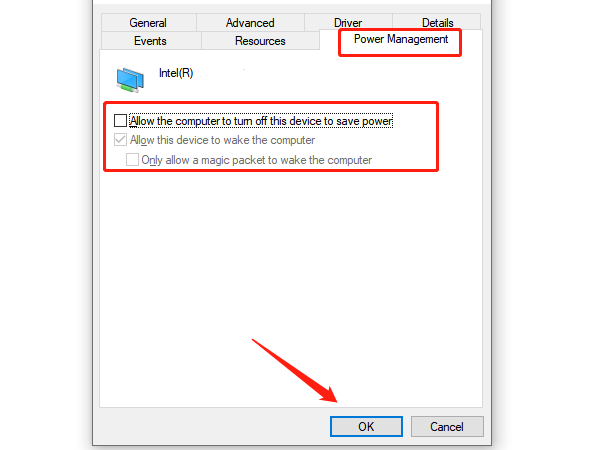
In the properties window, go to the "Power Management" tab.
Uncheck "Allow the computer to turn off this device to save power".

Click "OK" to save the changes. This setting prevents the OS from disabling the wireless adapter during inactivity.
6. Run Windows Network Troubleshooter
Press Windows + I to open Settings, and select "Update & Security".
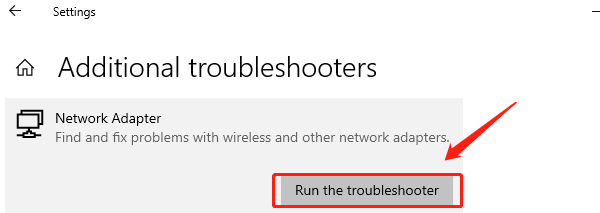
In the left menu, choose "Troubleshoot" and click "Additional troubleshooters".
Find "Network Adapter", then click "Run the troubleshooter".

Windows will automatically check for network adapter and connection issues and attempt to fix them. If any issues are detected, it will suggest solutions or fix them automatically.
7. Check for Hardware Issues
For external USB wireless adapters, ensure the adapter plug is secure; try unplugging and re-plugging the adapter.
Try connecting the adapter to another USB port on your computer to rule out port damage.
If you have a backup wireless adapter, switch out your current one to check for hardware faults.
If hardware issues are confirmed, consider contacting the device manufacturer for support or replacing the adapter.
Following these steps can help you diagnose and resolve various Wi-Fi adapter issues, ensuring a stable network connection. If problems persist, consider seeking professional technical support.
See also:
How to Fix Bluetooth Speaker No Sound Issue
8 Ways to Fix Realtek Microphone Not Working