Many Windows 11 users face WiFi disconnection issues. This article offers detailed solutions to help you quickly fix the problem and restore stable network connectivity.
1. Check Network Adapter and Router
Right-click the Start menu and select Device Manager.
Expand Network Adapters and check if the wireless adapter is functioning properly. If you see a yellow warning icon, it may indicate a driver issue.
Ensure the router is turned on and functioning properly. If there are issues, try restarting the router by unplugging it, waiting 30 seconds, then plugging it back in and allowing it to fully restart.
Make sure the router is not overloaded with too many connected devices, which could cause signal interruption.
Check the router's WiFi settings, ensuring MAC address filtering is not enabled and the signal is not hidden.
2. Update Drivers
Outdated or corrupted network adapter drivers may be a major cause of WiFi disconnections. Ensure that your network adapter drivers are up to date. We recommend using Driver Sentry to automatically detect and update drivers, saving you time and avoiding the risk of downloading incorrect drivers.
Download the latest version of Driver Sentry, install it, and open the software. Click "Scan" to check for outdated drivers.

Once the scan is complete, locate the network adapter driver and click "Upgrade".
After updating, it is recommended to restart your computer to ensure the updated drivers take effect.
3. Reset Network Settings
Open Settings and click "Network & Internet".
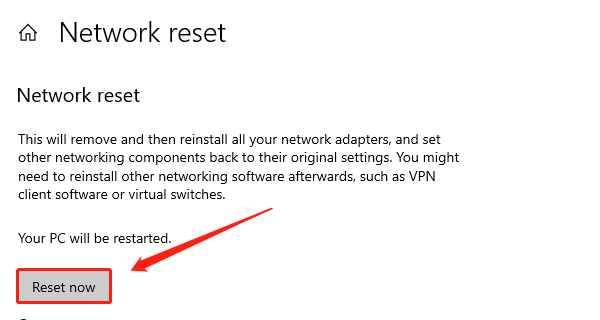
In the left menu, select Status, scroll down, and click "Network Reset".
In the pop-up dialog, click "Reset Now" and confirm the reset.

This will reset all network adapters and settings, including WiFi passwords, so you will need to reconnect to your WiFi network.
4. Use Command Line Tools to Fix Network
Press Windows + X, and select Command Prompt (Admin) or Windows PowerShell (Admin).
Enter the following commands, pressing Enter after each one:
netsh int ip reset (This resets the TCP/IP stack).
netsh winsock reset (This resets the Winsock catalog to fix network-related issues).

ipconfig /flushdns (This clears the DNS cache to resolve DNS resolution issues).
After running these commands, restart your computer and check if the WiFi connection issue is resolved.
5. Run Network Adapter Troubleshooter
Open Settings and select "Update & Security".
In the left menu, click Troubleshoot, then select "Additional Troubleshooters".
Locate "Network Adapter" and click "Run the troubleshooter".
The system will automatically detect and fix any network adapter-related problems. Follow the on-screen instructions to complete the troubleshooting.
6. Adjust Power Management Settings
Open Device Manager, find your wireless network adapter, right-click it, and select Properties.
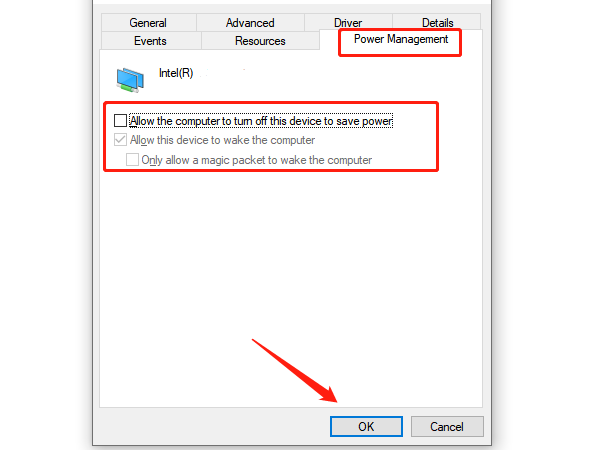
Switch to the Power Management tab.
Uncheck "Allow the computer to turn off this device to save power".

This will prevent the computer from turning off the network adapter, which could cause WiFi disconnections.
7. Disable IPv6
Press Windows + R, type "ncpa.cpl", and press Enter to open the Network Connections window.
Right-click your current WiFi connection and select Properties.
In the list of network components, find "Internet Protocol Version 6 (TCP/IPv6)" and uncheck it.
Click OK to save the changes.
Disabling IPv6 may resolve certain network connection issues.
8. Restart WLAN AutoConfig Service
Press Windows + R, type "services.msc", and press Enter to open the Services Manager.
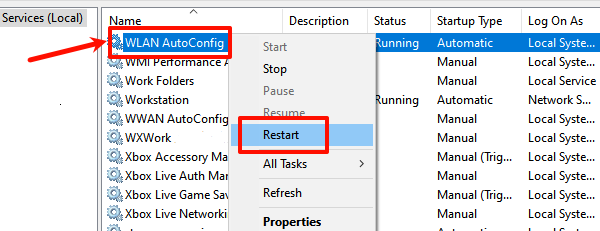
In the list, find WLAN AutoConfig and right-click it, then select Restart.

If the service is not started, right-click and select Start.
WLAN AutoConfig is responsible for managing wireless network connections, and restarting this service can sometimes resolve connectivity issues.
9. Change WiFi Properties
Press Windows + R, type "ncpa.cpl", and press Enter to open the Network Connections window.
Right-click your current WiFi connection and select Properties.
Click the Configure button, then switch to the Advanced tab.
In the advanced settings, check and modify the following options (if necessary):
Transmit Rate: Ensure the transmit rate matches your wireless network speed.
Wireless Mode: Choose the wireless standard supported by your router (e.g., 802.11g/n/ac).
Channel Width: Set the channel width to 20 MHz or 40 MHz to avoid automatic settings that may lead to unstable connections.
After completing these steps, reconnect to the WiFi network to see if the connection issue is resolved.
By following these steps, you can resolve your WiFi connection issue and restore a stable network. If the problem continues, contact your ISP or a technician for further assistance.
See also:
How to Fix Black Screen with Cursor Issue in Windows 11
How to Fix Scanner Not Working Issues