Audio issues on Windows 10 can disrupt playback or microphone use. This guide offers effective methods to restore normal audio functionality.
Method 1: Check for Driver Updates
Outdated or corrupted drivers are one of the main causes of audio problems. Updating your audio drivers is an important step to resolve Windows sound issues. Using Driver Sentry for automatic detection and updates can save time and prevent errors during installation.
Download the latest version of Driver Sentry. After installation, open the software and click "Scan".

After the scan, a list of missing or outdated drivers will appear. Locate the audio driver and click "Upgrade".
Restart your computer after the update to ensure the new driver functions properly.
Method 2: Check Basic Settings
Confirm the volume is not muted:
Click the volume icon in the bottom-right corner of the taskbar and ensure the volume slider is not at the lowest setting.
Use the volume up key on your keyboard (usually F8 or F12) to increase the volume.
Check the default audio device:
Right-click the volume icon on the taskbar and select "Sound Settings".
Under "Choose your output device", make sure the correct audio device is selected.
Test the audio device:
Click "Device Properties" in the Sound Settings and test the audio output.
Check physical connections:
If using headphones or external speakers, ensure the device is properly plugged into the computer's audio jack.
Method 3: Restart Audio Services
Press Win + R, type "services.msc", and press Enter.
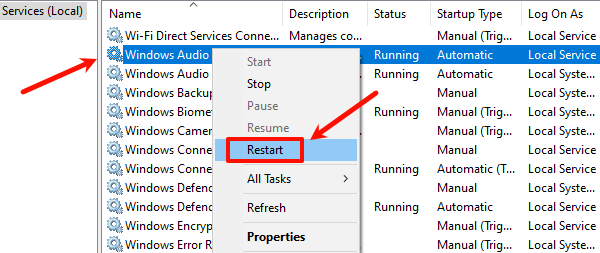
In the services list, find "Windows Audio" and "Windows Audio Endpoint Builder".
Right-click "Windows Audio" and select "Restart".

If the service is not running, select "Start".
Right-click each service, select "Properties", set the startup type to "Automatic", and click "OK" to save.
Restart your computer and check if the issue is resolved.
Method 4: Check Audio Format Settings
Right-click the volume icon on the taskbar and select "Sounds".
In the "Playback" tab, select the currently used audio device and click "Properties".
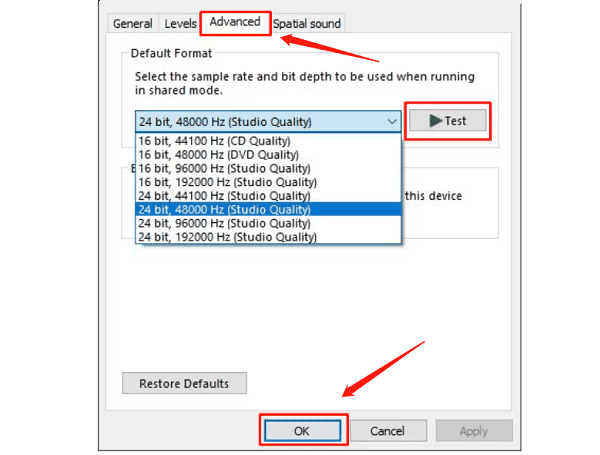
Go to the "Advanced" tab, and under "Default Format", select a different format (e.g., 24-bit, 44100 Hz or 16-bit, 48000 Hz).

Click "Test" to check if the audio works properly.
If the new format works, click "OK" to save.
If not, try other formats until you find one that works.
Method 5: Disable Audio Enhancements
Right-click the volume icon on the taskbar and select "Sounds".
In the "Playback" tab, select the current audio device and click "Properties".
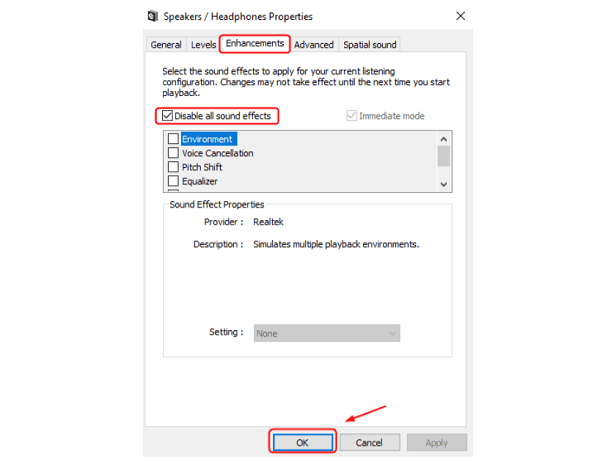
Navigate to the "Enhancements" tab and check "Disable all enhancements".

If this option is unavailable, look for similar settings in your driver software.
Click "OK" to save, then test the audio to see if the issue is resolved.
Method 6: Check Speaker Settings
Right-click the volume icon on the taskbar and select "Sounds".
In the "Playback" tab, select the default device and click "Configure".
Follow the wizard to select the correct speaker setup (e.g., Stereo or 5.1 Surround Sound).
Click "Test" to ensure audio is correctly output from the speakers.
Click "Next", enable or disable additional options based on your setup, and click "Finish".
Method 7: Run Audio Troubleshooter
Press Win + I to open "Settings".
Navigate to "System > Troubleshoot > Other Troubleshooters".
Locate "Playing Audio" and click "Run the Troubleshooter".
The system will automatically detect audio problems and provide recommendations.
Follow the on-screen instructions and check if the issue is resolved.
If the troubleshooter doesn't fix the problem, restart your computer to ensure settings take effect.
Using the methods above, you can effectively resolve audio issues. If the problem persists, consider hardware checks or updating audio drivers.
See also:
How to Fix The application was unable to start correctly
Fix Windows Key Not Working on Windows 10