Many Windows 10 users experience screen flickering issues. This article offers effective solutions to fix the problem and restore normal computer operation.
1. Update Drivers
Outdated or corrupted graphics drivers are a common cause of screen flickering in Windows 10. Keeping your graphics drivers updated can help effectively reduce screen flickering. It is recommended to use Driver Sentry to automatically detect and update drivers, saving time and avoiding the risk of downloading or installing incorrect drivers.
Click the download button to get the latest version of Driver Sentry. After installation, open the software and click "Scan".

After scanning, it will display the drivers that are missing or need to be updated. Find the graphics driver in the results list and click the "Upgrade" button.
Once the update is complete, it is recommended to restart your computer to ensure that the updated drivers take effect.
2. Check Hardware Connections
Before handling hardware connection issues, ensure the computer is fully powered off and unplugged to avoid electrical shocks or hardware damage.
Open the case and check if the RAM is securely inserted. If necessary, remove the RAM, clean the gold fingers, and reinsert it.
Ensure that the graphics card is properly seated in the PCI slot and check if the power connection is stable. If the graphics card has an external power connector, ensure the power cable is properly connected.
Make sure the hard drive data cable and power cable are not loose. The hard drive's power indicator should light up. You can unplug the data cable and power cable, then plug them back in to ensure a secure connection.
If you have external devices (such as printers, USB devices, etc.), unplug all external devices and restart the system to see if the issue is resolved.
3. Adjust Display Refresh Rate
Right-click on the desktop and select "Display Settings".
In the Display Settings window, find and click on "Advanced Display Settings".
Click on the "Display Adapter Properties" link to enter the graphics card settings.
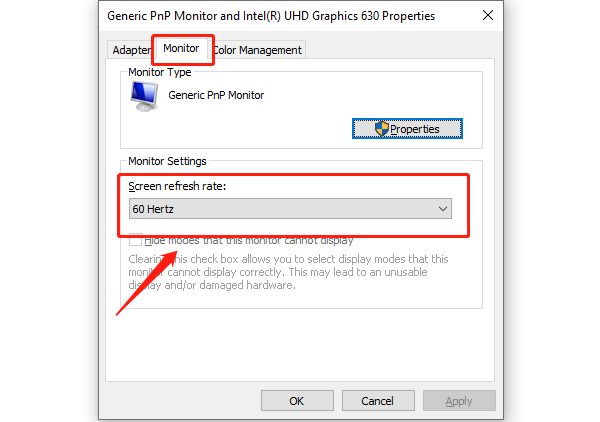
In the pop-up window, go to the "Monitor" tab.
In the "Monitor" tab, you will see the current refresh rate of your display. Use the dropdown menu to select an appropriate refresh rate, usually 60Hz or higher (if supported by your display).

After selecting the appropriate refresh rate, click "Apply" and confirm the changes.
Restart the computer and observe the display. If the screen flickering is resolved, the adjustment was successful.
4. Run Windows Memory Diagnostic Tool
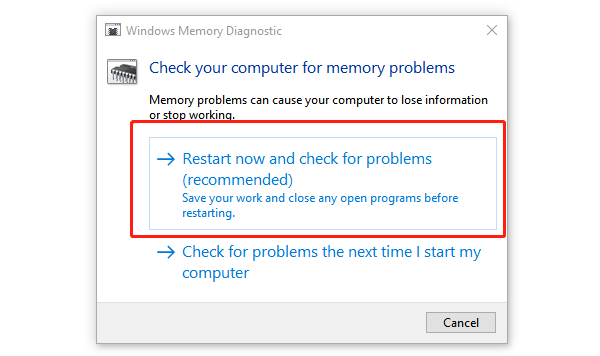
Press Win + S, type "Windows Memory Diagnostic" in the search box, and click on the result.
In the window, click on "Restart now and check for problems". The computer will restart and perform a memory test.

If memory issues are detected, the system will provide relevant information and suggest replacing the faulty memory module.
5. Uninstall Problematic Applications
Press Win + I to open "Settings", then select "Apps".
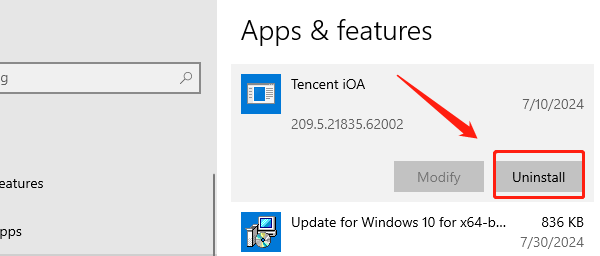
In the apps list, find the application you suspect may be causing the issue. If you're unsure, try uninstalling recently installed applications.
Click on the application you want to uninstall and select the "Uninstall" button.

Follow the prompts to complete the uninstallation. Some applications may require a restart to complete the uninstallation.
After restarting, check if the issue is resolved.
6. Check for System Updates
Press Win + I to open "Settings", then select "Update & Security".
In the "Windows Update" tab, click "Check for updates".
The system will check for available updates. If updates are found, click "Download and install".
After the update is complete, restart your computer to ensure all updates take effect.
Follow these steps to fix the screen flickering issue in Windows 10. If the problem persists, contact professional technical support for further help.
See also:
Guide to Fixing a Non-Working Mouse