
The black screen issue is common for Windows 11 users, disrupting work and potentially causing data loss or system failure. This article offers effective methods to resolve the problem and quickly restore normal computer use.
Method 1: Check Power and Restart
Ensure the power cable and monitor are properly connected without loose or damaged connections.
For laptops, check if the power adapter works and the battery is charged.
Hold the power button for 5-10 seconds to turn off the computer, wait, then restart to check if the black screen is resolved.
Method 2: Update Graphics Card Drivers
Faulty or incompatible graphics card drivers can often cause black screen issues on Windows 11. It's recommended to use Driver Sentry to automatically detect and update drivers, saving time and avoiding errors.
Download the latest version of Driver Sentry, install and open the software, then click "Scan".
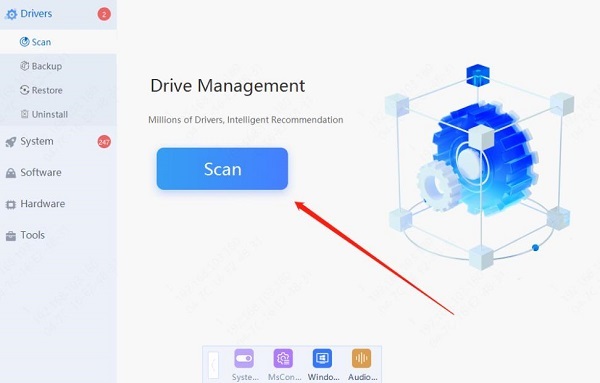
After scanning, a list of drivers requiring updates will be displayed. Locate the graphics card driver and click "Update".
Once the update is complete, restart the computer to ensure the new driver works properly.
Method 3: Adjust Power Settings
Press Win + X and select "Power Options", then click on "Additional power settings".
Next to the current power plan, click "Change plan settings".
Click "Change advanced power settings", and in the new window, locate "Processor power management".
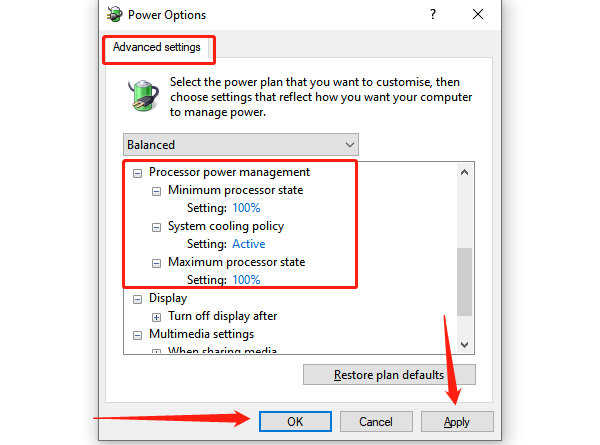
Ensure both the minimum and maximum processor states are set to 100%.
Save the changes, restart the computer, and check if the issue is resolved.
Method 4: Disconnect External Devices
Sometimes external devices may cause a black screen, especially if they conflict with display output.
Disconnect all external devices, including USB drives, external monitors, headphones, keyboards, and mouse.
Restart the computer and observe whether the black screen disappears. If resolved, reconnect the devices one by one to identify if one of them is causing the issue.
Method 5: Enter Safe Mode
Press and hold the power button for 5-10 seconds to turn off the computer.
Press and hold the power button again until the Windows logo appears, and it will automatically enter the Windows Recovery Environment (WinRE).
In the recovery environment, select "Troubleshoot" > "Advanced options" > "Startup settings" > "Enable Safe Mode".
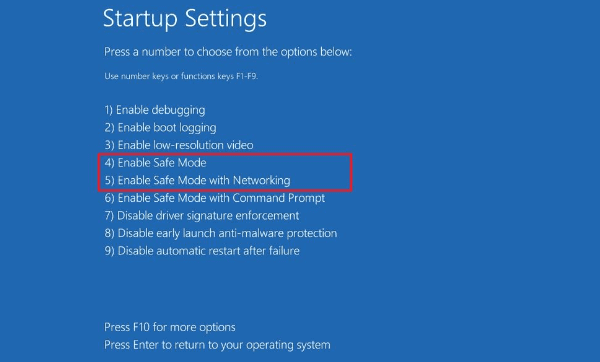
In Safe Mode, update or uninstall problematic drivers, or perform system repairs.
Check whether the black screen persists. If it doesn't, it may indicate a driver or software conflict.
Method 6: Check for System Updates
Press Win + I to open "Settings", and go to "Update & Security".
Click "Windows Update" and then "Check for updates".
If updates are available, click "Download and install".
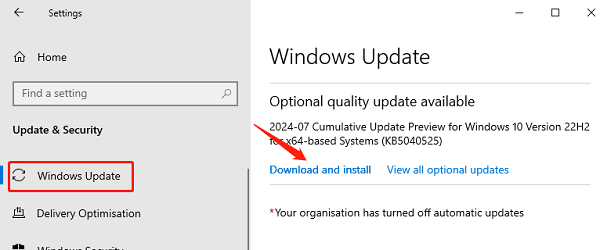
After installation, restart the computer and see if the issue is resolved.
Method 7: Reset the System
Press Win + I to open "Settings", and go to "Update & Security".
Find the "Recovery" option and click "Get started" under "Reset this PC".
Choose "Keep my files" or "Remove everything", and follow the on-screen instructions.
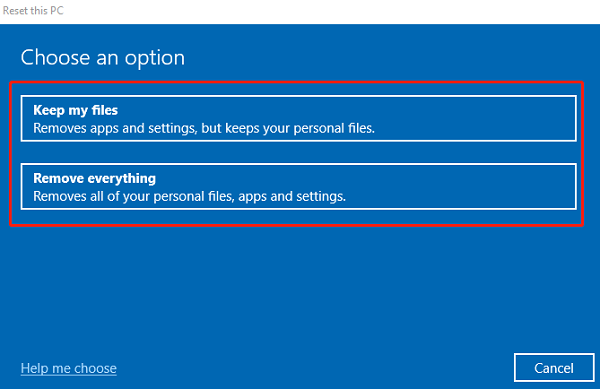
The system will automatically reset, and after completion, restart the computer to check if the problem is fixed.
These methods should resolve most Windows 11 black screen issues. If the problem persists, professional technical support or further hardware inspection may be required.
See also:
How to Fix Star Wars Outlaws Crashing Issues
Guide to Adjusting Logitech Mouse Sensitivity
How to Fix No Sound on an External Monitor Connected via HDMI