Experiencing no sound in Windows 11 is a common issue for many users. This article provides detailed solutions to help you quickly resolve this problem and restore a normal audio experience.
1. Check Audio Device Connection
If you're using wired headphones or speakers, make sure the audio cable is properly connected to your computer's headphone or audio output jack. Ensure the plug is fully inserted to avoid any looseness.
For desktop computers, verify that the headphones or speakers are connected to the correct audio port (the green port is usually for audio output).
If you're using Bluetooth headphones or wireless speakers, ensure the device is properly paired and connected to the computer. You can check the Bluetooth connection status in Windows settings. Also, make sure the device is turned on and in pairing mode.
If possible, test with other headphones or speakers to confirm whether the issue lies with the audio device itself.
2. Update Audio Drivers
Outdated or damaged audio drivers can cause headphones or speakers to malfunction. Regularly updating drivers can help prevent such issues. Driver Sentry is recommended for automatically detecting and updating drivers, saving time and reducing the risk of incorrect installations.
Download the latest version of Driver Sentry, install the software, and click "Scan".

After scanning, you'll see any missing or outdated drivers. Find the audio driver in the list and click "Upgrade".
Once updated, restart your computer to ensure the new driver is fully functional.
3. Restart the Computer
Sometimes, temporary system issues can cause audio problems. Restarting your computer can help resolve these.
Click the "Start" menu, select "Restart", and test your audio device once the system reboots.
4. Set the Default Output Device
Set the default audio output device:
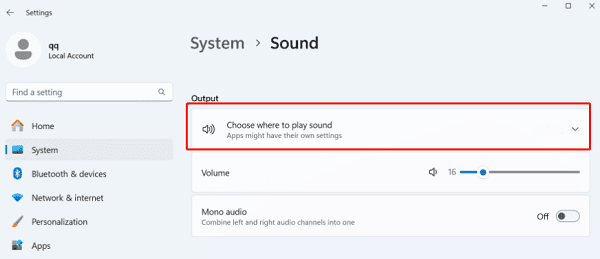
Open "Settings", go to "System" > "Sound".
In the "Output" section, click "Choose where to play sound", and select the correct output device (such as speakers or headphones). Ensure the device you are using is selected.

Check if the audio device is disabled:
In the "Sound" settings, click "Device Properties" to check the status of your audio device. If it's disabled, click to enable it.
Ensure the system is using the intended output device, not another one.
Set the device as default through Control Panel:
In Windows, right-click the volume icon on the taskbar, select "Sound Settings", and click "Playback devices".
Select the device you want to use, right-click it, and choose "Set as Default Device".
5. Check Volume Settings
Ensure the volume icon on the taskbar isn't muted. Click the icon to check the volume slider and ensure it's not set too low.
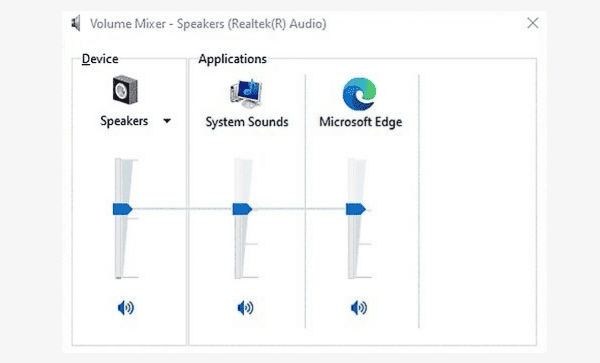
Windows 11 allows you to adjust volume individually for each application. Click "Open Volume Mixer" next to the volume icon on the taskbar to view each application's volume settings and make sure none are muted.

Some audio devices, like speakers or headphones, have physical volume controls. Check the device's volume button to ensure it's set to an appropriate level.
6. Restart Audio Services
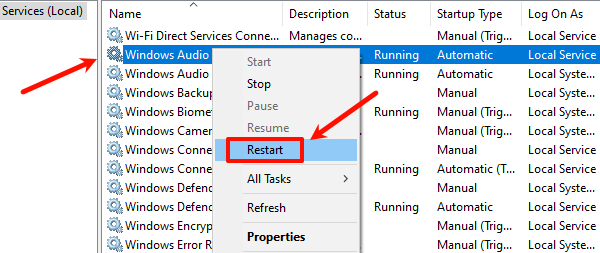
Press "Win + R", type "services.msc", and press Enter to open the Services Manager.
Find the "Windows Audio" service in the list, right-click it, and select "Restart". If the service isn't running, right-click it and select "Start".

Right-click "Windows Audio", select "Properties", and ensure the startup type is set to "Automatic". This will ensure the audio service loads automatically at startup.
In the Services Manager, also locate "Windows Audio Endpoint Builder" and other audio-related services to confirm they're running. If not, right-click the service and select "Start".
7. Run Built-In Audio Troubleshooter
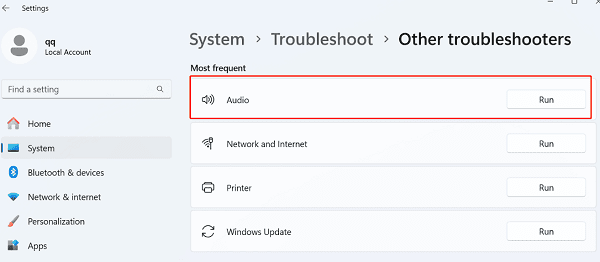
Open "Settings", go to "System" > "Troubleshoot" > "Other Troubleshooters".
In the list, find the "Audio" option and click "Run". The system will automatically detect and attempt to fix any audio issues.

If Windows detects an issue, it will provide solutions or automatically fix the problem with the audio device. Follow the prompts to see if the problem is resolved.
8. Check for System Updates
Open "Settings", go to "Update & Security" > "Windows Update", and click "Check for updates".
If updates are available, download and install them. Restart the computer after installation to check if the audio is working properly.
These steps should fix most audio issues in Windows. If the problem continues, try restoring your system to an earlier point or contact technical support.
See also:
Fix a Crashed Windows Computer
8 Methods to Fix Windows 10 Taskbar Not Working