Many Windows 11 users may experience slow internet speeds, affecting their regular network usage. This article provides detailed steps to help you fix network slowness and restore normal internet speeds.
1. Check Network Hardware Connection
If you're using a wired connection, ensure that the Ethernet cable is securely connected and undamaged. If the cable appears worn or broken, consider replacing it with a new one.
Confirm that your router and modem are properly connected, with the indicator lights on and stable. Unusual blinking lights may indicate an unstable connection.
Unplug the router and modem, wait a few minutes, then plug them back in. After the devices reboot, try reconnecting.
2. Update Network Drivers
Outdated or damaged network drivers are common causes of slow internet speeds. Updating your network drivers can often improve performance. Using Driver Sentry to automatically detect and update drivers can save time and reduce the risk of installing incorrect drivers.
Download the latest version of Driver Sentry, install it, open the software, and click "Scan".

Locate the network driver in the scan results and click "Upgrade".
After updating, restart your computer to ensure the new drivers take effect.
3. Restart Your Computer
Save any ongoing work to avoid data loss from the restart.
Click the "Start" menu, select the "Power" icon, and choose "Restart".
After the computer reboots, check if the network connection is more stable and faster.
4. Test Internet Speed
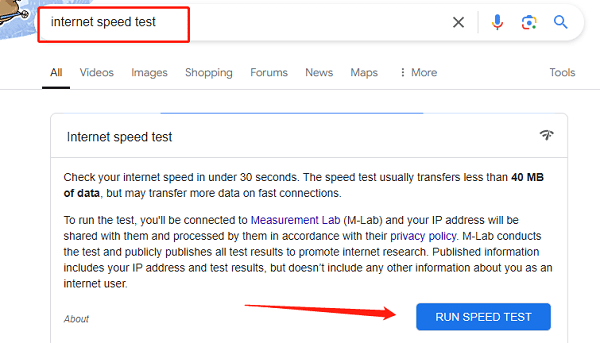
Open a browser and go to a speed test website, such as Speedtest.

Click the "RUN SPEED TEST" button and wait for the test to complete. The tool will display download speed, upload speed, and latency.
If the measured speed is significantly lower than your internet plan's expected speed, there may be an issue with your ISP. Consider contacting ISP support for further assistance.
5. Disable Peer-to-Peer Updates
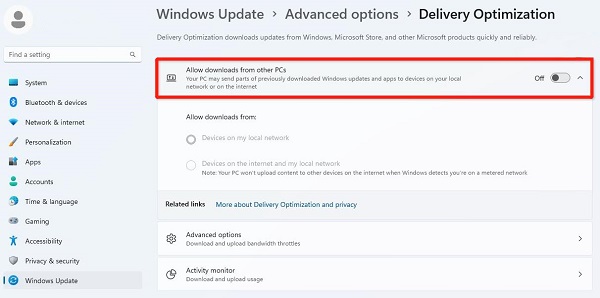
Open "Settings" and select "Update & Security".
In the left menu, choose "Windows Update" and click "Advanced options".
Select "Delivery Optimization" in Advanced options.
Turn off "Allow downloads from other PCs" to prevent Windows from using P2P for updates, reducing network load.

6. Disable Windows Auto-Tuning
In the "Start" menu, search for "Command Prompt", right-click it, and select "Run as administrator".
Enter the following command in the command prompt and press Enter:
netsh int tcp set global autotuninglevel=disabled
Restart the computer to ensure the setting takes effect.

Check if network speed has improved. To re-enable auto-tuning, use the following command:
netsh int tcp set global autotuninglevel=normal
7. Disable Large Send Offload
Right-click the "This PC" icon and select "Manage".
In the "Computer Management" window, open "Device Manager".
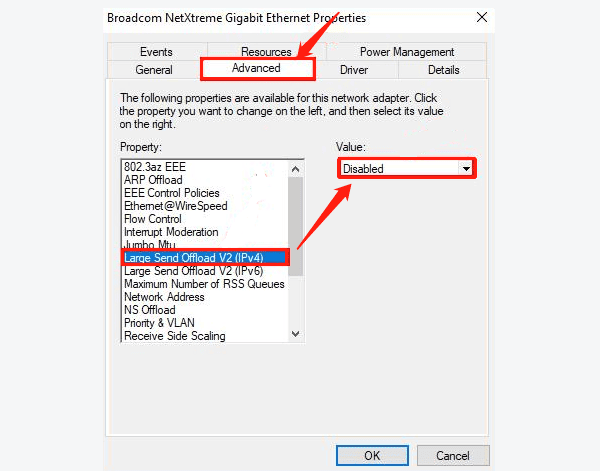
Expand the "Network adapters" list, locate your network adapter, right-click it, and select "Properties".
In the "Advanced" tab, find "Large Send Offload v2 (IPv4)" and "Large Send Offload v2 (IPv6)" options, and set them to "Disabled".

Click "OK" to save changes and close the window.
Restart the computer and check if the network speed has improved.
8. Use Network Troubleshooter
Open "Settings", click "Network & Internet".
Select the "Status" tab on the left, then find "Network troubleshooter" on the right.
Run the troubleshooter, which will automatically check your current network settings and attempt to fix detected issues.
Follow any prompts from the tool and complete the necessary steps.
After completing the process, check if network speed has improved.
By following these steps, you can effectively improve the stability and speed of your network connection. If the issue persists, consider contacting your ISP or further checking for possible hardware issues.
See also:
How to Fix Bluetooth Speaker No Sound Issue
8 Ways to Fix Realtek Microphone Not Working