Many Windows users may encounter high CPU usage, often caused by drivers. This article provides a guide to resolve the issue and restore normal performance.
What is High CPU Usage
High CPU usage refers to a situation where the computer's central processing unit (CPU) runs at or near 100% utilization for extended periods. This can lead to slower computer response times and even cause lagging or freezing. When the system's CPU resources are overused, other programs may fail to run properly.
1. Update Device Drivers
Outdated or corrupted drivers are one of the common causes of high CPU usage. Updating your drivers can resolve many issues related to high CPU usage. We recommend using Driver Sentry to automatically detect and update drivers, saving time while avoiding the risks of downloading or installing incorrect drivers.
Click the download button to get the latest version of Driver Sentry, install the software, and click "Scan".

After scanning, it will show which drivers are missing or need updating. Find the driver that needs updating and click the "Upgrade" button.
Once the update is complete, restart your computer to ensure the updated drivers take effect.
2. Disable Windows Driver Foundation Service
Press the Windows logo key + R to open the Run dialog, type "service.msc", and press Enter.
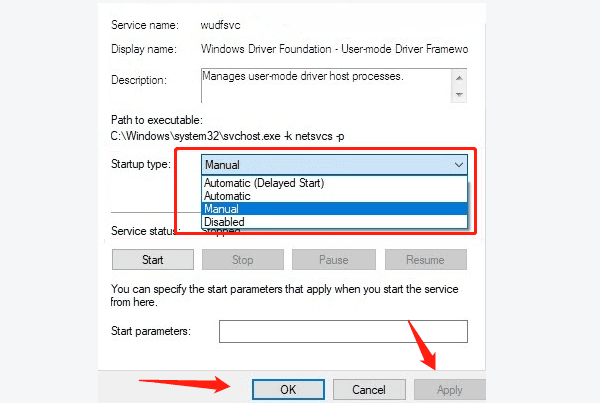
In the window that opens, scroll down to find "Windows Driver Foundation – User-mode Driver Framework".
Right-click this service and select "Properties".
Change the startup type to "Disabled" or "Manual", then click "Apply" and "OK".

If the CPU usage decreases after stopping the service, you can confirm that this service is causing the issue.
Note: Disabling this service may cause certain hardware devices to malfunction, so check system functionality after using it.
3. Perform a Clean Boot
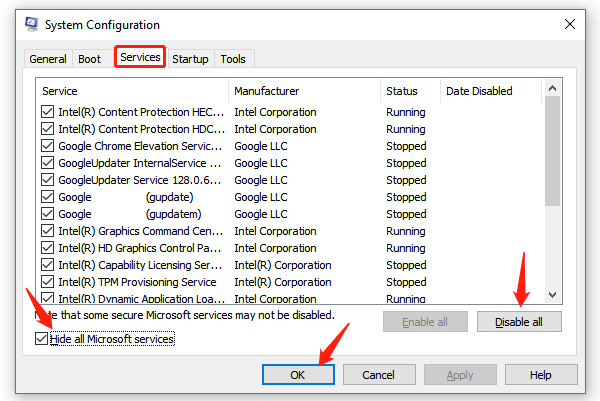
Press Win + R to open the Run dialog, type "msconfig", and press Enter.
In the "System Configuration" window, go to the "Services" tab.
Check "Hide all Microsoft services", then click "Disable All".

Switch to the "Startup" tab and click "Open Task Manager".
In the Task Manager, disable all unnecessary startup items.
Return to the "System Configuration" window, click "OK", and restart the computer.
After restarting, check if CPU usage has decreased. If the issue is resolved, gradually enable services and startup items to identify the program causing high CPU usage.
4. Run the System File Checker
Press Win + S to open the search box, type "Command Prompt", right-click the result, and select "Run as administrator".
In the Command Prompt, type the following command and press Enter: sfc /scannow
The system will scan and repair any corrupted system files. This may take some time.
Once the scan is complete, restart the computer and check if CPU usage is normal.
5. Check and Fix Hardware Issues
Run the Disk Check Tool:
In the search box, type "Command Prompt", right-click and select "Run as administrator".
Type the following command and press Enter: chkdsk C: /f /r

This will check and fix errors on the hard drive.
Run the Memory Diagnostic Tool:
Press Win + R to open the Run dialog, type "mdsched.exe", and press Enter.
Select "Restart now and check for problems".
If there are hardware issues, it is recommended to contact professional technical support or replace the faulty components.
6. Perform a System Restore
Press Win + R to open the Run dialog, type "rstrui", and press Enter.
In the "System Restore" window, choose a restore point before the issue occurred.
Click "Next", then follow the on-screen instructions to complete the restore process.
After the system restore is complete, restart the computer and check if CPU usage is back to normal.
By following these steps, you can diagnose and fix the issue, restoring your computer's performance. If the problem persists, seek professional technical support for further help.
See also:
HP Printer Driver Unavailable Fix Guide
How to Fix Brother Printer Not Printing on Windows 10