In Windows 10, the Windows key may stop working. This guide provides methods to quickly fix the issue and restore functionality.
1. Check Keyboard Drivers
Outdated or corrupted drivers can cause the Windows key to malfunction. Checking for driver updates is an important step to ensure your keyboard functions properly. Driver Sentry can automatically detect and update drivers, saving time and preventing errors caused by installing incorrect drivers.
Install the latest version of Driver Sentry. Open the software and click "Scan".

After the scan, locate the keyboard driver in the results and click the "Upgrade" button.
After the update, restart your PC to ensure the new driver is applied successfully.
2. Check the Physical Condition of the Keyboard
Inspect the Windows Key:
Check if the Windows key is stuck or damaged.
Use compressed air to clean the keyboard, removing any dust or debris around the keys.
Change USB Port or Reconnect:
If using a wired keyboard, plug it into a different USB port.
For wireless keyboards, replace the batteries or re-pair the device.
Test on Another Device:
Connect your keyboard to another computer and test the Windows key.
Alternatively, connect a different keyboard to your current PC to see if the issue persists.
3. Restart Windows Explorer
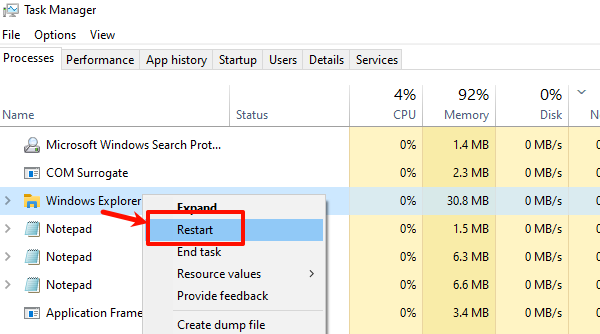
Press Ctrl + Shift + Esc or right-click the taskbar and select "Task Manager".
Under the "Processes" tab, scroll down to find "Windows Explorer".
Right-click it and select "Restart".

After Explorer reloads, test if the Windows key works.
4. Disable Filter Keys
Press Win + I, then navigate to "Ease of Access > Keyboard".
Locate the "Filter Keys" option and ensure it is turned off.
If it's on, disable it.
Alternatively, press and hold the Right Shift key for 8 seconds to toggle Filter Keys off.
5. Fix via the Registry
Press Win + R, type "regedit", and hit Enter.
Navigate to Keyboard Layout Settings:
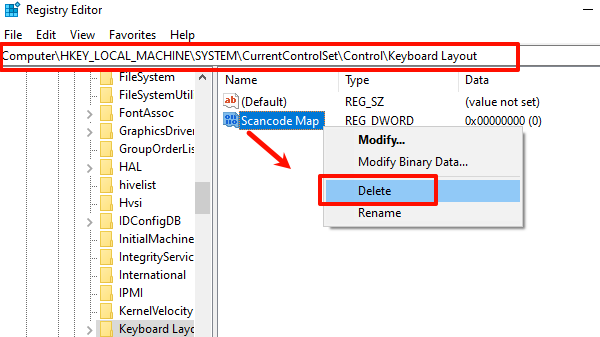
HKEY_LOCAL_MACHINE\SYSTEM\CurrentControlSet\Control\Keyboard Layout
Look for a value named "Scancode Map" in the right panel.
If it exists, right-click it and select "Delete".

Close the Registry Editor and reboot your PC to apply the changes.
6. Disable Gaming Mode
Check Keyboard for a Gaming Mode Switch.
If present, turn it off.
Disable Gaming Mode in "Windows Settings".
Press Win + I, go to "Gaming > Game Mode".
Ensure Game Mode is turned off.
7. Run System File Checker (SFC)
Press Win + S, search for "cmd", right-click Command Prompt, and select "Run as administrator".
Enter the following command: sfc /scannow

Wait for the process to complete.
Run DISM (if needed):
If SFC doesn't resolve the issue, run the following command: DISM /Online /Cleanup-Image /RestoreHealth
Restart the computer after completing the repair.
8. Check Group Policy Settings
Press Win + R, type "gpedit.msc", and press Enter.
Navigate to Keyboard Settings: User Configuration > Administrative Templates > Windows Components > File Explorer
Locate the setting "Turn off Windows Key hotkeys".
Ensure it is set to "Not Configured" or "Disabled".
Click "Apply" and then "OK".
Restart your computer to apply the changes.
Follow these steps to troubleshoot and fix Windows key issues. If the problem persists, contact hardware support or reinstall the system.
See also:
Guide to Fix Low Volume in Windows 10