
Many Windows users may face update failures, with error code 0x80070643 being common. This article offers solutions to help you quickly fix this issue and restore normal updates.
Method 1: Restart the Computer
Click the "Start" menu, select the "Power" button, and choose "Restart".
After restarting, try running Windows Update again to see if the problem is resolved.
Method 2: Update Drivers
Outdated or corrupted drivers can cause update errors, so it's crucial to keep drivers up to date. It is recommended to use Driver Sentry to automatically detect and update drivers, saving time and avoiding incorrect driver installations.
Click the download button to get the latest version of Driver Sentry, install it, then open the software and click "Scan".
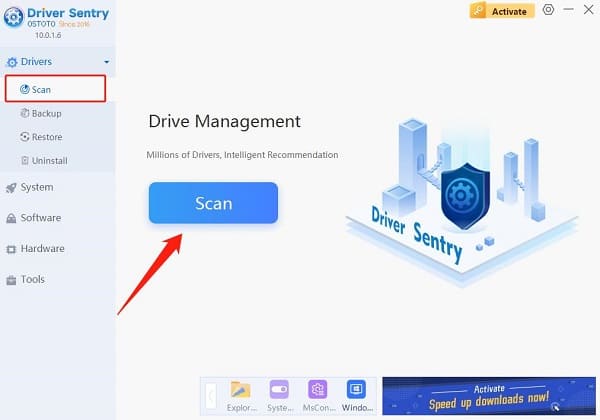
Once the scan is complete, you will see which drivers need installation or updates. In the result list, find the drivers that need updating and click the "Update" button.
After the update is complete, restart the computer to ensure the updated drivers take effect and re-run Windows Update.
Method 3: Repair the .NET Framework
Press "Win + R", type "Control Panel", and press Enter.
Select "Programs and Features", then click "Turn Windows features on or off" on the left. Uncheck ".NET Framework 3.5" and ".NET Framework 4.x", then click "OK".
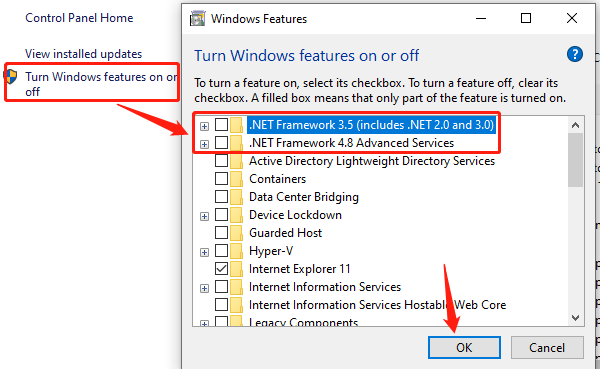
Restart the computer, reopen "Turn Windows features on or off", recheck .NET Framework, and click "OK" to install.
After installation, restart the computer and try running Windows Update again.
Method 4: Rebuild Windows Recovery Partition
Open Command Prompt as an administrator, type "reagentc /disable" to disable the recovery partition, and press Enter.
Type "diskpart" and press Enter.
Execute the "list disk" command to list all disks.
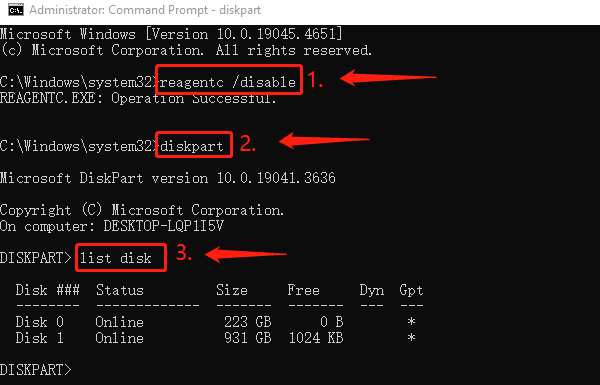
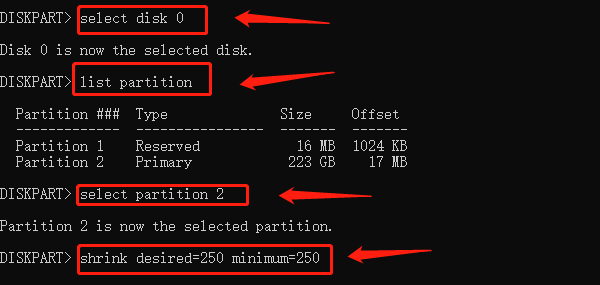
Select the disk with the operating system. For example, if it's Disk 0, type "select disk 0" and press Enter.
Type "list partition" to list partitions on the disk.
Select the main partition, type "select partition 2" and press Enter.
Shrink the partition by typing "shrink desired=250 minimum=250" and pressing Enter.
Select the recovery partition by typing "select partition 3" and pressing Enter (the "Recovery" partition is usually marked).
Type "delete partition override" and press Enter to delete the recovery partition.
Check the disk partition style:
If the GPT column has a star (*), type "create partition primary id=de94bba4-06d1-4d40-a16a-bfd50179d6ac", then "gpt attributes =0x8000000000000001".
If it's MBR, type "create partition primary id=27".
Type format quick fs=ntfs label="Windows RE tools" and press Enter to format the partition.
Execute "list vol" to confirm the recovery partition has been created.
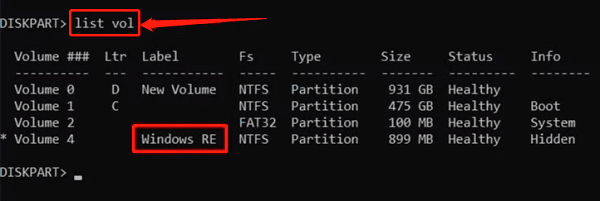
Type "exit" and press Enter to exit Diskpart.
Type "reagentc /enable" and press Enter to re-enable the recovery partition.
Enter "reagentc /info" to confirm the recovery partition is correctly configured. If the status shows "Enabled", the recovery partition is working correctly.
Finally, restart your computer and try downloading Windows Update again; the error code 0x80070643 should no longer appear.
Method 5: Run Windows Update Troubleshooter
Press "Win + I" to open "Settings" and click "Update & Security".
From the left-hand menu, select "Troubleshoot", then click "Additional troubleshooters".
Find the "Windows Update" option and click "Run the troubleshooter".
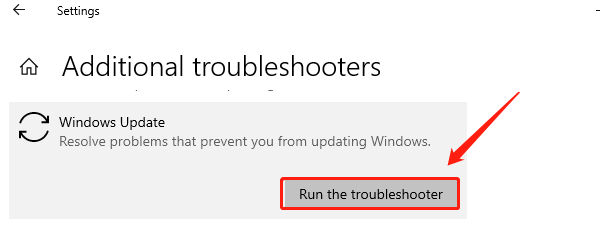
Follow the on-screen instructions to complete the repair process, and restart the computer when finished.
Following these steps should resolve Windows Update error 0x80070643. If the issue persists, check system files or contact support. We hope this guide helps you complete your updates!
See also:
How to Download and Install Sound Card Drivers
Common Causes and Solutions for Windows Blue Screen of Death