GIGABYTE Control Center is a popular system management tool for users of GIGABYTE motherboards and laptops. It supports key functions such as adjusting fan speeds, RGB lighting effects, and power modes.
However, many users have encountered issues where the Control Center fails to start or becomes unresponsive, negatively affecting the user experience. This article provides a variety of practical solutions to help you quickly resolve the issue and restore smooth system management.
1. Reinstall GIGABYTE Control Center
Press the Windows + R keys simultaneously on your keyboard, type "appwiz.cpl", and press Enter.
Locate "GIGABYTE Control Center" in the list, and click "Uninstall".
Restart your computer.
Open your browser and search for "Download Gigabyte Control Center".
On the GIGABYTE Control Center page, click "Download Now" to download the installer.
After installation, restart your PC and try launching the Control Center again.
2. Check for Driver Updates
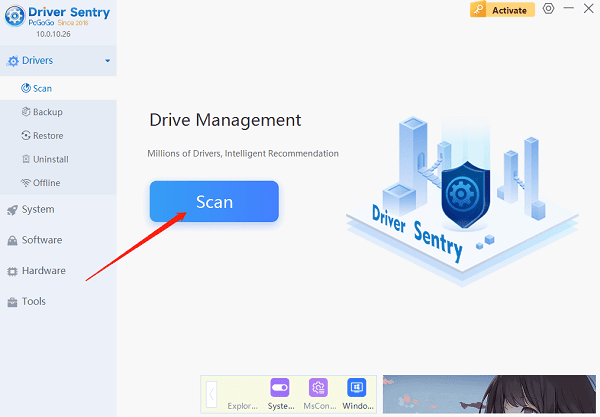
GIGABYTE Control Center relies on drivers to communicate with your system components. Outdated or corrupted drivers may cause it to malfunction. It's recommend to use Driver Sentry to automatically detect and update your drivers—saving time and reducing the risk of downloading the wrong versions.
Click the download button to get the latest version of Driver Sentry. After installing, open the software and click "Scan".

Once scanning is complete, you'll see a list of missing or outdated drivers. Click the "Upgrade" button next to the relevant drivers.
After updating, restart your PC to apply the changes.
3. Run as Administrator
Locate the GIGABYTE Control Center shortcut on your desktop.
Right-click the icon and select "Properties".
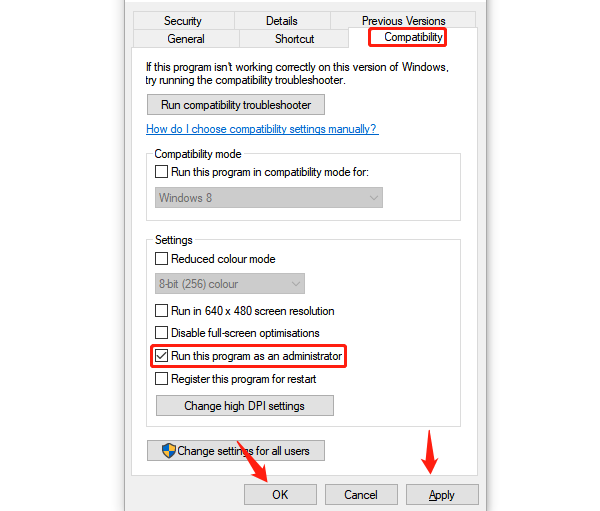
Go to the "Compatibility" tab and check "Run this program as an administrator".

Click "Apply", then "OK".
Try launching the software to see if it works.
4. Install Microsoft .NET Framework & C++ Redistributables
Install Microsoft .NET Framework:
Visit the official Microsoft .NET Framework download page.
Choose the latest version (usually listed at the top).
Click to download the .NET 4.8.1 Runtime.
Run the installer, and restart your PC after installation.
Install Visual C++ Redistributables:
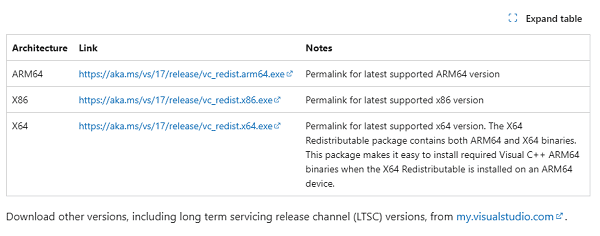
Visit the official Microsoft Visual C++ Redistributables download page.
You will find packages for ARM64, x86 (32-bit), and x64 (64-bit) under Visual Studio 2015, 2017, 2019, and 2022.

Choose the version that matches your system architecture and download it.
Run each installer and restart your computer.
5. Perform a Clean Boot
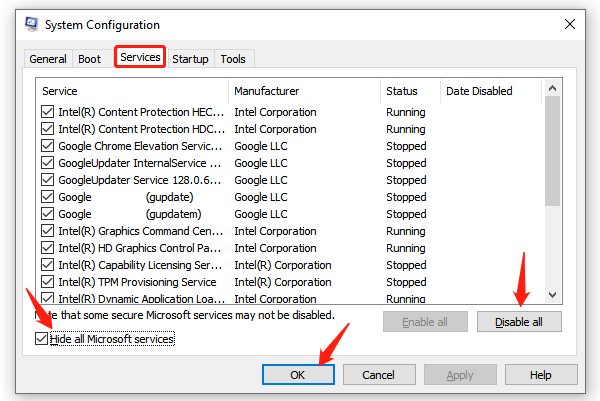
Press Win + R, type "msconfig", and press Enter.
Under the Services tab, check "Hide all Microsoft services", then click "Disable all".

Go to the Startup tab and click "Open Task Manager".
Disable all startup items.
Restart your PC and try launching GIGABYTE Control Center again.
6. Temporarily Disable Windows Defender
Click the Start menu in the bottom-left corner, then go to "Settings" > "Update & Security" > "Windows Security".
Click "Virus & threat protection" > "Manage settings".
Turn off "Real-time protection". Confirm the warning prompt.
Note: Disabling your antivirus software temporarily can pose risks. Only do this if the software source is trusted and during troubleshooting.
Frequently Asked Questions
1. What systems are supported by GIGABYTE Control Center?
It supports 64-bit versions of Windows 10 and Windows 11. Keeping your OS up to date is recommended.
2. What if the software still doesn't work after reinstallation?
Ensure that all chipset drivers and runtime libraries are up to date, and try running the software as an administrator.
3. Will GIGABYTE Control Center affect system performance?
It should not affect performance under normal operation. If you notice unusual resource usage, consider updating to the latest version or contacting GIGABYTE support.
By following the steps above, most issues can be resolved easily. Keeping your system and drivers up to date is the best way to prevent such problems. If the issue persists, we recommend contacting GIGABYTE Technical Support for further assistance.
See also:
Solutions to Fix the Windows 11 Unidentified Network Issue
Solutions to Fix WiFi Connected but No Internet Issue