When the computer is first turned on, the Wi-Fi connection may not be enabled automatically, which requires you to manually install the appropriate Wi-Fi driver to ensure a smooth network connection. This article will detail the steps on how to install Wi-Fi drivers on a new computer.
1. Confirm That the Wi-Fi Hardware is Installed
Before installing the Wi-Fi driver, you first need to confirm whether your new computer is equipped with Wi-Fi hardware. Most modern laptops and desktops already have built-in Wi-Fi adapters, but some low-cost desktops may require an external Wi-Fi adapter. You can check this by following these steps:
Press "Win+X" and select "Device Manager".
Expand the "Network Adapters" section to see if there are any Wi-Fi adapters listed (e.g. Intel, Realtek or Broadcom Wi-Fi adapters). If you see "Wireless Network Adapter" or a similar entry, the computer is equipped with Wi-Fi hardware.
If there is no entry for a Wi-Fi adapter, your computer may not have a built-in Wi-Fi module, or the module is disabled.
2. Install Drivers Using Driver Sentry
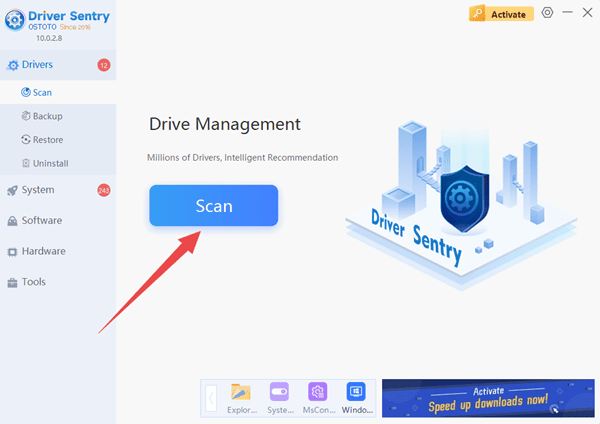
Driver Sentry is a popular driver update tool that automatically scans your computer and provides appropriate driver updates.
Simply download and install Driver Sentry and run the scan.

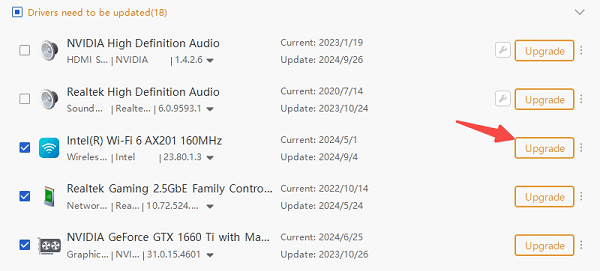
The software will automatically identify your computer's hardware model and provide relevant driver updates. Find your Wi-Fi driver and click the "Upgrade" button.

3. Automatic Installation of Wi-Fi Drivers
Most operating systems (e.g. Windows 10 and Windows 11) will try to automatically recognize and install the Wi-Fi driver after installation. Here are the steps to install the driver automatically:
If your computer has a wired network connection (via an Ethernet cable to your router), first connect to the network. This helps the operating system to download the required drivers from Windows Update.
After connecting to the network, Windows usually downloads and installs Wi-Fi drivers for your hardware automatically. You can check the progress of the installation in Device Manager.
If the system successfully installs the driver, you should be able to see the Wi-Fi icon and connect to the wireless network through it. If it didn't install automatically, the next step is to install the driver manually.
4. Manually Download the Wi-Fi Driver
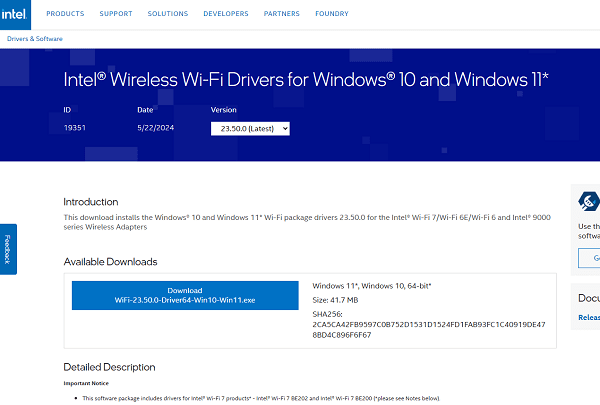
If the system fails to install the driver automatically, you can manually download and install the driver from the Wi-Fi adapter manufacturer's official website.
In Device Manager, right-click the wireless device under Network Adapters and select Properties to view the device details (such as model number and hardware ID).
Download the appropriate driver from the manufacturer's official website according to the device model. Make sure to download the driver that matches your operating system version.

Once the download is complete, run the installation file and follow the instructions of the installation wizard. Most driver installation programs will automatically detect the hardware and install it.
Once the installation is complete, restart your computer and the Wi-Fi adapter should be recognized correctly and you can start connecting to the wireless network.
5. Confirm Wi-Fi Connection
After installing the driver, restart your computer and then follow the steps below to check the Wi-Fi connection:
Click the Wi-Fi icon on the taskbar to view the list of available networks.
Select your wireless network and enter the password to connect.
If the Wi-Fi connection works, your computer should be able to access the Internet without any problems. If it still doesn't connect, try checking your router settings, restarting your network devices, or double-checking that the drivers are installed correctly.
These are the steps to install Wi-Fi drivers on a new computer, hope it helps you.
See also:
How to Fix Bluetooth Speaker No Sound Issue
8 Ways to Fix Realtek Microphone Not Working