There's nothing more annoying than sitting down to type, only to find that your keyboard isn't working. If you're dealing with the frustrating issue of your "keyboard not typing letters", you're not alone. Many Windows 10 and 11 users have encountered this problem, but the good news is that there are several ways to fix it. In this blog, we'll walk you through four effective methods to get your keyboard typing again.

4 Ways to Fix Keyboard Not Typing
1. Restart Your PC
One of the simplest and most effective ways to fix a "keyboard not typing" issue is to restart your PC. Sometimes, the keyboard or the system can get stuck, which prevents the keyboard from functioning properly. A restart can clear up these temporary glitches.
For Windows 10 and 11 users, it's easy to restart your PC. Just click on the Start button, which is usually located at the bottom-left corner of your screen. Then, click on the power icon. A menu will pop up, and you can select "Restart" from the options. Wait for your PC to shut down and restart completely.
Once the system has restarted, verify whether your keyboard functions properly. Try opening a text editor or a browser and type a few words. If the keyboard still won't type, don't worry. There are other methods you can try.
2. Check Keyboard Drivers
Outdated or damaged keyboard drivers are often the culprit behind a "keyboard not typing" problem. You can either reinstall or update the driver to fix this issue.
Reinstall the Keyboard Driver
-Right-click on the Start button. A menu will appear, and you should select "Device Manager" from the list.
-In the Device Manager window, look for the "Keyboards" category and click on the arrow next to it to expand the list.
-Right-click on your keyboard driver and select "Uninstall device". A confirmation window will pop up; click "Uninstall" to proceed.
-After uninstalling the driver, restart your PC. When your computer boots up, Windows will automatically install the keyboard driver again. This fresh installation might fix the "keyboard wont type" problem.
Update the Keyboard Driver
- Right-click on the Start button and choose "Device Manager" to open the Device Manager again.
-Find your keyboard driver in the "Keyboards" category, right-click on it, and select "Update driver".
-Windows will give you two options: "Search automatically for updated driver software" and "Browse my computer for driver software". Choose the first option, and Windows will start searching for the latest driver for your keyboard.
-Follow the on-screen instructions to complete the update process.
If you're not comfortable with manually updating or reinstalling the driver, PcGoGo Driver Sentry can be a great alternative. PcGoGo Driver Sentry is a powerful tool that can automatically scan your system for outdated or damaged drivers, including your keyboard driver. It will subsequently download and install the appropriate drivers on your behalf.
To use PcGoGo Driver Sentry:
-First, download and install the software from the official PcGoGo website.
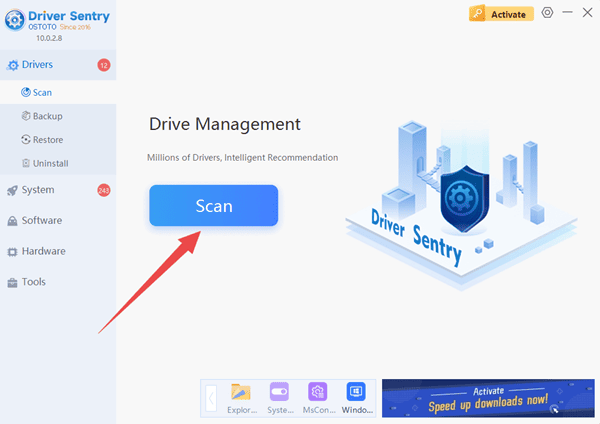
-Open PcGoGo Driver Sentry and click the "Scan" button. The software will scan your computer and identify any driver issues.
-After the scan is complete, look for the keyboard driver in the list of detected problems. Click the "Update" or "Reinstall" button (depending on what's needed) next to the keyboard driver.
-PcGoGo Driver Sentry will then take care of the rest. It will download the appropriate driver and install it on your computer.

3. Adjust Keyboard Settings
In Windows 10, some built-in keyboard features can sometimes cause "keyboard wont type" problems. Features like Sticky Keys, Toggle Keys, and Filter Keys are designed to help users with disabilities, but they can interfere with normal keyboard operation if enabled accidentally.
To check and adjust these settings:
-First, click on the Start button. Then, type "Ease of Access" in the search bar and select it from the results.
-In the Ease of Access settings, scroll down until you find the "Keyboard" section.
-Here, you'll see options for "Use Sticky Keys", "Use Toggle Keys", and "Use Filter Keys". Make sure that the status of all these options is set to "Off". If any of them are turned on, simply toggle the switch to turn them off.
After making these changes, try using your keyboard again. If the problem was due to these settings, your keyboard should start typing normally. If that doesn't work, proceed to the next solution.

4. Change USB Keyboard Port
If you're using a USB keyboard and the above methods haven't worked, there's one more thing you can try. Sometimes, the USB port you're using might be faulty or experiencing issues. To check if this is the case:
-Unplug your USB keyboard from the current port.
-Insert it into another USB port on your computer. It could be a port on the front, back, or side of your PC, depending on your computer's design.
-Once you've plugged it in, wait a moment for your computer to detect the keyboard. Then, try using your keyboard again. If the problem was with the original USB port, your keyboard should start typing normally when connected to the new port.
Conclusion
The "keyboard not typing letters" problem can be a real pain, but with these four methods, you should be able to get your keyboard working again. Whether it's a simple restart, adjusting settings, dealing with the driver, or changing the USB port, there's a solution for you. And don't forget about PcGoGo Driver Sentry, which can be a great asset in keeping your drivers up-to-date and preventing future keyboard issues. If you've tried all these methods and your keyboard still won't type, it might be time to consider getting a new keyboard or seeking further technical assistance. But for most cases, these steps should do the trick. So, give them a try and get back to typing without any hassle.