
Was your Lenovo keyboard not working before? It's a common headache for many Lenovo laptop users, but don't worry. There are several effective ways to get your keyboard back in working order. In this blog, we'll walk you through various methods to fix the "Lenovo keyboard not working" problem.

5 Methods to Fix Lenovo Keyboard Not Working
Method 1: Restart Your Computer
The simplest solution is often the most effective. Restarting your Lenovo laptop can clear temporary glitches that might be causing the keyboard to misbehave. Many hardware-related issues can be resolved with a simple restart.
Just click the "Restart" option in the Windows start menu. If your Lenovo keyboard not responding happens, you can use the mouse to navigate. After the laptop restarts, check if the keyboard works. Try typing a few words or using some common keyboard shortcuts. If the problem persists, don't worry. There are more methods to try.

Method 2: Update the Keyboard Driver
Driver problems are a common cause of a Lenovo keyboard not working. Outdated or corrupt drivers can prevent the keyboard from communicating properly with your laptop.
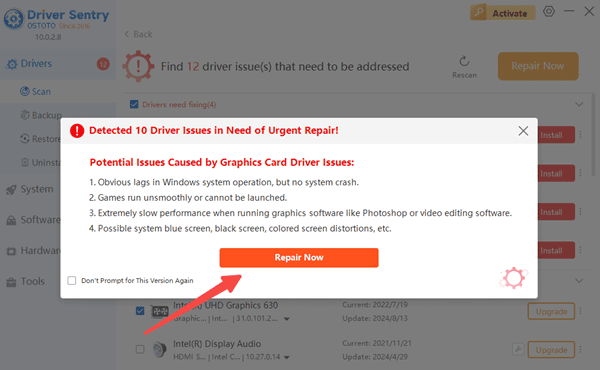
PcGoGo Driver Sentry is a powerful tool that can automatically scan your system for outdated drivers. It then downloads and installs the correct ones, ensuring your devices work smoothly. Here's how to use it:
First, download and install PcGoGo Driver Sentry from the official PcGoGo website.
Launch the program. Once it's open, click the "Scan" button. Driver Sentry will start scanning your computer to identify any driver issues.
After the scan is complete, look for the keyboard driver in the list of detected problems. Click the "Update" button next to it. PcGoGo Driver Sentry will then download the latest and compatible driver for your Lenovo keyboard.
Restart your laptop after the update. This allows the new driver to take effect. If it is working now, great! If not, move on to the next method.
If you prefer to update the driver manually, it's a bit more complicated. You need to visit the Lenovo official website, find the support section, and search for the latest keyboard driver for your laptop model. Make sure to select the correct Windows version. Then download and install the driver. But this method requires more time and computer skills, and there's a risk of downloading the wrong driver.
Method 3: Press Problem Keys Diagonally
Sometimes, specific keys of your keyboard not working on Lenovo laptop
might happen. In such cases, a simple trick could help. Try pressing the problem keys diagonally, specifically on the lower-left side of the key, for a few seconds.
This method has worked for some users. It might seem strange, but it can sometimes fix minor mechanical issues with the keys. For example, if the "A" key isn't working, press the lower-left corner of the "A" key firmly for about 3-5 seconds. Then try typing the letter "A" again. If it works, you're in luck. If not, keep trying other methods.
Method 4: Remove the Battery and Power Cable
This method is a bit more involved, but it has proven effective for many Lenovo laptop users experiencing keyboard problems.
First, shut down your laptop properly. Make sure all your work is saved.
Unplug the power cable from your laptop. In case your laptop has a detachable battery, remove it. If it's a built-in battery, this step might be a bit more challenging, but you can still try to perform a hard reset.
Press and hold the power button for about 60 seconds. This drains any remaining power in the laptop's circuits.
After 60 seconds, put the battery back in (if removed) and plug the power cable back in.
Turn on your laptop. Check if the keyboard is working. This method can sometimes reset the hardware and fix keyboard-related issues.
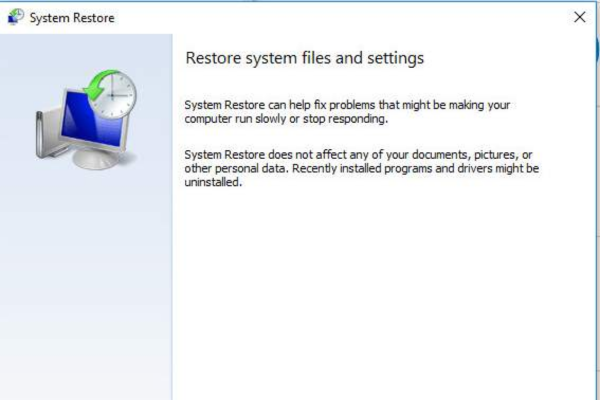
Method 5: Perform a System Restore
If your keyboard not working on Lenovo laptop after you updated Windows or installed new software, a system restore could be the solution. But this method requires you to have created restore points in advance.
Press the Windows logo key and the "R" key on your keyboard simultaneously. This opens the Run dialog box.
Type "control" in the Run box and press Enter. This opens the Control Panel.
In the Control Panel, set the view to "Small icons" and click on "System".
On the left-hand side of the System window, click "System protection".
Click "System Restore" in the System Protection window.
Click "Next" in the System Restore window.
Select a restore point from the list. Choose a restore point that was created before the keyboard problem started. You can identify it by the date and time.
Click "Next" again, then click "Finish".
Confirm the restore by clicking "Yes".
Your laptop will reboot. After the reboot, check if your keyboard is working.
Conclusion
Dealing with a Lenovo keyboard not working can be frustrating, but with these methods, you should be able to resolve the issue. If you've tried all of them and your Lenovo keyboard not responding persists, it might be a hardware problem, and you may need to contact Lenovo's customer support. And remember, PcGoGo Driver Sentry can be your go-to tool for keeping your drivers updated and preventing future issues.
