On a Windows computer, a Logitech wireless mouse may sometimes stop working unexpectedly, affecting normal operations. This article introduces several solutions to help you quickly fix the issue and restore normal mouse functionality.
1. Check Basic Connections
Ensure the Mouse Is Turned On: First, check if the switch at the bottom of the mouse is turned on (usually labeled ON / OFF). Some Logitech mouse have a power-saving mode, which may require toggling the switch off and on again to reactivate the device.
Replace or Recharge the Battery: If your mouse uses replaceable batteries, try installing new ones. If it has a built-in rechargeable battery, ensure it is fully charged and properly connected.
Reinsert the USB Receiver: Remove the receiver, wait for one minute, and then reinsert it into a USB 3.0 or 2.0 port. Try different USB ports, as some ports may not provide sufficient power for the mouse to function correctly.
2. Check for Driver Updates
Outdated or corrupted drivers can cause the Logitech wireless mouse to malfunction. Ensuring your drivers are up to date can effectively resolve issues related to driver problems. It is recommended to use Driver Sentry to automatically detect and update drivers, saving time and avoiding the risk of installing incorrect drivers.
Click the Download button to get the latest version of Driver Sentry. Install and open the software, then click "Scan".

After the scan is complete, the software will display missing or outdated drivers. Locate the mouse driver in the list and click "Upgrade".
Once the update is finished, restart your computer to ensure the new driver takes effect.
3. Reconnect the Logitech Mouse
Using Logitech Options:
Visit the official Logitech website, download, and install Logitech Options software.
Open the software and click Add Device.
Press and hold the connect button on the bottom of the mouse (some models do not have this button, in which case proceed to the next step).
Select your mouse from the list and click Pair to complete the connection.
Using Logitech Unifying (For Unifying Receiver Models):
Download and install Logitech Unifying Software.
Open the software and click Pair a Device.
Press and hold the pairing button on the bottom of the mouse for 3 seconds until the LED indicator starts flashing.
Select your mouse from the list, click Finish, and test if the mouse is working.
4. Run Windows Troubleshooter
Press Win + I to open Settings, then go to "Update & Security" > "Troubleshoot".
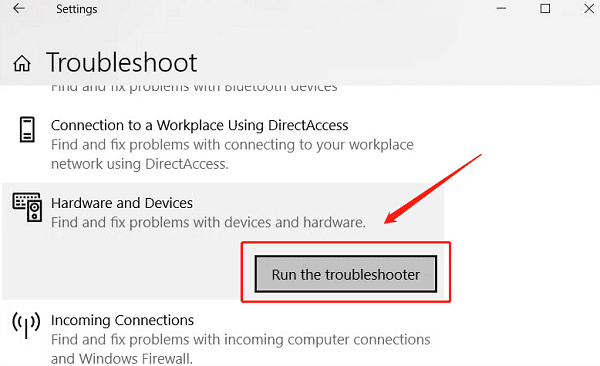
Click "Additional Troubleshooters", find "Hardware and Devices".
Click "Run the troubleshooter" and wait for Windows to complete the repair.

After the repair is finished, restart your computer and check if the mouse is working properly.
5. Adjust Power Management Settings
Press Win + X and select "Device Manager".
Expand "Mice and other pointing devices", right-click your mouse device, and select "Properties".
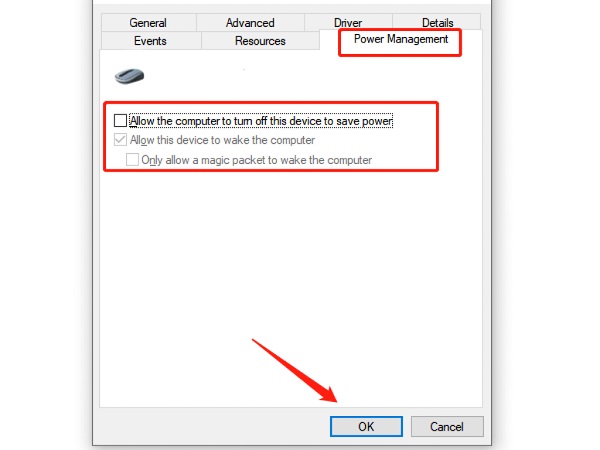
In the pop-up window, go to the "Power Management" tab.
Uncheck "Allow the computer to turn off this device to save power", then click "OK".

Restart your computer and check if the mouse disconnection issue is resolved.
6. Try Replacing the Mouse or Receiver
Plug the Logitech wireless receiver into another computer's USB port for testing. If the mouse still does not work, it may be faulty.
Try replacing the USB receiver. Some Logitech mouse support purchasing a separate Unifying receiver for re-pairing.
By following the above methods, you should be able to quickly troubleshoot and fix the Logitech wireless mouse not working issue. If the problem persists, consider contacting Logitech customer support or a professional technician for further assistance.
See also:
Resolve Bluetooth audio stuttering issue on Windows 10
Ways to resolve the "Audio Device is Disabled" issue
How to fix Marvel Rivals crashing on PC
Methods to resolve the "Vanguard Not Initialized" issue in Valorant