Some Windows 11 users may experience no sound. This article provides quick and effective solutions to fix the issue and restore audio functionality.
1. Update Audio Drivers
Outdated or corrupted audio drivers are a common cause of sound issues in Windows. Updating the audio driver is an essential step in fixing no sound problems. We recommend using Driver Sentry for automatic driver detection and updates, which saves time and reduces the risk of downloading or installing incorrect drivers.
Click the download button to get the latest version of Driver Sentry. After installation, open the software and click "Scan".

Once the scan is complete, the list will show which drivers are missing or need updating. Find the audio driver and click the "Upgrade" button.
After updating, restart your computer to ensure the new driver takes effect.
2. Check Volume Settings
Click the volume icon in the taskbar to check if the sound is muted. If the mute icon appears, click to unmute it.
Use the volume control keys on your keyboard to adjust the volume to an appropriate level.
Also, check the volume settings within individual apps. For example, in a media player, ensure that the app's volume is not muted or set too low.
3. Check Audio Output Device
Press the Windows key + I to open Settings.
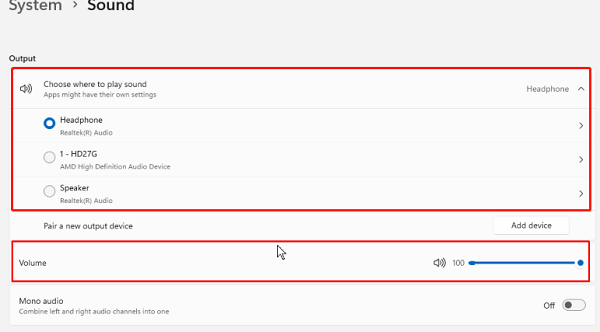
Go to "System" > "Sound".
Under the "Output" section, locate "Choose where to play sound", and select the correct device (e.g., speakers or headphones) from the dropdown list.

Test the audio output to check if it's working. If the device is not listed, check the device connection and reinsert it.
4. Restart Windows Audio Services
Press Win + R, type "services.msc", and press Enter.
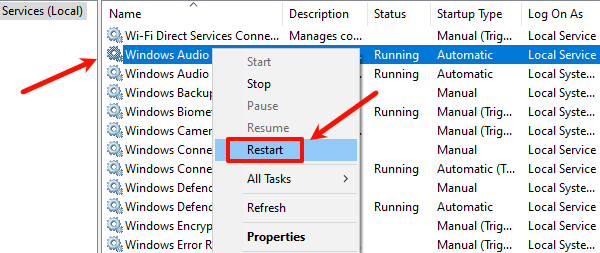
In the service list, find "Windows Audio" and "Windows Audio Endpoint Builder".
Right-click "Windows Audio" and select "Restart".

After restarting, repeat the same steps for "Windows Audio Endpoint Builder".
Test if the audio output is restored.
5. Disable Audio Enhancements
Press the Windows logo key + I to open "Settings".
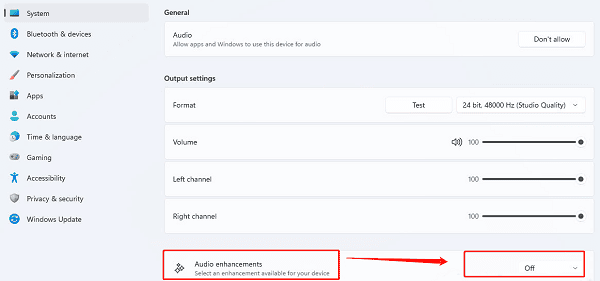
Go to "System" >"Sound", then click "All sound devices".
Select "Properties", scroll down, and find "Audio Enhancements". Click the dropdown menu and select "Off".

After completing these steps, test if the audio works.
6. Run Built-in Audio Troubleshooter
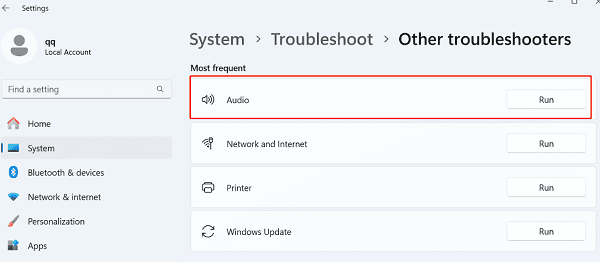
Open Settings, then go to "System" > "Troubleshoot" > "Other troubleshooters".
Find "Audio", then click "Run".

Follow the on-screen instructions to complete the troubleshooting process.
Check if the problem is resolved.
7. Check Hardware Issues
Check if external devices are properly connected. If using headphones, ensure the plug is fully inserted into the jack.
Test with other devices, such as replacing the headphones or speakers, to check if there's sound output.
If using Bluetooth audio devices, ensure they are properly paired and check the Bluetooth connection for any issues.
These methods can help you quickly fix the "no sound" issue in Windows 11. If it persists, contact technical support for further help.
See also:
7 Ways to Fix the Unexpected Kernel Mode Trap Error
Fix Windows 10 PFN LIST CORRUPT BSOD Error