Many computer users have reported that their monitors display black borders, making it impossible to use the full screen. This not only diminishes the display quality but can also be uncomfortable to look at. So, how can you resolve the issue of black borders on your monitor? Here are several simple and effective solutions!
Method 1: Check Monitor Settings
First, check your monitor settings. Sometimes, incorrect resolution or display mode settings can lead to the black border problem.
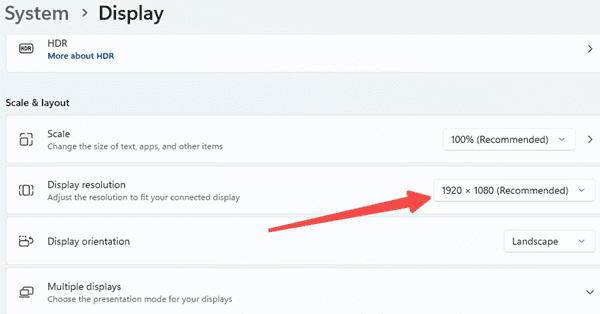
Right-click on the empty space on your desktop and select "Display Settings". In the "Dispiay resolution" option, choose the recommended resolution; this often resolves the black border issue.

Method 2: Update Graphics Card Drivers
Drivers serve as a bridge between the operating system and the graphics card, and outdated or corrupted drivers can cause display problems. You can use the "Driver Sentry" tool to automatically detect and update your graphics card drivers. This will save you time searching for and installing drivers, ensuring you are using the latest version.
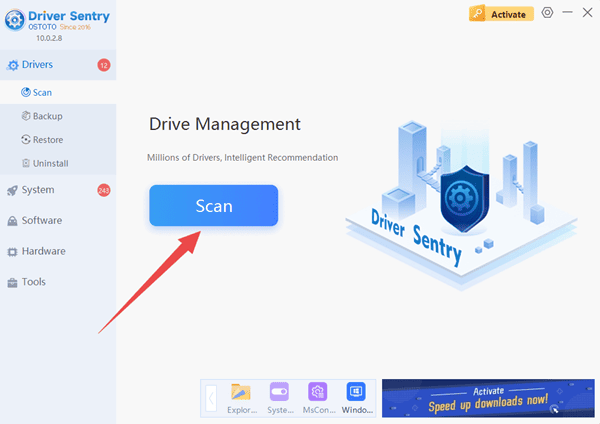
1. Install and open the Driver Sentry software, and click on the "Scan" option.

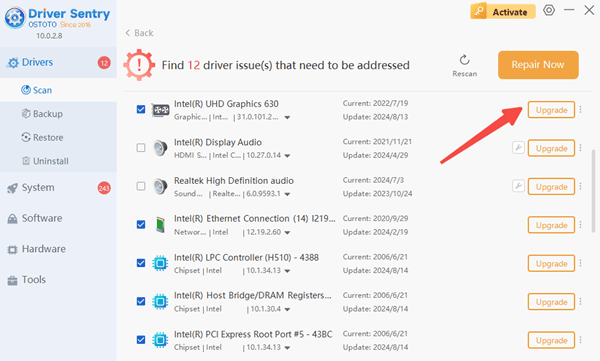
2. The software will automatically identify your computer's hardware model and provide relevant driver updates in a list. Locate your graphics card and click the "Upgrade" button.

3. Wait for the download and installation to complete, then restart your computer to apply the changes.
Method 3: Adjust Graphics Card Control Panel
1. NVIDIA Control Panel:
Right-click on the empty space on your desktop and select "NVIDIA Control Panel". In the control panel, navigate to "Display" > "Adjust Desktop Size and Position", and choose the scaling mode as "Full Screen". If you're gaming, you can set the game's resolution to 16:9, 1920x1080, and save the settings.
2. Intel Graphics Control Panel:
In the search bar at the bottom of your desktop, type "Graphics" and select "Intel Graphics Control Center". In the pop-up window, choose "Display" on the left. Change "Maintain Aspect Ratio" to "Custom" and set everything to "100".
3. AMD Graphics Control Panel:
Click on the "Start" button in the lower-left corner, find "AMD Radeon Settings" (now known as "AMD Radeon Software"), open the RADEON settings, and go to "Display" > "Scaling Mode" > "Full Panel" to complete the setup.

Method 4: Check Monitor Settings Again
Sometimes, adjustments to the monitor itself can cause black borders. Most monitors have a physical button to access the menu settings. In the menu, find "Image Settings" or "Display Settings" and choose an appropriate aspect ratio. Typically, 16:9 or 16:10 are the most common options.
Method 5: Check Connection Cables
Occasionally, the black border issue may also be caused by connection cables. Ensure that the cable connecting your monitor to your computer is not damaged and is securely connected. If you are using an HDMI cable, try switching to another HDMI cable to ensure it works properly. Additionally, check for dirt or loose connections on both your computer and monitor interfaces, and clean and reconnect them if necessary.
By following these tips, you should be able to eliminate the black borders on your computer screen. If you encounter any driver-related issues, "Driver Sentry" can help you easily detect and fix them.
See also:
How do I make my computer screen clear?
7 Ways to Fix Helldivers 2 Black Screen on Startup
How to fix computer screen went black but still running
Solutions for 0x0000001A Blue Screen Error and System Crash