Many users face the "Audio device not plugged in" issue with Realtek High Definition Audio, even when devices are correctly connected. This guide offers solutions to fix it quickly.
1. Update the Audio Driver
A corrupted or outdated audio driver is a common cause of this issue. Checking for updates can effectively resolve the "Realtek High Definition Audio not plugged in" problem. Using Driver Sentry for automatic detection and updates is recommended to save time and avoid incorrect driver installations.
Download the latest version of Driver Sentry, install the software, and open it. Click "Scan".

After the scan, check the results for uninstalled or outdated drivers. Locate the audio driver and click "Upgrade".
Restart your computer after the update to ensure the new driver works properly.
2. Check Hardware Connections
Inspect the audio plug connection:
Ensure the headphone or speaker plug is securely inserted into the audio jack.
Check for dirt or damage on the plug, and clean it with a soft cloth if necessary.
Switch audio ports:
If using the front panel jack, try connecting the plug to the rear panel audio port.
If the rear panel also fails to detect the device, there might be an issue with the motherboard audio port.
Test with a different device:
Connect a different set of headphones or speakers to check if the issue lies with the original device.
If other devices also fail to work, the issue might be related to system settings or hardware.
3. Repair System Files
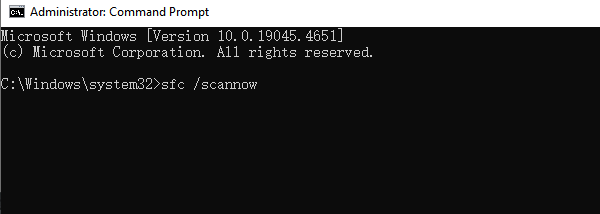
Press Win + S, search for "Command Prompt", right-click it, and select "Run as Administrator".
Type the following command and press Enter: sfc /scannow

The system will scan and repair corrupted files automatically.
After the process completes, restart your computer and test the audio functionality.
4. Restart Audio Services
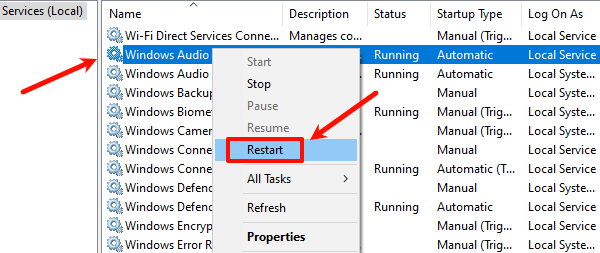
Press Win + R, type "services.msc", and press Enter to open the Service Manager.
Locate "Windows Audio" and "Windows Audio Endpoint Builder" in the service list.
Ensure both services are running. Right-click each service and select "Restart".

In the service properties, go to the "Dependencies" tab and ensure related services, such as "Remote Procedure Call", are also running.
5. Disable Front Panel Jack Detection
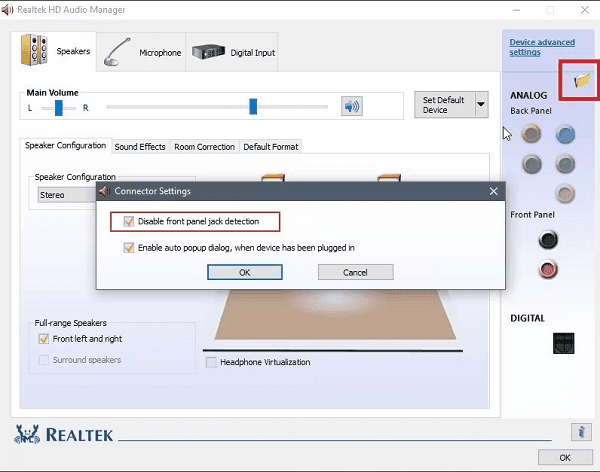
Locate the Realtek icon in the taskbar (if not visible, search for it in the Control Panel).
Double-click to open the Realtek High Definition Audio Manager.
Click the "folder" icon in the top-right corner (usually representing advanced settings).
Check the box for "Disable front panel jack detection" and click "OK".

After making this change, unplug and replug your headphones or speakers and check if the device works.
6. Run the Audio Troubleshooter
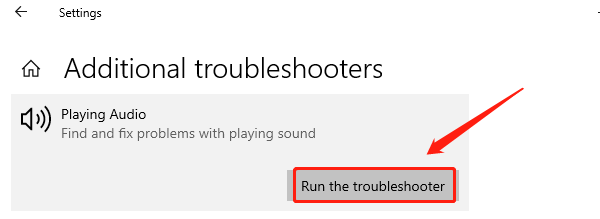
Press Win + I to open Settings, then select "Update & Security" > "Troubleshoot".
Click "Additional troubleshooters" and find "Playing Audio". Click "Run the troubleshooter".

Follow the on-screen instructions to diagnose and fix the issue.
Once the tool completes the process, reconnect your audio device and check if it functions properly.
Follow these steps to resolve the "Realtek High Definition Audio not plugged in" issue. If the problem persists, contact professional technical support.
See also:
Fix Windows 10 Bad Image Error
Easy Ways to Fix the kernelbase.dll Error