When using NVIDIA graphics cards, some users may encounter issues where the graphics card is not detected. This article provides multiple solutions to help you quickly resolve the issue.
1. Update Drivers
Outdated or corrupted drivers are a common cause of graphics cards not being detected. Updating your drivers promptly is an effective way to resolve this issue. We recommend using Driver Sentry for automatic driver detection and updates, saving time and avoiding errors in downloading or installing the wrong drivers.
Click the download button to get the latest version of Driver Sentry. After installation, open the software and click "Scan".

After scanning, a list of uninstalled or outdated drivers will appear. Locate the graphics card driver in the list and click the "Upgrade" button.
Once updated, restart your computer to ensure the new driver functions properly.
2. Check Device Manager
Press Win + X and select "Device Manager" from the menu.
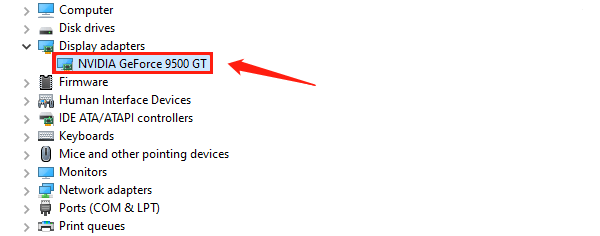
Under "Display Adapters", look for your NVIDIA graphics card. If a yellow exclamation mark or the device is unavailable, it indicates a driver or hardware issue.

Update the Driver
Right-click the NVIDIA graphics card and select "Update Driver".
Choose "Search automatically for updated drivers" to let the system attempt to update the driver.
3. Show Hidden Devices
Right-click the Start menu and select "Device Manager".
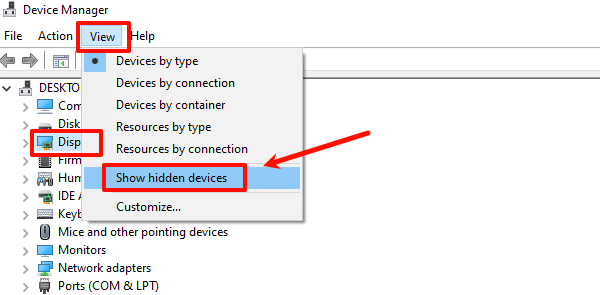
In the Device Manager menu bar, click "View" and choose "Show Hidden Devices".

If the NVIDIA graphics card appears in the hidden devices list, it might be disabled or have an incomplete driver.
Right-click the hidden NVIDIA graphics card and select "Enable Device". Once enabled, check the device status again.
4. Manually Install NVIDIA Drivers
In Device Manager, expand "Display Adapters", right-click the NVIDIA driver, and select "Uninstall Device".
Check "Delete the driver software for this device" and click "Uninstall".
Visit the NVIDIA official website to input your GPU model and operating system, and download the latest driver.
Perform a Clean Installation
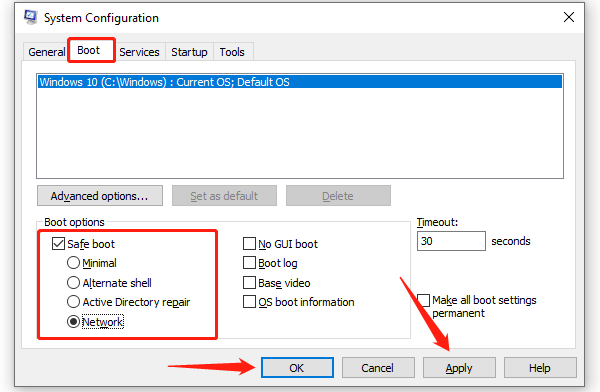
Press Win + R, type "msconfig", and press Enter.
Under the Boot tab, check "Safe Boot", click "OK", and restart your computer in Safe Mode.

Run the downloaded driver installation package and select "Custom Installation".
Check "Perform a Clean Installation" to replace old driver files completely.
After installation, reopen the System Configuration Tool (msconfig), uncheck "Safe Boot", and restart the system.
5. Check for System Updates
Press Win + I to open the Settings menu.
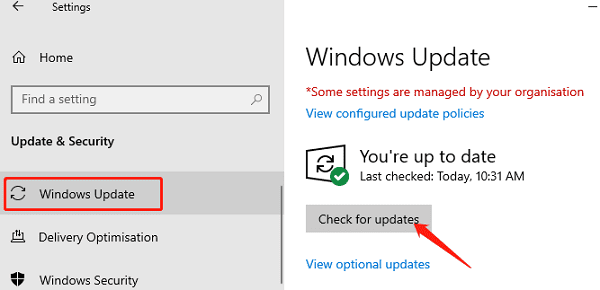
Navigate to "Update & Security" > "Windows Update".
Click "Check for Updates" to install all available system and driver updates.

In the "Windows Update" interface, check the "Optional Updates" section to ensure NVIDIA-related updates are installed.
6. Rule Out Hardware Issues
Check Graphics Card Connection
Turn off the computer, disconnect all cables, and open the case to check if the graphics card is properly inserted into the motherboard's PCI-E slot.
Ensure the graphics card's power connector is securely attached.
Test the Graphics Card
Insert the graphics card into another computer to test its functionality. If the card works on another system, the problem may lie in the motherboard or software configuration.
Check Motherboard Settings
Enter the BIOS settings and locate the graphics card option under Advanced Settings.
Ensure the configuration is set to PCI-E instead of Integrated Graphics mode.
Save the settings and restart the computer.
Follow these steps to fix the issue of your NVIDIA graphics card not being detected. If the problem continues, contact NVIDIA support for further assistance.
See also:
6 Ways to Fix "No Audio Device Installed" on Windows 10
Fix Bluetooth Audio Delay on Windows PC