A non-working network adapter is a common issue that prevents network connection. This article offers effective solutions to fix it and restore connectivity.
1. Update Network Adapter Drivers
Outdated, corrupted, or missing drivers are one of the main causes of a non-working network adapter. Updating the network adapter drivers is a common and effective way to resolve this issue. It is recommended to use Driver Sentry to automatically detect and update drivers, saving time and avoiding the risk of downloading or installing incorrect drivers.
Click the download button to get the latest version of Driver Sentry. After installation, open the software and click "Scan".

After the scan, the list will show which drivers are missing or need updating. Find the network adapter driver in the results list and click the "Upgrade" button.
After the update is complete, it is recommended to restart the computer to ensure the updated drivers take effect.
2. Reset Network Settings
Open Settings, then click "Network & Internet".
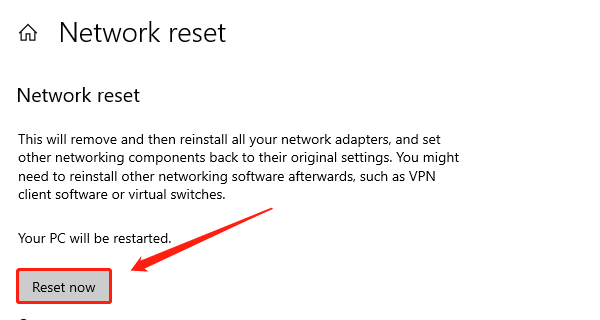
In the left-hand menu, select "Status", then click "Network reset".
On the network reset page, click "Reset now".

The system will prompt you to restart the computer to complete the reset. Click "Yes" and restart the computer.
After restarting, the computer will automatically reconfigure the network adapter to default settings, and you can try reconnecting to the network.
3. Disable Power Saving Mode
Press Windows + X and select "Device Manager".
In Device Manager, expand "Network adapters", right-click the network adapter you are using, and select "Properties".
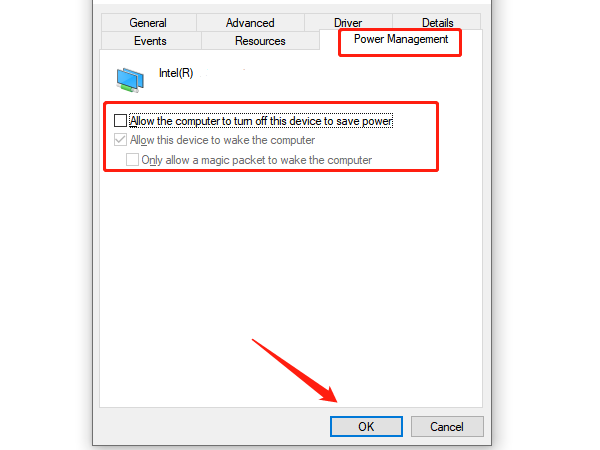
In the Properties window, go to the "Power Management" tab.
Uncheck the option "Allow the computer to turn off this device to save power".

Click "OK" to save the settings, then restart the computer for the changes to take effect.
4. Disable and Re-enable the Network Adapter
Press Windows + X and select "Device Manager".
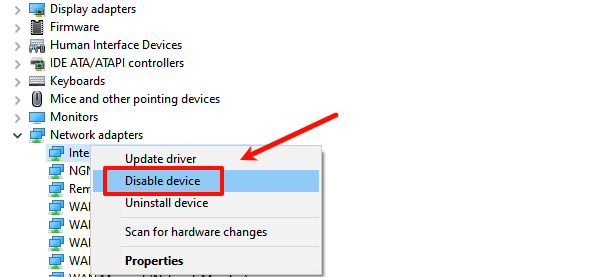
In Device Manager, find and expand "Network adapters", right-click your network adapter.
Select "Disable device" and wait for a few minutes.

Right-click the same network adapter again and select "Enable device".
After re-enabling, check if the network adapter is functioning properly and try reconnecting to the network.
5. Run Network Troubleshooter
Open Settings, then click "Update & Security".
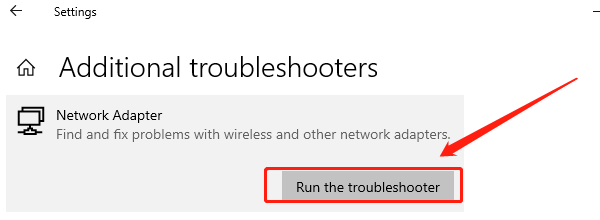
In the left-hand menu, select "Troubleshoot", then click "Additional troubleshooters".
In the list, find "Network Adapter" and click "Run the troubleshooter".

The system will automatically scan and fix issues related to the network adapter.
After completion, restart the computer and check if the network adapter is working properly.
6. Check for Hardware Issues
If you're using an external network adapter (such as a USB wireless card), make sure its port is not loose or damaged. Try plugging it into another USB port to check if it works properly.
If possible, try replacing the network adapter to see if the issue lies with the adapter itself.
These methods help you troubleshoot and fix issues with a non-working network adapter. If the problem continues, contact professional support for further help.
See also:
Resolve Audio Delay Issues on Windows
Fix Audio Cutting Out on Windows 11