Some Valorant players may encounter the "Vanguard Not Initialized" issue when starting the game, preventing it from running properly. This article introduces several effective methods to help you quickly resolve the problem and get back into the game smoothly.
1. Restart Your Computer
Close Valorant and Riot Client.
Click the "Start menu" > "Power" > "Restart", and wait for the system to reboot.
After restarting, try launching Valorant again to check if the "Vanguard Not Initialized" error still occurs.
2. Update Graphics Drivers
Outdated or corrupted drivers can affect Vanguard's compatibility, leading to the "Vanguard Not Initialized" error. Updating your graphics drivers can effectively fix this issue. It's recommend to use Driver Sentry to automatically detect and update drivers, saving time and avoiding the risk of downloading or installing incorrect drivers.
Click the download button to get the latest version of Driver Sentry, install it, and then open the software. Click "Scan" to check for outdated or missing drivers.

Once the scan is complete, find the graphics driver in the list, and click the "Upgrade" button.
After updating, it's recommended to restart your computer to ensure the new drivers take effect.
3. Restart Riot Vanguard
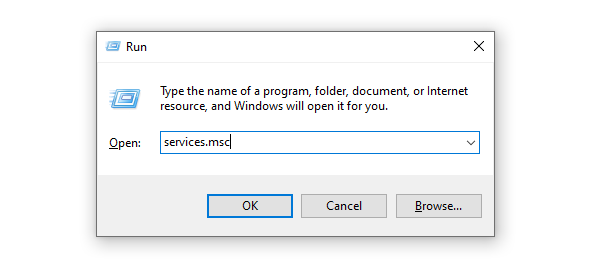
Press Win + R, type "services.msc", and press Enter to open the Services Manager.

Locate the "vgc" service (Riot Vanguard anti-cheat service) in the list.
Right-click "vgc", and select "Stop". Wait for the service to completely stop.
Right-click "vgc" again, and select "Start" to restart the service.
Right-click "vgc" > "Properties", set the "Startup type" to "Automatic", and click "OK".
Close the window and restart Valorant to check if the issue is resolved.
4. Set Virtual Disk Service to Automatic
Press Win + R, type "services.msc", and press Enter to open the Services Manager.
Find "Virtual Disk" (Virtual Disk Service) in the list.
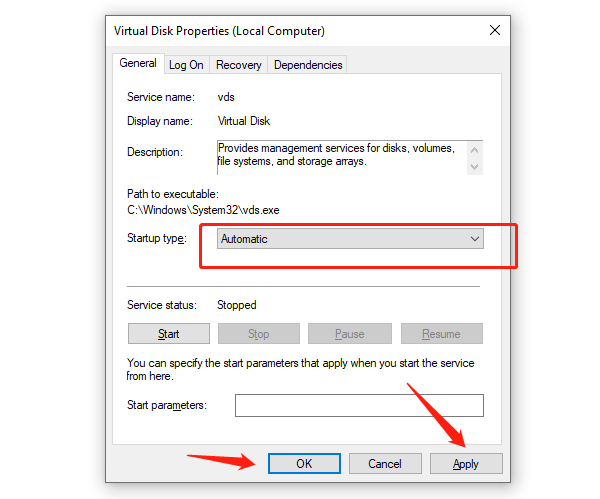
Right-click the service, and select "Properties".
Set the "Startup type" to "Automatic", then click "Apply" > "OK".

Right-click "Virtual Disk", and select "Start" to ensure the service is running.
Close the window, restart your computer, and try launching Valorant again.
5. Check for Operating System Updates
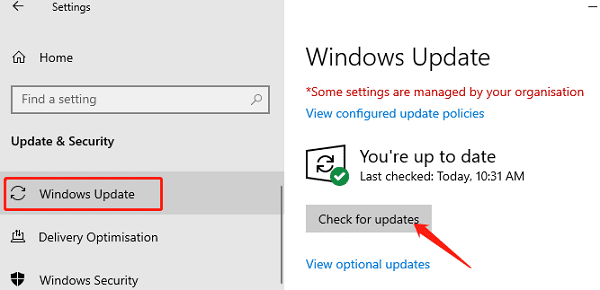
Press Win + I to open Settings, and click on "Update & Security".
Select "Windows Update" on the left side, then click "Check for Updates".

If updates are available, click "Install Now", and wait for the process to finish.
Once the update is complete, restart your computer and try running Valorant to see if the issue is fixed.
6. Reinstall Riot Vanguard
Uninstall Riot Vanguard:
Press Win + R, type "appwiz.cpl", and press Enter to open Programs and Features.
Find Riot Vanguard in the list, right-click, and select "Uninstall".
Ensure Vanguard is completely removed, then restart your computer.
Reinstall Riot Vanguard:
Restart Valorant, and the system will automatically detect the missing Vanguard and prompt you to reinstall it.
Follow the on-screen instructions to complete the installation, then restart your computer.
Relaunch Valorant to check if the "Vanguard Not Initialized" error still occurs.
By following these methods, you can effectively resolve the "Vanguard Not Initialized" issue and enjoy Valorant without interruptions! If the problem persists, it is recommended to contact Riot Games Official Support for further assistance.
See also:
How to Fix Computer Speakers Not Working
Ways to Fix Windows 11 Microphone Not Working