In Windows 11, network adapter issues can cause unstable connections or prevent internet access. This article explains how to run the network adapter troubleshooter to quickly fix these problems.
Step 1: Open Settings
Click the "Start" button in the bottom-left corner of the screen and select "Settings" (or press Win + I).
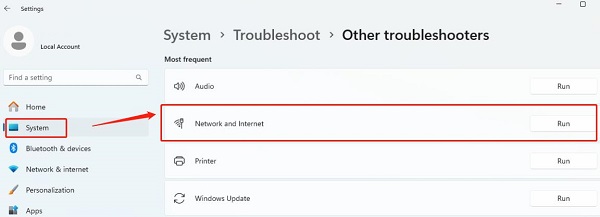
In the Settings window, select "System".
Step 2: Access Troubleshooting
Scroll down in the System interface to find "Troubleshoot".
Click on "Other troubleshooters", and locate "Network and Internet".
Step 3: Run the Troubleshooter
Click the "Run" button next to "Network and Internet".
The system will begin scanning and identifying network adapter issues. Based on the prompts, it may provide suggestions or automatic repair options.

Step 4: View Troubleshooting Results
Once troubleshooting is complete, you will see any detected issues and their solutions.
If the system identifies a problem and fixes it, follow the prompts to restart your computer to ensure changes take effect.
Step 5: Manual Fixes (if necessary)
If the troubleshooter does not resolve the issue, you can try manually fixing the network adapter.
1. Update Network Adapter Drivers
Outdated or corrupted drivers can cause network adapter failures. Timely updates can effectively improve connection stability and performance. It's recommended to use Driver Sentry to automatically detect driver updates, saving time and avoiding the risk of downloading or installing incorrect drivers.
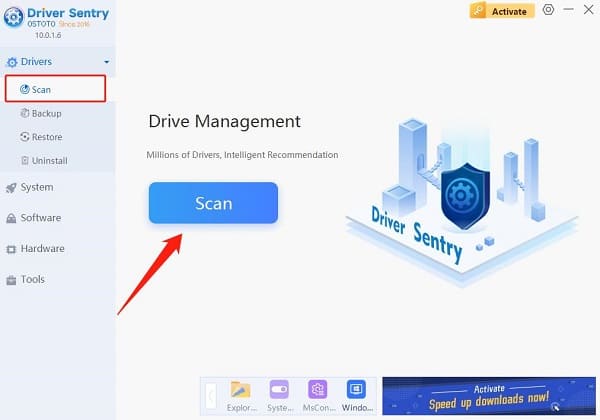
Click the download button to get the latest version of Driver Sentry, open the software after installation, and click "Scan".

After scanning, it will display which drivers are missing or need updates. Find the network adapter driver in the results list and click the "Upgrade" button.
After the update is complete, it's advisable to restart your computer to ensure the updated drivers take effect.
2. Reset Network Adapter
Click the "Start" button in the bottom-left corner and select "Settings" (or press Win + I).
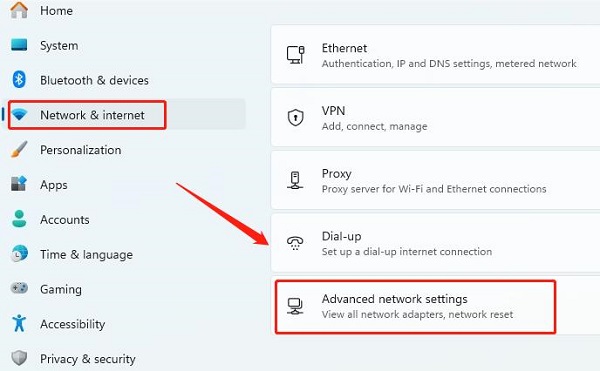
In the Settings window, choose "Network and Internet".
In the "Network and Internet" page, scroll down and click "Advanced network settings".

In the "Advanced network settings" page, find the "Network reset" section and click "Network reset".
A prompt will appear explaining that resetting the network adapter will delete and reinstall it, restoring network settings to default.
Click the "Reset now" button, and then confirm by selecting "Yes".
After the network adapter reset, the system will prompt you to restart your computer. Please do so to ensure changes take effect.
3. Check Network Services
Press Win + R to open the Run dialog, type "services.msc", and press Enter. This will open the Services Manager window.
In the services list, look for the following key services:
DNS Client: Handles domain name resolution, converting domain names to IP addresses.
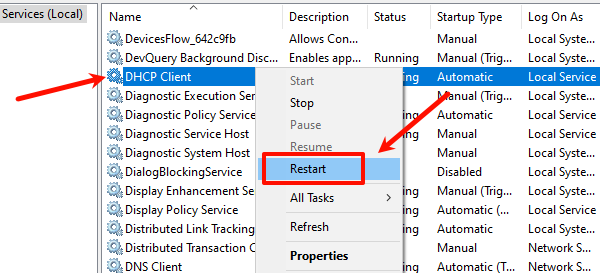
DHCP Client: Responsible for dynamically allocating IP addresses, allowing devices to be recognized on the network.
Network Connections: Manages network connections, ensuring the network adapter operates normally.
Right-click each service, select "Properties" to check the service status.
Ensure the "Startup type" is set to "Automatic", and check that the "Status" shows "Running". If a service is not running, click the "Start" button to start it.
If the service is already running, you can right-click the service and select "Restart" to reload it.

Some services may depend on others, so ensure all dependent services are also running.
Additional Suggestions for Resolving Network Adapter Issues
Suggestion 1: Ensure Wi-Fi functionality is enabled.
Suggestion 2: Restart the modem and router to refresh the connection.
Suggestion 3: Restart the computer, as this can sometimes resolve temporary issues.
Suggestion 4: Update Windows 11. Running Windows Update can refresh outdated network adapter drivers. The path is: Click "Start" > "Settings" > "Windows Update" > "Check for updates".
By following these steps, you can easily run the network adapter troubleshooter in Windows 11, diagnosing and fixing network connection issues. If problems persist, it is advisable to contact professional technical support for further assistance.
See also:
9 Methods to Fix Screen Flickering After Windows 10 Update
Guide to Boot into Safe Mode in Windows 10