Some Windows users may encounter network recognition issues after upgrading or installing Windows 11, preventing them from connecting to the internet or network devices. This article will introduce some common solutions to help you quickly resolve this issue and restore normal network connectivity.
1. Check Network Connection Hardware
Check Router and Modem: Ensure that your router and modem are functioning properly. Check if the devices are powered on and if the cables are securely plugged in. If other devices (such as phones or tablets) can connect to the network, the issue may lie with the computer.
Restart Router and Modem: Sometimes, a simple restart can resolve network connection issues. Unplug the devices, wait for 1-2 minutes, then plug them back in. Wait for the devices to fully restart and try reconnecting to the network.
Check Ethernet Cable Connection: If you are using a wired network, ensure that the Ethernet cable is intact and securely plugged into both your computer and router. If the issue persists, try using a different cable to rule out cable damage.
2. Check for Driver Updates
Outdated or corrupted network adapter drivers are one of the common causes of network recognition issues in Windows 11. Updating your drivers can resolve this issue. It is recommended to use Driver Sentry to automatically detect and update drivers, saving time and avoiding the risk of downloading or installing incorrect drivers.
Click the download button to get the latest version of Driver Sentry, install it, and open the software. Click "Scan".

After the scan is complete, the software will display which drivers are missing or need updating. Locate the network adapter driver in the results list and click the "Upgrade" button.
After the update is complete, restart your computer to ensure the updated driver works properly.
3. Run the Network Troubleshooter
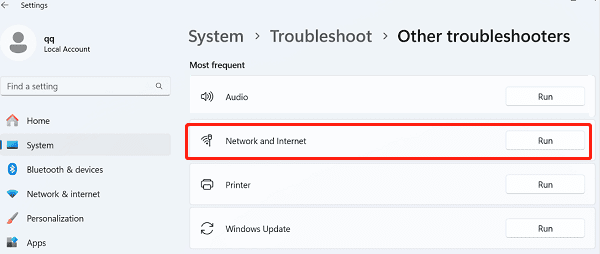
Open Settings (press Win + I), click "System", and then select "Troubleshoot".
In the Troubleshoot page, click "Other troubleshooters".
Locate "Network and Internet" and click "Run".

Follow the on-screen instructions to complete the troubleshooting process and check if the network recognition issue is resolved.
4. Reset Network Settings
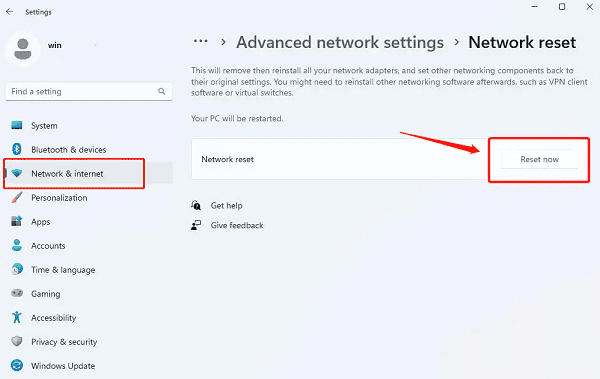
Open Settings, then click "Network & Internet".
Scroll down and select "Advanced network settings", then find "Network reset" and click "Reset now".

The system will prompt you to reset all network adapters. Click "Yes" to confirm.
Restart your computer and check if the network can be recognized.
5. Check DNS Settings
Press Windows logo key + X, select "Network Connections", and open it.
In the Network Connections settings, find and click "Advanced network settings".
Under More network adapter options, find the connection showing the error, right-click it, and select "Properties".
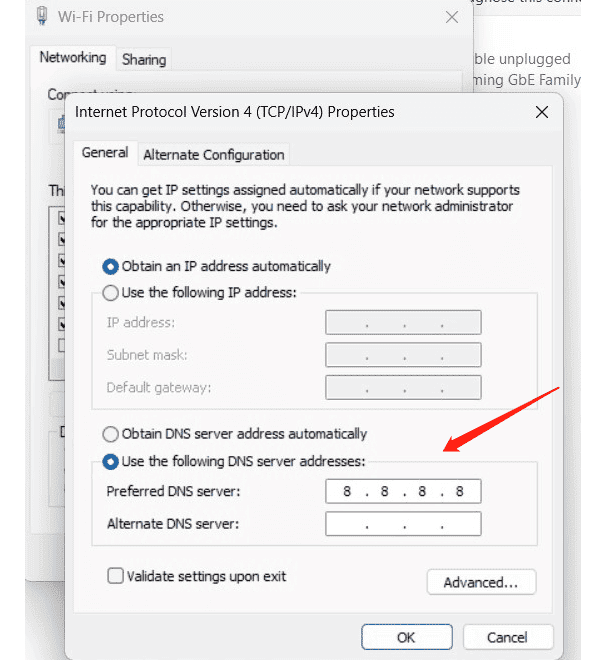
Find Internet Protocol Version 4 (TCP/IPv4), select it, and click "Properties".
Enter the following DNS server addresses:
Preferred DNS server: 8.8.8.8

Click "Save", then restart your computer and check if the network is restored.
6. Check Firewall Settings
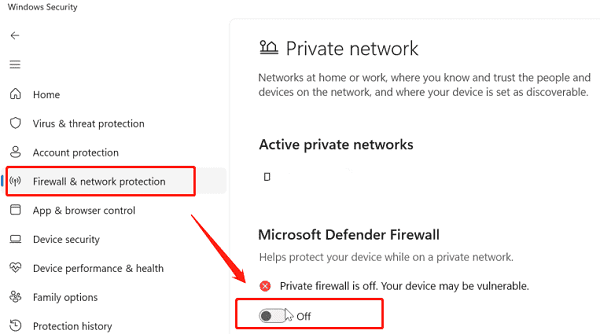
In the search box, type "Windows Security" and open it.
In the left sidebar, select "Firewall & network" protection, then click on the network type (e.g., Public or Private).
Under Microsoft Defender Firewall, turn the switch to "Off".

After turning off the firewall, check if you can connect to the network.
After testing, it is recommended to turn the firewall back on to prevent your computer from being vulnerable to viruses.
By following the above methods, you should be able to resolve the network recognition issue in Windows 11. If the problem persists, it is recommended to contact professional technical support for further assistance.
See also:
How to Fix Windows 11 Unable to Enter Sleep Mode
Methods to Fix 'HP Printer Driver Is Unavailable'
How to Solve Canon Printer Won't Print Issue