In daily use of Windows 10, you may encounter various system issues, and Safe Mode becomes an essential tool in such cases. This article will detail how to enter and exit Safe Mode in Windows 10, helping you resolve system issues effectively.
Routine Computer Maintenance
Drivers act as the bridge between the operating system and hardware, managing the operation of various devices. Keeping drivers up to date is a key step in ensuring stable system performance. Driver Sentry is a professional driver management software designed to help users install, update, and upgrade their computer's drivers. With Driver Sentry, you can automatically detect and update drivers, saving time and reducing the risk of installing incorrect drivers.
Click the download button to get the latest version of Driver Sentry. After installation, open the software and click "Scan".

After the scan, it will show which drivers are missing or need updates. Find the drivers that need updating in the list and click the "Update" button.
After updating, it's recommended to restart your computer to ensure the updated drivers take effect.
What is Safe Mode
Safe Mode is a troubleshooting mode that only loads the most basic drivers and system files, allowing users to diagnose potential conflicts or system issues. In Safe Mode, you can easily remove unnecessary software, update drivers, or perform a system restore.
How to Enter Safe Mode
Method 1: Entering Safe Mode via Settings
Click the "Start" button and select the "Settings" icon (gear-shaped).
In the Settings window, choose "Update & Security".
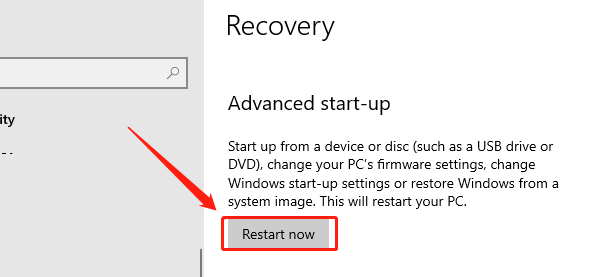
On the left menu, click "Recovery".
Under "Advanced startup", click "Restart now".

After restarting, select "Troubleshoot".
Next, choose "Advanced options".
Click "Startup Settings".
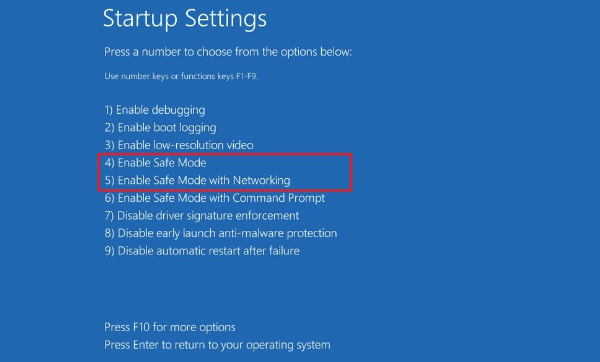
Click the "Restart" button, and your system will reboot to display startup options.
Press F4 to enter Safe Mode or F5 to enter Safe Mode with Networking.

Method 2: Using System Configuration Tool
Press Windows + R.
In the dialog box, type "msconfig" and press Enter.
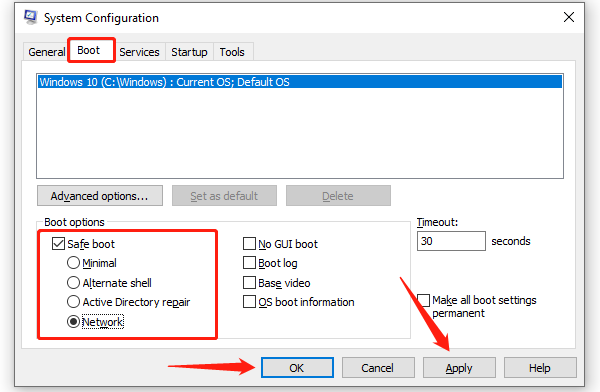
In the "System Configuration" window, switch to the "Boot" tab.
Check the "Safe boot" option, and select either "Minimal" Safe Mode or "Network" Safe Mode.

Click "Apply", then "OK", and restart your computer.
How to Exit Safe Mode
Method 1: Using System Configuration Tool
Press Windows + R. Type "msconfig" and press Enter.

In the "Boot" tab of the System Configuration window, uncheck the "Safe boot" option.
Click "Apply", then "OK", and restart your computer.
Method 2: Simple Restart
If you're already operating in Safe Mode, simply restart your computer, and the system will usually automatically exit Safe Mode and return to normal.

Frequently Asked Questions
When should I enter Safe Mode?
Safe Mode can be useful when your computer can't start normally, crashes frequently, or experiences driver issues.
Can I access the internet in Safe Mode?
If you select Safe Mode with Networking, you can connect to the internet, but some drivers may not work properly, potentially affecting network functionality.
Will Safe Mode affect my data?
Safe Mode doesn't delete any data, but be cautious when deleting or modifying files, ensuring that you don't affect important system files.
By following these steps, you can easily enter and exit Windows 10 Safe Mode. Safe Mode is a useful tool for troubleshooting system issues. If problems continue, consider contacting professional technical support.
See also:
8 Common Solutions for No Internet Connection
How to Download and Install Wireless Network Card Drivers