In Windows 11, a common issue is the microphone not working, affecting audio functionality. This article offers effective methods to resolve the problem and restore normal use.
1. Update Audio Drivers
Outdated or corrupted drivers can cause the microphone to stop working. Checking and updating the audio driver is an effective way to resolve this issue. It is recommended to use Driver Sentry to automatically detect driver updates, saving time and effort while avoiding the risk of downloading or installing incorrect drivers.
Click the download button to get the latest version of Driver Sentry. After installation, open the software and click "Scan".

Once the scan is complete, it will display which drivers are not installed or need updating. Find the audio driver in the results list and click the "Upgrade" button.
After the update is complete, it is recommended to restart your computer to ensure the updated drivers are working properly.
2. Check Microphone Settings
Click the Start menu, then select "Settings".
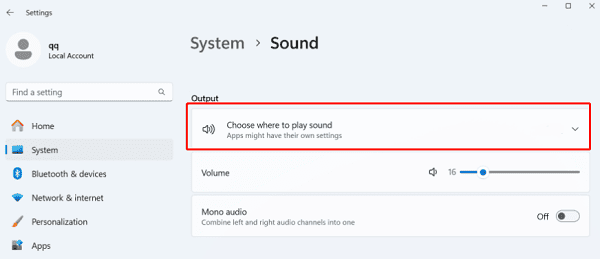
In the Settings window, click "System", then select "Sound".
Under the "Input" section, click "Choose where to play sound" and ensure that the correct microphone device is selected. If the correct microphone is not listed, click the dropdown menu and select the correct device.

Ensure that the selected microphone's volume is set appropriately and that the microphone is not muted.
In the microphone settings, you can also test the microphone to see if it is working properly.
3. Restart Audio Services
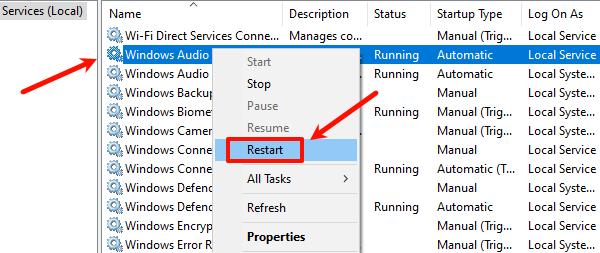
Press Win + R to open the "Run" dialog box, type "services.msc", and press Enter.
In the Services window, find the "Windows Audio" service, right-click it, and select "Restart".

Double-click the service to open it and ensure that its startup type is set to "Automatic". If the service is stopped, click the "Start" button.
Also, check the "Windows Audio Endpoint Builder" service to ensure it is running.
Afterward, restart your computer and test the microphone.
4. Disable Audio Enhancements
Press the Windows logo key + I to open Settings.
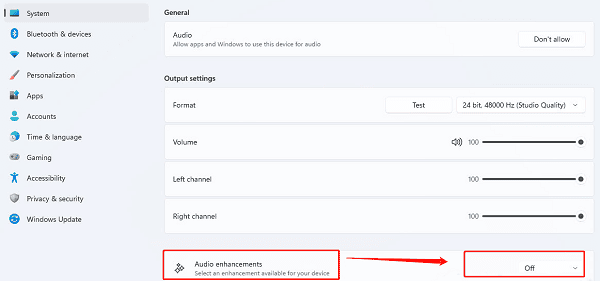
Go to the "System" tab, select "Sound", and then click "All sound devices".
Select "Properties", scroll down, and find "Audio Enhancements". Click the dropdown menu on the right side and select "Off".

After completing these steps, test the audio to see if it works properly.
5. Run Windows Troubleshooter
Click the Start menu and select "Settings".
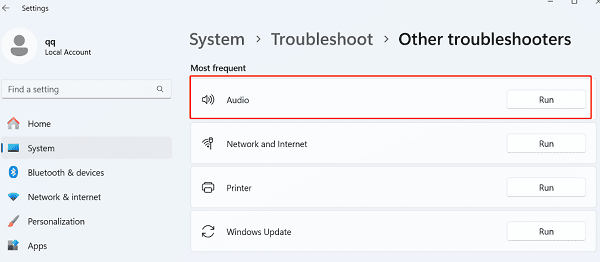
In the Settings window, select "System", then click "Troubleshoot".
In the "Other troubleshooters" section, find "Audio" and click the "Run" button.

Follow the on-screen instructions, and Windows will automatically detect and fix any microphone-related issues.
After the troubleshooting is complete, restart your computer and test the microphone.
6. Update Your Operating System
Click the Start menu and select "Settings".
In the Settings window, click "Update & Security".
Under the "Windows Update" tab, click "Check for Updates".
If updates are available, click "Download and Install". After the installation is complete, restart your computer.
Once the update is finished, test the microphone to see if it is working properly.
By following the steps in this article, you can fix the microphone issue in Windows 11. If the problem persists, contact the device's technical support.
See also:
6 Ways to Fix Wireless Headphones Connected but No Sound
Fix Printer Offline Issue on Windows 10