Some users may encounter the 0x800f0922 update error while updating Windows. This article provides solutions to help fix the error and ensure a successful update.
1. Check for Driver Updates
Outdated or corrupted drivers can cause the 0x800f0922 update error in Windows. Checking for and updating device drivers is an important step in maintaining system stability. We recommend using Driver Sentry to automatically detect and update drivers, saving time and avoiding the risk of downloading or installing incorrect drivers.
Click the download button to get the latest version of Driver Sentry. After installation, open the software and click "Scan".

Once the scan is complete, a list of missing or outdated drivers will appear. Find the driver you need to update and click the "Upgrade" button.
After updating, it's recommended to restart your computer to ensure the updated drivers take effect.
2. Check Network Connection
Ensure that you are connected to a valid network. If you're using a wireless network, try switching to a wired connection to ensure a more stable connection.
If using Wi-Fi, you can restart your router or reconnect to the network to make sure the connection is working properly.
Open your browser and visit a website to confirm that your network is working. If you can't access any websites, it means there is a network issue, and you need to resolve that before trying the update again.
If you're using a proxy server, it may interfere with Windows Update. Go to "Settings" > "Network & Internet" > "Proxy", disable any proxy settings, and try restarting Windows Update.
3. Check .NET Framework Version
Press Win + S to open the search box.
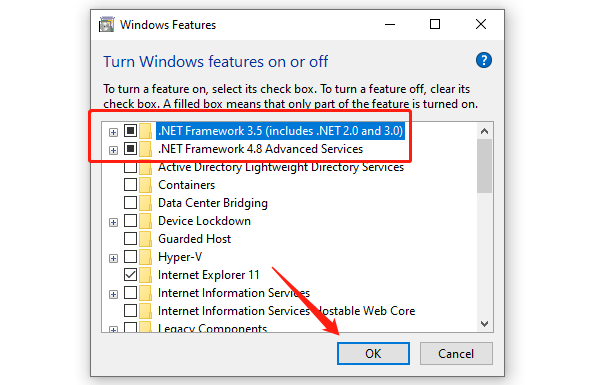
Type "Windows Features" in the search box and select "Turn Windows features on or off".
In the pop-up window, check the options related to ".NET Framework".
Click "OK" to save the changes.

A prompt will appear asking to "Let Windows Update download the files for you".
Windows will automatically download and install the necessary files.
After the installation is complete, restart your computer to finish the repair.
4. Run DISM and SFC Scans
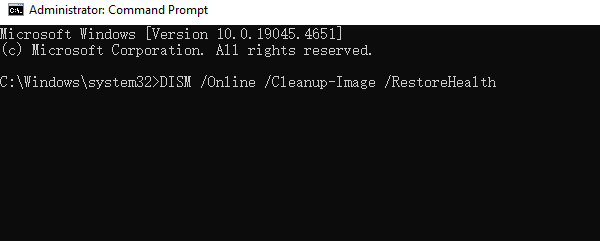
Press Win + S, type "Command Prompt", and select "Run as Administrator".
Run DISM scan:
In the Command Prompt, type the following command and press Enter: DISM /Online /Cleanup-Image /RestoreHealth

This command will scan and repair issues in the Windows image, which may take a few minutes.
Run SFC scan:
After DISM completes, it's recommended to run an SFC scan to further repair system files.
Type the following command: sfc /scannow
Press Enter, and the system will scan and repair corrupted files. After the scan is complete, restart your computer.
5. Delete Specific Registry Keys/Values
Press Win + R, type "regedit", and press Enter to open the Registry Editor.
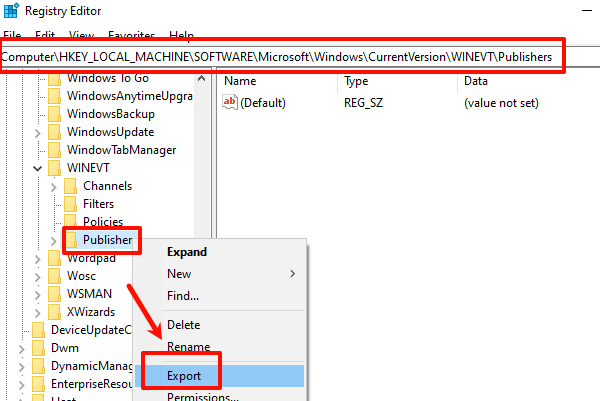
In the Registry Editor, follow this path: HKEY_LOCAL_MACHINE > SOFTWARE > Microsoft > Windows > CurrentVersion > WINEVT > Publishers
Right-click the "Publishers" folder and select "Export".

Choose a save location, name the file, and click "Save" to back up this folder.
In the "Publishers" folder, find the following two keys:
e7ef96be-969f-414f-97d7-3ddb7b558ccc
8c416c79-d49b-4f01-a467-e56d3aa8234c
Right-click each key and select "Delete".
After deleting, close the Registry Editor.
Restart your computer and re-run the update installation process to verify if the issue is resolved.
6. Run Windows Update Troubleshooter
Press Win + I to open Settings and select "Update & Security".
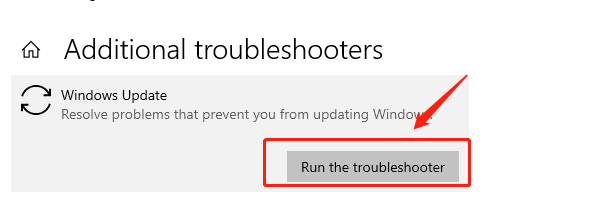
In the "Troubleshoot" section, click "Additional troubleshooters".
Select "Windows Update" and click "Run the troubleshooter". The system will automatically scan and attempt to fix issues related to Windows Update.

If any issues are found, the system will automatically fix the related errors. Follow the on-screen instructions to complete the repair process.
After the troubleshooter completes, restart your computer and try running Windows Update again.
By following these methods, you can fix the Windows Update error 0x800f0922. If the issue continues, contact Microsoft Support for help.
See also:
How to Fix Windows 11 Audio Not Working
6 Ways to Fix the Audio Service Not Running in Windows 10